


Remote Installation Instructions
Please note that the following instructions are only applicable to the remote control
(MS-QHA-12W and MS-QHA-24W) models.
The remote control can be used either as a wall mounted unit, or as a conventional remote
control.
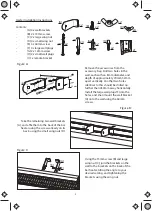
To mount it on the wall, drill two holes approximately 40mm apart vertically, at a depth of
approximately 30mm.
6
1.
On/off button
2.
Timer button
3.
Up button
4.
Power level button
5.
Smart Heating button
6.
Child lock button
7.
Down button
8.
Set button
9.
Display button
10.
Body Sensor button
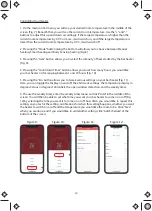
Please note that the following instruc-
tions are only applicable to the remote
control (MS-QHA-12W and MS-QHA-24W)
models.
1
2
3
4
5
6
7
8
9
10
Insert the two small wall plugs (H) into the
holes, before affixing the bracket to the wall
using the two 12mm screws. Ensure that the
base of the bracket is at the bottom before
screwing it in.
The remote can then affix to the bracket
using the grooves down its side. Push the
remote down until you hear a click.
(H)
(G)
(I)


