Mirrorstone MS-QHA-12J Manual Download Page 10

Controlling Your Heater

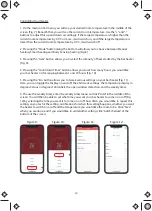
1. On the main control menu, you will see your desired room temperature in the middle of the 

screen (Fig. 7). Beneath that, you will see the current room temperature. Use the “+” and “-“ 

buttons to adjust this up and down accordingly. If the target temperature is higher than the 

current room temperature by 0.5

o

C or more, it will switch on, and if the target temperature is 

lower than the current room temperature by 0.5

o

C, it will switch off.

2. Pressing the “Mode” button along the bottom will allow you to choose between Manual 

heating, Smart heating and Body Sensing heating (Fig. 8).

3. Pressing the “Gear” button allows you to select the intensity of heat emitted by the bar heater 

(Fig. 9).

4. Pressing the “Countdown Timer” button allows you to set how many hours you would like 

your bar heater on for, ranging between 1 and 24 hours (Fig. 10)

5. Pressing the “Eco button allows you to tweak various settings on your bar heater (Fig. 11). 

Here, you can toggle the Display on and off, the Child Lock settings, the temperature display in 

degrees Celsius or degrees Fahrenheit, the open window detection, and the weekly timer.

6. The use the weekly timer, enter the weekly timer menu and click “Add” in the middle of the 

screen. You will then be able to set what time you want your bar heater to come on or off (Fig. 

12) by selecting the time you want it to come on or off, how often you would like to repeat this 

setting, any notes for the setting, notifications for when this setting happens, whether you want 

the heater to switch on or off and the temperature you would like the room to be. Click “Save” 

when you are done, and if you would like to add another setting, click “Add Schedule” at the 

bottom of the screen.

Figure 9:

Figure 10:

Figure 11:

Figure 12:

10

Summary of Contents for MS-QHA-12J

Page 1: ...Model MS QHA 12J MS QHA 24J MS QHA 12W MS QHA 24W Please read instructions carefully before use Remote control not available with all models Aurora Wi Fi Infrared Bar Heater Manual...

Page 2: ...wn Once the heater has cooled down ensure that any foreign material has been cleared from the housing of the heater and from the heating element Due to the intensity of the heat produced by the heater...

Page 3: ...e mains power supply or socket The power cord should be safely tucked away behind the heater when in use and should not be placed in front of the heater or hung off it Do not use the heater in areas w...

Page 4: ...cally please ensure that the power cord is at the bottom of the heater When the heater is on the body of the heater will increase so please ensure that the power cord is tucked away safely and never c...

Page 5: ...s should be drilled no further than 450mm away horizontally Install the large wall plugs F into the holes and then mount the wall bracket A onto the wall using the 60mm screws Figure B Take the remain...

Page 6: ...Up button 4 Power level button 5 Smart Heating button 6 Child lock button 7 Down button 8 Set button 9 Display button 10 Body Sensor button Please note that the following instruc tions are only applic...

Page 7: ...gle smart heating on where the heater will automati cally adjust the power level to maintain your temperature The intelligent heating icon will appear on the display when this mode is on Pressing the...

Page 8: ...n the Life subcategory Fig 1 6 Next the heater needs to placed in pairing mode you can do this by quickly pressing the on off switch at the back of the panel 3 5 times until you see the LED light on t...

Page 9: ...Figure 1 Figure 2 Figure 3 Figure 4 Figure 5 Figure 6 Figure 7 Figure 8 9...

Page 10: ...you would like your bar heater on for ranging between 1 and 24 hours Fig 10 5 Pressing the Eco button allows you to tweak various settings on your bar heater Fig 11 Here you can toggle the Display on...

Page 11: ...r you want the heater to switch on or off at the time you have set OFF Switch PM 2 23 Every day Switch ON Add Schedule AM 01 22 PM 02 23 03 24 Save Repeat Note Notification ON Once Switch PM 2 23 Ever...

Page 12: ...aning it Do not use solvent cleaners or abrasive materials when cleaning the heater as this can damage the exterior Instead use a mildly damp cloth Do not touch the heating element with your fingers a...

Reviews: