


19
Fibre
Gasket
6.
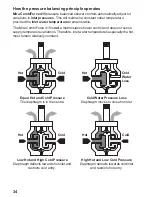
Fit the gaskets to the
1
/
2
" BSP connector
nipples and screw in the nipples with the
tapered ends outermost to accept the
compression fittings. Tighten the
1
/
2
"
BSP connector nipples fully with a
12 mm A/F hexagon wrench (not
supplied).
7. Thoroughly flush the incoming hot
and cold water supply pipes before
connecting the shower control
. Failure
to do so may result in product
malfunction.
8.
Slip the compression nuts and olives
over the supply pipes.
9.
Locate the shower control body onto the
backplate and inlet supply pipework,
then secure by tightening, clockwise,
the two recessed grub screws, using the
2.5 mm A/F hexagon wrench (supplied).
Tighten the compression nuts, using if
necessary, a cloth to protect the plated
surfaces.
Turn on the water supplies and check
for any leaks!
10.
Fit the ‘O’ seal to the tapered end of the
outlet nipple and screw it into the shower
control outlet using a 12 mm A/F hexagon
wrench (not supplied). This will leave the
flat face for connection to the shower
hose.
11.
This completes the installation of the
Mira CombiForce 415 for
“Back Inlet
Supplies”
.
Connector Nipple
Fibre
Gasket
Connector Nipple
'O' Seal
15 mm
Compression
1
/
2
" Male
BSP
'O' Seal
Summary of Contents for Combiforce 415
Page 51: ...51 Appendix Notes ...


