background image

52

2. Performing White Calibration

User calibration cannot be performed with the memory channel CH00.

(CH00 memory channel is provided for measurement that uses the Minolta’s calibration standard.)

White calibration must be performed for each display type (model).

Characters of displays vary with the display type (model). Because of this, measured values differ even if the

same color is measured. Thus, a different memory channel must be used for each display type (model) to

perform white calibration.

If white calibration is performed with a memory channel to which the target color has already been set, that

target color will be deleted.

If white calibration is performed with a memory channel which has already been matrix-calibrated, the correc-

tion factor of the previous matrix calibration will be deleted and the correction factor obtained from the white

calibration will be set.

[Operating Procedure]

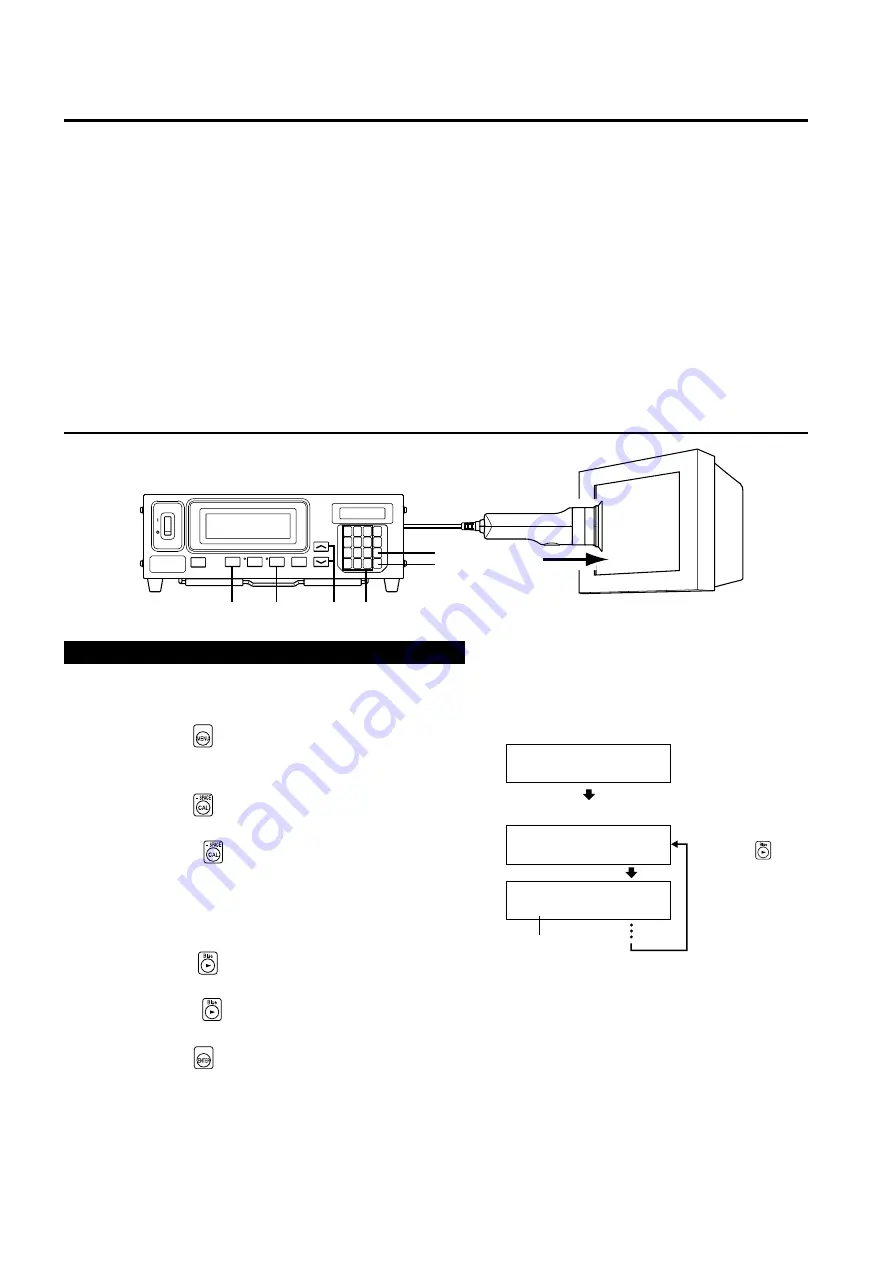
 When the optional 4-point expansion board CA-B04 is used

Select the probe no. to be white-calibrated. White calibration can be performed independently for each probe

connector ([P1] to [P5]) for each memory channel.

1

1

1

1

1

Press the 

 key.

The LCD display section will switch to the menu selec-

tion screen.

2

2

2

2

2

Press the 

 key to open the PROBE selec-

tion screen.

Each time the 

 key is pressed, the screen will switch

in the order PROBE 

 SYNC 

 ID Name input 

RANGE 

 Measurement Speed 

 Number of Digits

 Calibration Standard 

 RS232C Baud Rate 

PROBE.

3

3

3

3

3

Press the 

 key to display the probe no.

you want to select.

Each time the 

 key is pressed, the probe no. switches

in the order [P1] ….

4

4

4

4

4

Press the 

 key to confirm the selection.

* By default (factory setting), the instrument is set so that [P1] will be selected automatically when the POWER switch is set to ON. If you

want to change this setting, refer to page 29.

3

1

4,10

6,7

2

5

8,9

MENU : SELECT

PUSH SPACE KEY

SELECT : PROBE

  P1 35881112

SELECT : PROBE

  P3 35881113

Menu selection screen

PROBE selection screen

Probe no.

Press the 

 key

until the desired
probe no. appears.

Artisan Technology Group - Quality Instrumentation ... Guaranteed | (888) 88-SOURCE | www.artisantg.com

Summary of Contents for CA-100PLUS -

Page 1: ...service in house repair center WE BUY USED EQUIPMENT Sell your excess underutilized and idle used equipment We also offer credit for buy backs and trade ins www artisantg com WeBuyEquipment REMOTE IN...

Page 2: ...CRT Color Analyzer CA 100Plus Instruction Manual Artisan Technology Group Quality Instrumentation Guaranteed 888 88 SOURCE www artisantg com...

Page 3: ...y adhered to Denotes an instruction Disconnect the AC power cord from the AC outlet Denotes a prohibited operation The part must never be disassembled Denotes an instruction Connect the grounding term...

Page 4: ...he AC power cord itself Doing so may dam age the AC power cord causing a fire or electric shock In addition do not insert or disconnect the AC power cord s plug with wet hands Doing so may cause elect...

Page 5: ...or where the humidity is excessively high The instrument should be used at ambient temperatures of between 0 and 40 C and humidity of 85 RH or less The instrument must not be exposed to excessive imp...

Page 6: ...summary of measurement methods is given in Measurement Quick Guide pages 115 to 119 please refer to it when you need a quick check For Those Who Want to Purchase Optional Accessories for this Instrume...

Page 7: ...change of Luminance Unit 32 Measurement Preparation _________________________________________33 Zero Calibration 34 1 Performing Zero Calibration 34 2 Zero Calibration Check Method 35 Selecting Measur...

Page 8: ...n Analyzer Mode 80 Communications Section __________________________________________83 Communicating with PC 84 1 Communicating with PC via RS 232C 84 2 Selecting the RS 232C Baud Rate 85 3 Communicat...

Page 9: ...cannot be performed if zero calibration is not completed The Preparation Setting Measurement section explains the procedure up to measurement The Measurement Preparation section explains preparations...

Page 10: ...et Color by Entering Values User Calibration Gives detailed explanation of user calibration and explains its execution method Target color is also set at this time Analyzer Mode Gives detailed explana...

Page 11: ...rement Preparation and Measurement sections Page 90 Communication Format Explains the format of commands that are input to the instrument and that of data which is output from the instrument Page 87 C...

Page 12: ...n the LCD display section Breakdown Check Please read when the instrument does not function correctly Specifications Measurement Quick Guide Provides an outline of operations explained in the previous...

Page 13: ...d P1 EXT D 1 50 2 Digital display 1 POWER switch 4 Measurement mode indications 9 Tilt stand 6HOLDLED 7REMOTELED 8Keypanel 5 LCD display 3Analog display RS 232C P1 C Vertical synchronizing signal inpu...

Page 14: ...ays the memory channel probe no ID name warning and settings 6HOLDLED Lights up during hold 7REMOTELED Lights up when the instrument is ready for communication with the PC via RS 232C or USB interface...

Page 15: ...ement 2 Screw hole Used to secure the probe to a jig etc 3 Plug Connect this plug to the probe connector on the main unit or that on the optional 4 point expansion board CA B04 4 Suction cup CA A23 Me...

Page 16: ...lyzer PC software CA SDK Instruction manual Read this manual before operating the instrument Optional Accessories Measuring probe CA P02 CA P05 Connect measuring probes to the probe connectors provide...

Page 17: ...colors at up to 5 points on the display s surface Location of the explanation Installation method Page 27 Measuring method Measurement Preparation Setting Measure ment sections Suction Cup CA A23 P2 P...

Page 18: ...r 4 for CA 200 mode When 3 is set Displayed in up to the first decimal place When 4 is set Displayed in up to the second decimal place Normally the number of display digits must be set to 3 to display...

Page 19: ...t the measuring probe is blocked from light Page 34 2 Mode key Select measurement mode Page 40 Measurement mode changes in the following order xyLv T uvLv RBG R G B G G RBG R B G G R u v Lv XYZ xyLv 3...

Page 20: ...you to use the number key as alphabet keys Pressing this key again will restore the origi nal function of the ten key 3 Alphabet keys Used to enter alphabets for the ID name 4 MENU key Switches the LC...

Page 21: ...will be is heard when the setting is saved effective when the power is turned on next time 3 Holding down the MR key When xyLv T uvLv or XYZ measurement mode is selected for two to four seconds Displa...

Page 22: ...R u v Lv XYZ xyLv 2 Digital display section Displays the measured values When xyLv measurement mode is selected x y and Lv are displayed When T uvLv measurement mode is selected T uv and Lv are displa...

Page 23: ...display section Displays the memory channel probe no ID name warning and set tings In case of error an error message will appear For a description of what to do in case of error refer to page 107 R G...

Page 24: ...nce is below 0 10 cd m2 Digital display blinking white calibration equivalent to Minolta s Analog display blinking calibration standard Measurement mode blinking When T uvLv measurement mode Digital d...

Page 25: ...22 Artisan Technology Group Quality Instrumentation Guaranteed 888 88 SOURCE www artisantg com...

Page 26: ...nstallation About Connection Explains how to connect measuring probes and connect the power cord It also explains installation method of the optional 4 point expansion board Before turning on the powe...

Page 27: ...nside the instrument do not use the instrument Doing so may result in a fire For periodic inspection contact a Minolta autho rized service facility Always use theAC power cord supplied as a stan dard...

Page 28: ...rument in a place where the temperature changes rapidly since measured values will be incorrect The instrument must not be used in areas where there is an excessive amount of dust or where the humidit...

Page 29: ...ly When disconnecting the measuring probe set the POWER switch to OFF first and pull the probe by holding the plug Never pull the probe by its cord Notes when Connecting the Probe Never connect or rem...

Page 30: ...tallation When installing removing the 4 point expansion board al ways set the POWER switch to OFF and pull the AC power cord from the AC outlet first Do not touch the connectors gold plated parts or...

Page 31: ...rtical synchronizing signal from the display can be input to the instrument to allow synchronous measure ment when EXT SYNC mode is selected However if another SYNC mode is selected it is not necessar...

Page 32: ...Connect the AC power cord to an AC outlet Page 28 Turning the Power ON Set the POWER switch to ON If the instrument is connected to external equipment set the instrument s POWER switch to ON first th...

Page 33: ...Calibration data stored in CH00 to CH99 Page 51 6500K D65 Minolta s standard data CA 200 mode CA 100 compatible mode Page 15 CA 100 compatible mode Changing the Instrument Status at Power ON Change ne...

Page 34: ...y is pressed the screen will switch in the order PROBE SYNC ID Name input RANGE Measurement Speed Number of Digits Calibration Standard data RS232C Baud Rate PROBE 3 Press the key to select the desire...

Page 35: ...e after another as shown 2 Press the key before a total of sixteen asterisks appear Keeping the key held down will display as shown below switching the luminance unit from one to another Unit before U...

Page 36: ...cannot be performed if zero calibration has not been completed Selecting Masurement Speed SYNC Mode Measurement Mode and the Number of Display Digits Explains how to select SYNC mode that selects meas...

Page 37: ...will be performed simultaneously with all the connected measuring probes Operating Procedure Before starting zero calibration check that a measuring probe is connected to the probe connector P1 on th...

Page 38: ...check whether zero calibration has been performed correctly block entry of light into the measuring probe s receptor using a blackout curtain etc If the message shown on the right appears in the LCD d...

Page 39: ...the five measured values This mode is used when you want to perform accurate measurement AUTO mode Switches measurement speed to FAST or SLOW automatically according to the intensity of the display m...

Page 40: ...ted automatically when the POWER switch is set to ON If you want to change this setting refer to page 29 To cancel selection of measurement speed press the key Notes when Selecting the Measurement Spe...

Page 41: ...is pressed the screen will switch in the order PROBE SYNC ID Name input RANGE Measurement Speed Number of Digits Calibration Stan dard RS232C baud rate PROBE 3 Press the key to display the SYNC mode...

Page 42: ...5 measurements sec PAL 15 measurements sec 4 measurements sec EXT 17 measurements sec 4 5 measurements sec UNIV 7 measurements sec 1 5 measurements sec INT 17 measurements sec 4 5 measurements sec Th...

Page 43: ...v chromaticity coordinates CIE 1976 UCS chromaticity diagram and luminance Lv The analog display section shows x y and Lv XYZ mode Used to display output tristimulus values X Y and Z The analog displa...

Page 44: ...etting the instrument is set so that xyLv mode will be selected automatically when the POWER switch is set to ON If you want to change this setting refer to page 29 x y Lv x y Lv T Lv uv x y Lv R B G...

Page 45: ...FIGURES will be selected automatically when the POWER switch is set to ON If you want to change this setting refer to page 29 To cancel selection of the number of display digits press key Notes on Num...

Page 46: ...switch in the order PROBE SYNC ID Name input RANGE Measurement Speed Number of Digits Calibration Standard RS232C Baud Rate PROBE 3 Press the key to display the probe no you want to select Each time t...

Page 47: ...44 Artisan Technology Group Quality Instrumentation Guaranteed 888 88 SOURCE www artisantg com...

Page 48: ...f user calibration and explains its execu tion method Target color is also set at this time Page 51 Analyzer Mode Gives detailed explanation of ana lyzer mode and explains how to input the RGB emissio...

Page 49: ...g cases However it is not possible to perform user calibration using the memory channel CH00 To correct variation of readings that occur due to the deviation of spectral sensitivity from the CIE 1931...

Page 50: ...etting changing the target The display s measured values are set as the target color color by measurement This method can be used for any memory channels 2 Setting changing the target color Set the de...

Page 51: ...alyzer mode is stored in their common memory irrespective of measurement mode Therefore when matrix calibration is performed the RGB emission characteristic for analyzer mode is also input at the same...

Page 52: ...analyzer mode emission characteristic for analyzer mode also set the target color page 59 W Since when calibration factor is input for user calibration analyzer mode the target color is also set at th...

Page 53: ...ibration standard will be set for CH00 as well as for all the memory channels that have not been user calibrated By default factory setting the instrument is set so that 6500K D65 mode will be selecte...

Page 54: ...or more instruments are used 3 When the optional 4 point expansion board CA B04 is used Correction of difference of readings between measuring probes when two or more probes are used At the same time...

Page 55: ...4 is used Select the probe no to be white calibrated White calibration can be performed independently for each probe connector P1 to P5 for each memory channel 1 1 1 1 1 Press the key The LCD display...

Page 56: ...factor is entered 10 Press the HOLD key to start measurement To cancel white calibration press the key before pressing the key at step 9 To view the white calibrated values target color values press t...

Page 57: ...et for matrix calibration will be set as the RGB emission characteristic Operating Procedure 1 5 8 5 9 2 3 5 6 7 8 9 When the optional 4 point expansion board CA B04 is used Select the probe no to be...

Page 58: ...e Calibration on page 53 5 Press the key The LCD display section will return to the user calibration input screen with the mark displayed on the left of R 6 Press the HOLD key to resume measurement 6...

Page 59: ...rection factor is entered Steps 5 to 8 can be performed in any order Pressing the or key before pressing the key at step 9 allows you to re enter the emission characteristic of the color or the measur...

Page 60: ...ite calibration user calibration m Matrix calibration user calibration Error Messages in LCD Display Section For other error messages refer to page 107 E3 When the key is pressed in the calibration va...

Page 61: ...nd the target color W are set and measurement is performed in analyzer mode Digital display section R B G Outputs of the currently measured monochrome lights R B and G in ratio to those of the specifi...

Page 62: ...expansion board CA B04 is used Select the probe no for which the RGB emission characteristic for the display s analyzer mode is to be input The RGB emission characteristic for the display s analyzer...

Page 63: ...left of B 7 Enter the target color W 1 Place the measuring probe against the display which is now emit ting the target color W 2 Press the key In the LCD display section the mark will appear on the le...

Page 64: ...anged zero calibration must be performed before inputting the RGB emission characteristic Static electricity on the display s screen surface must be removed as much as possible Make sure that the meas...

Page 65: ...nt using Minolta s calibration standard without user calibration and want to use the analog display function When you want to set a color that differs from the color used for user calibration as the t...

Page 66: ...1 will be selected automatically when the POWER switch is set to ON If you want to change this setting refer to page 29 1 Press the MEMORY CH and keys until the memory channel where you want to set th...

Page 67: ...ntly measured color as the target color since the instrument s measurement range is exceeded Error Messages in LCD Display Section For other error messages refer to page 107 OVER after the HOLD key is...

Page 68: ...lt factory setting the instrument is set so that P1 will be selected automatically when the POWER switch is set to ON If you want to change this setting refer to page 29 1 Press the MEMORY CH and keys...

Page 69: ...ess the key before pressing the key To view the target color you set press the MR key For details refer to page 73 By default factory setting x 0 3127 y 0 3293 and Lv 160 0 cd m2 are set for the memor...

Page 70: ...the memory channel to which you want to set an ID name appears 2 Press the key The LCD display section will switch to the menu selection screen 3 Press the key to open the ID name input screen Each ti...

Page 71: ...an ID Name The ID name will be kept even if the POWER switch is set to OFF Never press the following keys during ID name setting Doing so will cancel setting and activate the mode corresponding to th...

Page 72: ...r XYZ In the case of 2 the value set for G G reference the value set for R R reference the values set for R G and B G G reference and those set for B R and G R R reference will be common Thus for inst...

Page 73: ...or analyzer mode R reference Rt R Rt 100 R 100 R B R 100 R B R G R R G R 100 where Gt Rt Target color values being 100 R G B Measurement Values Display examples x 15 when set to 2 Green Red Artisan Te...

Page 74: ...set to 2 0 1 Press the and then key to set the x y range 2 Press the key The cursor _ will move to the Lv position 3 Press the and then key to set the Lv range 5 Press the key The ranges will be set T...

Page 75: ...will cancel range setting and activate the mode corresponding to the pressed key 0 CAL MODE REMOTE MR MEMORY CH Digital and Analog Display In the case of four digit digital display measured values ar...

Page 76: ...formed The values for the target color will be displayed if user calibra tion has not been performed When matrix calibration is performed as user calibration 1 If only user calibration has been perfor...

Page 77: ...e is selected The probe serial no that was used to input the analyzer mode RGB emission characteristic or set the target color for the currently selected memory channel will be displayed When the opti...

Page 78: ...ttings Section Measurement Explains measuring methods how to hold the measured values and how to read them White Balance Adjustment in Analyzer Mode Explains how to adjust white balance Page 76 Page 8...

Page 79: ...h as possible Perform zero calibration if the ambient temperature has changed When measuring a display of intensity of 0 1cd m2 or less for a long period of time perform zero calibration approximately...

Page 80: ...l not appear if E1 is currently displayed When the optional 4 point expansion board CA B04 is used If two or more measuring probes are connected measurement will be performed with all the probes simul...

Page 81: ...T uvLv mode 2300 T 20000 K uv 0 1 Over Under Range Indications When the measurement range is exceeded Digital display section _ _ _ Analog display section Not lit LCD display section OVER When white c...

Page 82: ...0 1 step for the range from 10 0 to 99 9 In 1 step for the range from 100 to 999 In 10 step for the range from 1000 to 9 990 In 100 step for the range from 10000 to 99990 Analog display section Displa...

Page 83: ...values are the same for the selected memory channel In the analog display section only the center green segments light up When only the center green segments light up in the analog display section an...

Page 84: ...on screen Each time the key is pressed the screen will switch in the order PROBE SYNC ID Name input RANGE Mea surement Speed Number of Digits Calibration Standard RS232C Baud Rate PROBE 3 3 3 3 3 Pres...

Page 85: ...G are changed to 100 0 adjustment of the white color of the display to the target color W i e the xyLv values are the same is complete 7 2 When analyzer mode R standard is selected 1 1 1 1 1 Adjust t...

Page 86: ...s how to connect the USB cable to enable communication with PC via USB Remote Measurement Explains how to perform measurement from the PC remotely Communication Method Explains how to input communicat...

Page 87: ...WER switch to OFF 2 Connect the instrument to the computer with the RS 232C cable 3 Connect the cable to the connector and secure them with two screws firmly When disconnecting the RS 232C cable set t...

Page 88: ...0 2400 1200 600 300 38400 4 Press the key to confirm the selection By default factory setting the instrument is set so that 38400 will be selected automatically when the POWER switch is set to ON To c...

Page 89: ...r has two or more USB ports the USB cable can be connected to any of them Notes on Communication via USB One computer cannot control more than two instruments i e only one instrument can be controlled...

Page 90: ...the command F1 from the computer To turn OFF remote mode To cancel remote control mode do either of the following 1 Press REMOTE key again or 2 Input the command F0 from the computer Notes on Remote M...

Page 91: ...conds from the time preparation of the measurement data set has been completed the measurement data will be discarded and the preparations for the next measurement data will begin To signal that measu...

Page 92: ...urement conditions ere changed by inputting commands from the computer the new measurement data recalculated according to the new measurement conditions will be output If this data is not accepted wit...

Page 93: ...ets T uvLv display mode M2 Sets analyzer RBG display mode S0 Sets NTSC SYNC mode S1 Sets PAL SYNC mode S2 Sets EXT SYNC mode S3 Sets UNIV SYNC mode H0 Cancels display hold H1 Sets display hold U x val...

Page 94: ...0134 willcausedatafrom measuring probes connected to probe connectors 1 3 and 4 to be output For data output from measuring probes connected to all probe connectors input 0 as the probe connector numb...

Page 95: ...en calibra tion mode has been set by pressing key or by inputting the com mand J1 Correspond to pressing 4 1 0 and 7 respectively after key has been pressed in analyzer mode Sets present displayed dat...

Page 96: ...data communication via RS 232C terminal only 1 Inputting the command will not accept the following commands until zero calibration is complete They should not be sent after the command separated with...

Page 97: ...er of spaces In example T 6500 uv value First three decimal places output preceded by a space if positive or if negative In example uv 0 005 Lv value Up to four characters output if value consists of...

Page 98: ...teristics of CRT phosphors 4 Serial number b 8 characters serial number of probe used for setting standard color data 5 Standard color data For xyLv or T uvLv display mode Format x value y value Lv va...

Page 99: ...ed by required number of spaces Inexample analogdisplayrangeforRissetto1 0 andtherangeforBandGissetto2 0 LUMI cd m m _ _ _ For cd m2 LUMI fL _ _ _ _ _ _ _ For fL In the example the luminance unit is f...

Page 100: ...t accepted The input command is not acceptable Remote control mode canceled new or additional commands not accepted A command string of more than 250 characters was input Remote control mode canceled...

Page 101: ...98 Artisan Technology Group Quality Instrumentation Guaranteed 888 88 SOURCE www artisantg com...

Page 102: ...the LCD display section Breakdown Check Please read when the instrument does not function correctly Specifications Measurement Quick Guide Provides an outline of operations explained in the previous s...

Page 103: ...are calculated according to the measurement mode SYNC mode and correction factor user calibration which have been set using keys and switches 5 The processing results are then displayed in the displa...

Page 104: ...hen a color is on the isotemperature line the color temperature at the point where that line crosses the blackbody locus is assumed to be the correlated color temperature of that color The isotemperat...

Page 105: ...rement is taken Performing user calibration provides higher accuracy for measurement of colors that are close to the white color MatrixCalibration User s own matrix correction factor is set to the mem...

Page 106: ...balance Each sensor spectral sensitivity x2 y z of the measuring probe has sensitivity towards the display s R G and B Thus even if R monochrome light is emitted on the display s screen an output wil...

Page 107: ...in percentage to each monochrome light of the target color W being 100 Therefore before performing measurement in analyzer mode the display s emission characteristic and target color W must always be...

Page 108: ...in the anti static bag in which the board is supplied SAFETY WARNING Failure to adhere to the following points may result in death or serious injury If you are not going to use the instrument for a lo...

Page 109: ...MEMORY CH PQRS 7 TUV 8 WXYZ MENU ALPHA 9 GHI 4 JKL 5 MNO LOCK 6 CAL White 1 ABC 2 DEF SPACE 3 ENTER Red 0 Green Blue ON OFF 340 216 127 110 17 70 45 142 2 m 47 4 60 30 2 44 45 Tripod screw Artisan Tec...

Page 110: ...zer mode has not been input for the selected memory channel since shipment from factory 2 The currently used measuring probe is differ ent from the one used to input the RGB emis sion characteristic f...

Page 111: ...l on the instrument The vertical synchronizing signal used for the dis play is outside the range of 40 to 200 Hz Input the vertical synchronizing signal correctly When the vertical synchronizing signa...

Page 112: ...probe selection 5Aborts SYNC mode selection 6Aborts ID name setting 7Aborts analog display range setting 8Aborts measurement speed selection 9Aborts selection of the number of display digits 0Aborts...

Page 113: ...er calibration again us ing the currently connected mea suring probe Cause The RGB emission characteristic for the display s analyzer mode has not been input Action Set the RGB emission characteristic...

Page 114: ...e inoper able Turn the power OFF turn it ON again and then perform zero calibration If this symp tom still occurs the instrument is broken down 29 35 Zero calibration does not end ZERO CALI BRATION is...

Page 115: ...occurs the in strument has broken down 105 69 84 86 29 29 Is the ambient temperature stable If the ambient temperature has changed perform zero calibration 34 Was user calibration performed correctly...

Page 116: ...cannot be dis played in the LCD display section Is the 4 point expansion board installed correctly Install it correctly 27 Are the measuring probes connected to the probe connectors P2 to P5 properly...

Page 117: ...can be chosen x y Lv R G B G G R B R G R Flicker Contrast method 16 characters by 2 lines with backlight NTSC PAL EXT UNIV INT Vertical synchronizing frequency 40 to 200 Hz 100 channels Standard func...

Page 118: ...the desired SYNC mode appears 4 Press the key to confirm the selection To use EXT mode the vertical synchronizing signal used for the display must be input to the instrument Page 28 EXT UNIV INT NTSC...

Page 119: ...2 Press the key to open the PROBE selection screen 3 Press the key until the desired probe connector no appears The connector No of the connected probe will be switched to the selected one 4 Press the...

Page 120: ...his method can be used for any memory channels HOLD lamp Memory channel Probe connector no When the optional 4 point expansion board CA B04 is used 1 Press the key to display the menu se lection scree...

Page 121: ...r after user calibration 1 Setting Changing the Target Color Page 117 To set an ID name 2 Setting an ID Name Page 119 To use the analog display function 3 Setting the Analog Display Range Page 119 Whe...

Page 122: ...emitting monochrome light of B 2 Press the key 7 Input the emission characteristic of W 1 Place the measuring probe against the display which is now emitting monochrome light ofW 2 Press the key 8 Pre...

Page 123: ...120 Artisan Technology Group Quality Instrumentation Guaranteed 888 88 SOURCE www artisantg com...

Page 124: ...Artisan Technology Group Quality Instrumentation Guaranteed 888 88 SOURCE www artisantg com...

Page 125: ...Radiometric Instruments Operations 3 13 2 Chome Azuchi Machi Chuo Ku Osaka 541 8556 Japan 2002 Minolta Co Ltd ACDAX 1 Printed in Japan Artisan Technology Group Quality Instrumentation Guaranteed 888...

Page 126: ...service in house repair center WE BUY USED EQUIPMENT Sell your excess underutilized and idle used equipment We also offer credit for buy backs and trade ins www artisantg com WeBuyEquipment REMOTE IN...

Reviews: