background image

- 4.18 -

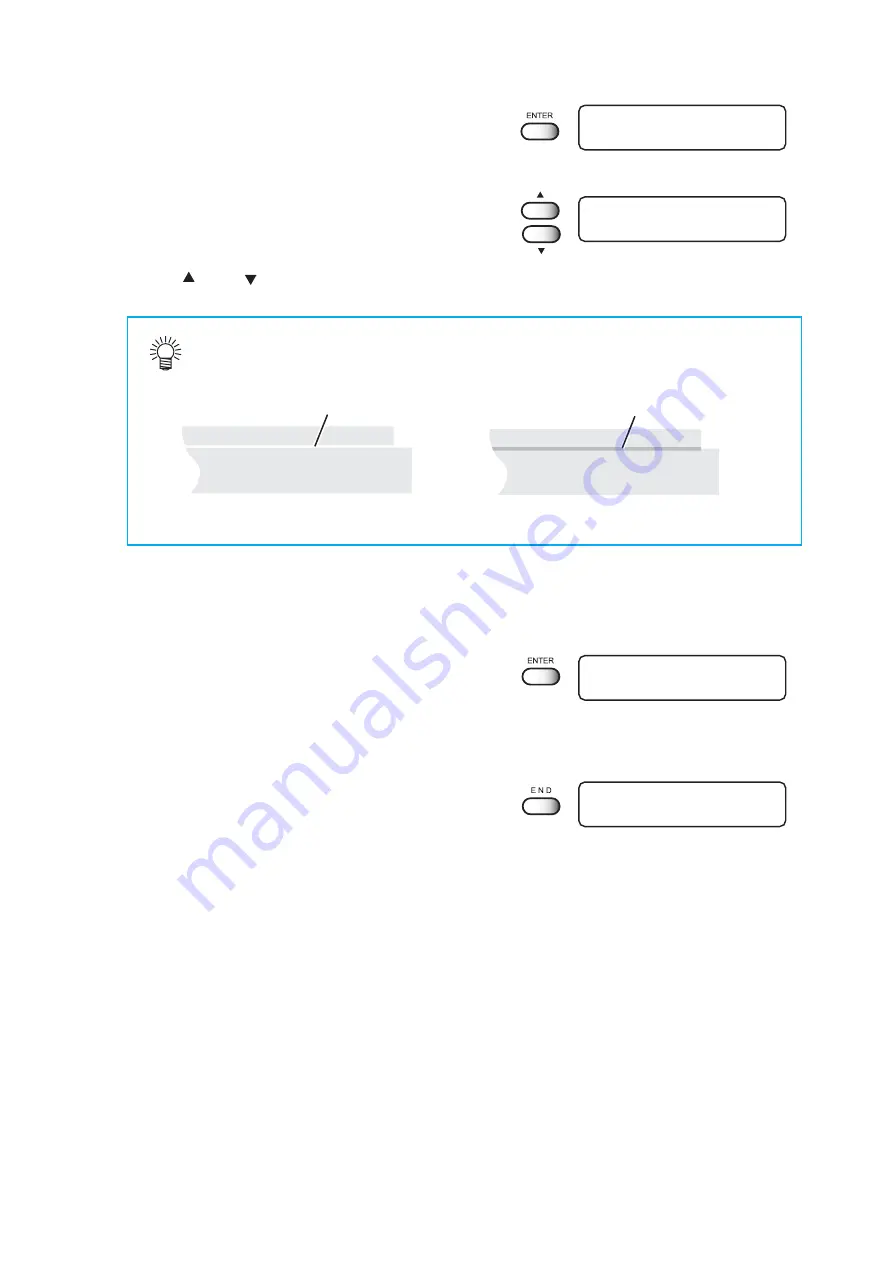
Gap between lines

Overlap

6.

Press the [ENTER] key.

Plot the correcting pattern.

7.

Confirm the correcting pattern.

Enter the correction value by pressing the JOG

keys [ ] and [ ].  (Setting value : -255 - 255)

The pattern moves by approximately 0.1mm in every 30 changes of the correction

value. Determine the correction value referencing this amount of movement.

TYPE. 1
ADJUST

=     20

TYPE. 1
PRINT  START

:  ent

TYPE. 1
PRINT  START

:  ent

< LOCAL >

width : 610 mm

Correction value is too large

Correction value is too small

8.

Press the [ENTER] key.

Register the correction value.

Repeat steps 6 to 8 until normal plotting result is obtained.

9.

Press the [END] key three times, and the menu

returns to the LOCAL mode.

Summary of Contents for GP-604D

Page 1: ...EERING CO LTD TKB Gotenyama Building 5 9 41 Kitashinagawa Shinagawa ku Tokyo 141 0001 Japan Phone 81 3 5420 8671 Fax 81 3 5420 8687 URL http www mimaki co jp E mail traiding mimaki co jp D201172 OPERA...

Page 2: ......

Page 3: ...s manufactured with damaged medium Please be noted that MIMAKI ENGINEERING CO LTD shall have no liability for any debts unearned profits and any claims from any third party resulting from the use of t...

Page 4: ...is product into an outlet which is isolated from power circuits connected to the television set or radio FCC Statement USA This equipment has been tested and found to comply with the limits for a Clas...

Page 5: ...d and fully understand this Operation manual before putting the machine into service It is also necessary to keep this Operation Manual on hand Make arrangements to deliver this Operation Manual to th...

Page 6: ...of ink that remains can be checked even during operation of the device you can use the ink and medium without waste For discharge liquid and Cleaner the amount of remaining ink is not indicated Use of...

Page 7: ...ilitate the use of the device Indicates the reference page for related contents Example of pictorial signs The symbol indicates the case where some phenomenon that requires a CAUTION sign including DA...

Page 8: ...our eyes immediately wash your eyes with a lot of clean water for at least 15 minutes In this case also wash the backside of eyelids to rinse ink away completely Then consult a doctor as soon as possi...

Page 9: ...Do the Following WARNING Do not disassemble or remodel the device Never disassemble or remodel the main unit of the printer and the ink cartridge Disassembling remodeling any of them will result in e...

Page 10: ...hich temperature and humidity vary by a great margin Use the device under the following environment Operating environment 20 to 35 C 35 to 65 Rh A place exposed to direct air blow from air conditioner...

Page 11: ...t the Refresh level 2 or 3 when in bad environment page 4 8 Keep the front cover to be closed also when the device is not engaged in printing If not dust can accumulate on the head nozzle When leaving...

Page 12: ...so as to prevent leakage of ink Do not touch or stain the contacts of the ink cartridge as doing so may cause damage to the print circuit board Heater Do not spill liquid on the table as this may cau...

Page 13: ...f this Operation manual xiii CHAPTER 1 Name and Function of each section The Front 1 2 The Rear 1 3 Operation Panel 1 4 Carriage 1 5 Capping station 1 5 Heater 1 6 Setting the heater voltage 1 7 Ink s...

Page 14: ...f 2 23 CHAPTER 3 Daily cleaning Daily Maintenance 3 2 Notes on cleaning 3 2 If the frame components of the device table T shirt plate have stained 3 3 Cleaning the wiper and ink caps 3 4 When the wast...

Page 15: ...aking a phenomenon as a sign of failure 6 2 The device cannot be energized 6 2 The device cannot perform printing 6 2 The device cannot perform printing after data transmission 6 3 The HEAT or CONSTAN...

Page 16: ...e LCD The content of display is shown in characters in a box as shown at right Operate the device according to the explanation of the operation procedure and the content of display on the LCD In this...

Page 17: ...ng Chapter 3 Daily Cleaning This chapter describes the replacing the waste ink tank and the cleaning procedure for each section Chapter 4 Setting Function This chapter describes the setting function C...

Page 18: ...xiv...

Page 19: ...is chapter describes the name and function of each section of the device Table of contents The Front 1 2 The Rear 1 3 Operation Panel 1 4 Carriage 1 5 Heater 1 6 Setting the heater voltage 1 7 Ink sta...

Page 20: ...OWER indicator lights in green 5 Operation panel Operation keys for operating the device and the LCD for displaying set items are on the panel page 1 4 6 Ink station Set the specified ink cartridges p...

Page 21: ...Not used on the device 3 Voltage selector switch Switches between 100 120 V and 220 240 V according to the power voltage used page 1 7 1 2 1 2 Name Function 1 AC inlet Connects the power cable 2 Main...

Page 22: ...rforms head cleaning TEST key Print the test pattern for checking the nozzle status LED POINTER key Set the printing point and the printing area CYCLE START key Detect the thickness of the garment in...

Page 23: ...e wiper is deformed or the garment is stained replace the wiper with a new one page 5 5 Carriage The carriage is provided with changeover valves of printing ink head and discharging ink head and disch...

Page 24: ...hile the CONSTANT indicator is lighting This is not an error but an indication that the temperature of the print heater have reached the set temperature and heating is interrupted If any failure occur...

Page 25: ...to 220V for shipment The plotter may be damaged if it is plugged to a 200 240V source while the voltage selector is set to 110V The heater temperature may not rise to the set temperature if it is plug...

Page 26: ...sponding to 2 lines of nozzles To the ink station each one color of ink cartridge two Cleaner and 2 discharge liquid totaling 8 cartridges are set At the time of checking the head nozzle clogging clea...

Page 27: ...right side valve to CLOSE 8 Press the ENTER key Left side changeover valve Right side changeover valve Initial filling of ink Operations when the device is started for the first time When this device...

Page 28: ...valve to DCG 16 Press the ENTER key 17 Turn the right side valve to CLOSE 18 Press the ENTER key 19 Discharge liquid is filling up 20 Turn the left side valve to CLOSE 21 Press the ENTER key 22 Turn...

Page 29: ...a long time such as the ending of works replace the discharge liquid by filling the Cleaner in the head for discharge liquid P 2 22 When this device is used from the state in which the Cleaner is fill...

Page 30: ...set plotting conditions Function mode 3 Pressing the TEST key to start test plotting 4 Pressing the CLEANING key to cleaning the head 5 Pressing the DATA CLEAR key to erase the plotting data the devi...

Page 31: ...arting works 2 4 Front cover 2 6 Adjusting the suitable temperature of heater 2 7 Checking and solving nozzle clogging 2 8 Setting Garment T shirt 2 10 Read the thickness of the garment T shirt 2 14 P...

Page 32: ...charge Read the image for discharge Receipt DATA PRINT Press the CYCLE START key Receipt DATA PRINT Remove the garment Heat on the press Washing Turn off the power Connect the computer to the plotter...

Page 33: ...ower switch on the back of the main device Tilt the power switch toward the I side 2 Push the power switch on the front face of the device Make sure that the front cover is closed In that case initial...

Page 34: ...in STEPS 1 At the LOCAL state press the FUNCTION key 3 times 2 Press the ENTER key 3 Perform changeover using up down keys 4 Press the ENTER key 5 Turn the left valve to DCG 6 Press the ENTER key 7 T...

Page 35: ...ait for about 1 and a half minutes 18 The changeover is completed Every day at the time of starting works the filling of the discharge liquid shall be performed Every day at the time of finishing work...

Page 36: ...ty resulting in abortion of plotting In this case restart the device and computer as following the procedure described below If opened the front cover during plotting STEPS 1 When opening the cover du...

Page 37: ...ined STEPS 1 Reverts to the LOCAL mode Press the REMOTE key to put the device back into the LOCAL mode 2 Press the FUNCTION key 3 Press the ENTER key 4 Select the type by pressing the JOG keys and pag...

Page 38: ...the attached thermal paper Other media paper T shirt except thermal paper can not judge properly When thermal paper is used up purchase thermal paper for FAX on the market The origin needs resetting...

Page 39: ...ssing soft Select this if any line is bent strong Select this if inferior plotting cannot be recovered after normal or soft cleaning 5 Press the ENTER key Starts the cleaning operation The operation s...

Page 40: ...head automatically after completing the plot operation Setting Garment T shirt Set the garment flatly after getting rid or wrinkles Do not touch the heater part for the part on the table is heating up...

Page 41: ...and set it on the table 2 Select the area plate There are two sizes of area plate L size 420 to 430mm and S size 320 to 430mm packed as accessories According to width of T shirt select the area plate...

Page 42: ...be printed in the manner it does not float above the area plate When the area mark is covered with medium using the area plate tells the printing range through the position of the area plate Hollows...

Page 43: ...he area plate up and float it Be careful not to injure the fingers when pushing the area plate up 2 Remove the floated area plate from the work table Be careful not to stain the printed side when remo...

Page 44: ...the garment T shirt After the operation is completed the menu enters the REMOTE mode When in use of a fuzzy or wrinkled garment move up the head height a few millimeters by pushing on the Z key to avo...

Page 45: ...o the REMOTE mode Press the REMOTE key to return to the LOCAL mode Press the ENTER key to enter the REMOTE mode without the temperature control 2 Transmit data from the computer The plotting condition...

Page 46: ...If still the plot operation interrupted Reread the garment thickness CYCLE START key page 2 14 Change the head height Z key Function mode page 4 15 LOCAL width 610 mm DATA CLEAR ENT LOCAL width 610 mm...

Page 47: ...rment completely or the inks absorbed by the disposal paper and it may cause the color differences on the plotted garment When used discharge liquid be sure to heat by pressing machine within 5 minute...

Page 48: ...dia T shirt contains residual formaldehydes a harmful substance make sure to wash the media T shirt to eliminate formaldehyde Furthermore small amount of residual formaldehydes re mains even washed th...

Page 49: ...ws on the right indicates that black ink comes to an end If NEAR END for discharge liquid is de tected discharge liquid does not fire on next data therefore replace to the new discharge liquid as soon...

Page 50: ...1 to 9 2 Press the ENTER key again to revert to the LOCAL mode If any error occurs on the ink cartridge the details are displayed page 6 5 NEAR END 0 1 2 3 4 5 6 7 8 9 LOCAL K C M Y W W D D REMAIN 9...

Page 51: ...l in the Cleaner STEPS 1 At the LOCAL state press the FUNCTION key 3 times 2 Press the ENTER key 3 Changeover using up down keys 4 Press the ENTER key 5 Turn the left valve to WASH 6 Press the ENTER k...

Page 52: ...for about 1 and a half minutes 18 Changeover is completed Every day at the time of finishing works the filling of Cleaner shall be per formed for the protection of head for discharge liquid Every day...

Page 53: ...on If the power is turned off while the device is engaged in plotting the head may fail to be retracted in the capping station If the head is left without capped for an extended period of time the noz...

Page 54: ...2 24...

Page 55: ...3 1 CHAPTER 3 Daily cleaning This chapter describes daily cleaning Table of contents Daily Maintenance 3 2 Cleaning the wiper and ink caps 3 4 When the waste ink tank becomes full 3 6...

Page 56: ...ure from entering inside the device If the inner part of the device becomes wet it may result in electric shock hazards and breakage of the device Conduct maintenance works after turning off the power...

Page 57: ...3 3 If the frame components of the device table T shirt plate have stained Dampen a piece of soft cloth with water or neutral detergent diluted with water squeeze it and wipe the frame components clea...

Page 58: ...iage out of the capping station by hand Use the appropriate operation key to move the carriage STEPS 1 Press the FUNCTION key 2 Press the and key to select the MAIN TENANCE 3 Press the ENTER key STATI...

Page 59: ...t both ends of the cleaned wiper to insert to the place 11 Wipe off ink or dirt adhered to the rubber of the cap and the ceiling of the wiper cover using cotton buds Be careful not to leave lint of th...

Page 60: ...one after completing discharging STEPS 1 Pull out the tank When pulling out the waste ink tank hold the opened waste ink tank with paper and then slowly pull it out to prevent waste ink from spatteri...

Page 61: ...g Table of contents Basic operations of menus 4 2 Register the function on each purpose Type Registration 4 4 Setup functions 4 5 Effective Plotting Area 4 10 Set the ORIGIN 4 14 Change the head heigh...

Page 62: ...peration flow to invoke menus For details refer to Appendix LOCAL width 610 mm FUNCTION SET UP ENT SET UP SELECT TYPE 1 REMOTE TYPE 1 2 5 REMOTE ENTER ENTER FUNCTION SET UP TYPE 2 v v v TYPE 1 FEED CO...

Page 63: ...e setup function and maintenance func tion Select either function 3 Select a type There are four types The FUNCTION mode can be set for each type depending on the garment type used 4 Select the Functi...

Page 64: ...ough 4 by pressing the JOG keys and 5 Press the ENTER key Setting Plotting Conditions page 4 5 Changing the type If plotting conditions for types 1 through 4 have already been registered settings can...

Page 65: ...settings device or computer REFRESH Refresh the head during plotting MM INCH Set a displayed unit values mm or inch STAMP Print the date of output and the print condition AUTO CLEANING Perform head cl...

Page 66: ...eat temperature NONE 10 90 min 10min step OFF TIME The heater is turned off in the following cases If the device does not plot for the setuptime or longer in the standby mode With STANDBY NONE selecte...

Page 67: ...e UNI D BI D LOGICALseek Select either the head moves to both ends of the garment or the head moves along the image width to make plotting ON Scans only width of the print image It enables to save the...

Page 68: ...0 0 9 9 sec When 3 seconds or longer interval is specified once the head is capped for the ink blockage protection function works PRIORITY page A 11 Specifies whether the values set on the device pan...

Page 69: ...lly Perform cleaning for each plot to prevent plotting failures ON OFF WORK CHANGE page A 12 Automatically up the head after printing to change the garment easily ON OFF LED POINTER page A 12 Select P...

Page 70: ...osition except for test print purposes Altering the origin on the device will cause an error from the origin set in RasterLinkGP output software If you must change the origin change it on the RasterLi...

Page 71: ...rmine the printing point 1 Specify the base point P0 2 Specify another point P1 to determine the printing point Create an output data according to the point specified P0 Base point P1 Printing point O...

Page 72: ...printing area A rectangle formed by the two opposing corners indicates the printing area e g When printing in a range 200 x 300 mm 1 Set the P0 point at the center of the lower neck 2 Determine the P...

Page 73: ...pointer to point P1 6 Press the ENTER key to determine the P1 point When selecting POINT printing point it returns to the LOCAL mode When selecting AREA printing point it moves to the predefined P2 po...

Page 74: ...key The effective plotting area is displayed on the LCD and the menu returns to the LOCAL mode When the device starts plotting the next time it uses the origin that has been determined unless the orig...

Page 75: ...ve up and down the head height as needed 2 Press the ENTER key after determined the height The menu reverts to the LOCAL mode 2 Determine the head gap in the FUNCTION mode STEPS 1 Press the FUNCTION k...

Page 76: ...arriage moves according to the head base not the LED pointer base 7 Press the ENTER key Detect the garment and the head move to establish in step 4 The garment thickness read by the CYCLE START key is...

Page 77: ...to correct dot positions If the correction value is not appropriate stripes may occur in the plotting disturbing neat plotting When the heater temperature is changed make sure that the CONSTANT indic...

Page 78: ...n every 30 changes of the correction value Determine the correction value referencing this amount of movement TYPE 1 ADJUST 20 TYPE 1 PRINT START ent TYPE 1 PRINT START ent LOCAL width 610 mm Correcti...

Page 79: ...e language from English to German STEPS 1 Make sure that the mode is LOCAL mode Press the FUNCTION key 2 Select the DISPLAY by pressing the JOG key 3 Press the ENTER key 4 Select the language to be us...

Page 80: ......

Page 81: ...ce of the device 5 2 Cleaning the station interior STATION CARRIAGEout 5 4 When the message REPLACE WIPER is displayed STATION WIPER EXCHANGE 5 5 Adjusting between the two plotting directions PRINT AD...

Page 82: ...of the maintenance functions it is necessary to perform the following opera tion on the operation panel You have to understand how to invoke the desired maintenance function to carry out maintenance...

Page 83: ...P Plots data commands received from the computer in HEX code WIPE LEVEL Makes setting to move up the wiper replacement warning depending on the operating environment TIME SET Sets the built in date an...

Page 84: ...tation interior maintenance WIPER EXCHANGE When the message REPLACE WIPER is displayed replace the wiper page 5 5 STEPS 1 Select CARRIAGEout Carriage moves out 2 Open the front cover to perform the fo...

Page 85: ...For details refer to your dealer Do not select REPLACE WIPER except for the wiper replacement or it resets the counted number of the wiper operation STEPS 1 Select the WIPER EXCHG to move the car ria...

Page 86: ...5 6 5 Clean the wiper guide shaft using a cotton bud or cloth 6 Close the front cover 7 Press the ENTER key The device enters the LOCAL mode INITIALIZING PLEASE WAIT LOCAL width 610 mm...

Page 87: ...RN 4 3 Press the JOG keys and to correct the dot position adjustment value of pattern 1 Select the correct dot positions on PATTERN 1 using the JOG keys and Select the dot positions that make a straig...

Page 88: ...dot positions on each of the patterns Enter the dot position correction value on Patterns 1 to 4 and then terminate dot position correction 6 Press the END key twice to revert the LOCAL mode MAINTENA...

Page 89: ...H several times contact your local distributor to call for service Cleaning the nozzle NOZZLE WASH If nozzle clogging cannot be resolved even after cleaning several times execute the FILL UP INK and W...

Page 90: ...s insert the wiper which has cleaned into place 10 Push the ENTER key 11 Fill the cap with the cleaning fluid using a dropper 12 Close the front cover and push the ENTER key 13 Press the and key selec...

Page 91: ...s in which discharge liquid or Cleaner is filled all Fill all heads in inks are filled 3 Press the ENTER key Starts ink filling automatically When ink filling is completed the menu returns 4 Press the...

Page 92: ...s discharging the cleaning fluid 8 Set the cleaning cartridge Aspirates the cleaning fluid 9 Remove the cleaning cartridge Starts discharging the cleaning fluid When cleaning complete display shown on...

Page 93: ...o CLOSE and press the ENTER key 6 Remove the ink cartridge Starts discharging the ink 7 Set the cleaning cartridge Aspirates the cleaning fluid 8 Remove the cleaning cartridge Starts discharging the c...

Page 94: ...discharging the cleaning fluid 16 Set the cleaning cartridge Aspirates the cleaning fluid 17 Remove the cleaning cartridge Starts discharging the cleaning fluid 18 Cleaning complete 19 Press the END...

Page 95: ...e left valve to CLOSE and press the ENTER key 23 Turn the right valve to DCG and press the ENTER key Discharge liquid fill up starts 24 Turn the left valve to DCG and press the ENTER key 25 Discharge...

Page 96: ...carriage out of the capping station by hand Use the appro priate operation key to move the carriage Cleaning tools Cleaning fluid RS for maintenance SPC 0137 Pipette Glove STEPS 1 Select the STATION...

Page 97: ...a dropper During the suction pause period drop cleaning fluid RS until just before it overflows from the cap Repeat at all other caps 7 Close the front cover and push the ENTER key Dry suction contin...

Page 98: ...ove Goggle STEP 1 Press the FUNCTION key 2 Press the and key until the display gives the indication MAINTENANCE 3 Press the ENTER key STATION is displayed 4 Press the and key until the display gives t...

Page 99: ...the projections at both ends insert the wiper which has cleaned into place 10 Press the ENTER key 11 Fill the cap with the cleaning fluid using a dropper 12 Close the front cover 13 Press the ENTER k...

Page 100: ...id using a pipette Repeat the performance several times to clean the ink discharge way for the air aspiration is performed fitfully Perform the operation for the each cap 18 Close the front cover 19 P...

Page 101: ...cified with the FUNCTION 2 PRINTadjust Indicates a correction value for dot position 3 REPLACE COUNTER Indicates the number of times the ink cartridges are replaced 4 VERSION Indicates the version of...

Page 102: ...HEX code The HEX code is an alphanumeric representation of plotting commands Please mailing the output data to our office nearby or fax it By using this code it is possible to check if there are any a...

Page 103: ...value 1 2 Displays the wiper replacement warning when a half of the standard number of wiping is reached 1 3 Displays the wiper replacement warning when one third of the standard number of wiping is...

Page 104: ...ss the and jog keys to change the value 4 Press the and key to select the TIME 5 Set the time Press the and jog keys to select the digit Press the and jog keys to change the value 6 Press the ENTER ke...

Page 105: ...ase inform the dealer or MIMAKI sales office of the contents of the trouble as well as this information STEPS 1 Select the INFORMATION 2 Press the ENTER key 3 Press the ENTER key again Display the fir...

Page 106: ...5 26...

Page 107: ...aken in the case where an abnormal phenomenon arises on the device and where an error message is given on the display Table of contents Before taking a phenomenon as a sign of failure 6 2 If an image...

Page 108: ...t the power cable has been properly connected to the power outlet and the computer The device cannot perform printing In case data is not transmitted to the device properly the device may not perform...

Page 109: ...e heater page 2 7 No No No The device cannot perform printing after data transmission In case a heater temperature is not enough it may take time to raise the heater temperature to the appropriate tem...

Page 110: ...nt during plotting Corrective measure 1 Execute the wiper cleaning page 3 4 2 Execute the ink caps cleaning page 3 4 3 Execute the head cleaning normal page 2 8 Ink beadings occur Corrective measure L...

Page 111: ...zle clogged the device needs repairs by a service person Display the ink cartridge error to confirm the details STEP 1 Press the ENTER key in the LOCAL mode 2 Press the ENTER key The menu will return...

Page 112: ...rned on It is recommended however to replace the wiper with a new one as soon as possible The mounted ink cartridge is defective The amount of ink remaining in the ink cartridge is insufficient The in...

Page 113: ...MY The IC chip of the ink cartridge cannot be read normally The type of the loaded ink cartridge is different from the previous one The color of the loaded ink cartridge is different from the previous...

Page 114: ...near encoder Control circuit board is defective FPGA Error HDC Error The device has received data other than command data The interface cable used is not in conformance with this plotter A parameter o...

Page 115: ...rrent error on the Ymotor has been detected Turn off the power to the device and turn it on after a while If the same error message appears again on the LCD contact your local distributor to call for...

Page 116: ...nt correctly Set the garment correctly or alter the head height Sensor fails to detect the garment or the garment is not properly set Set the garment correctly ERROR 71 WORK TOO HIGH ERROR 120 ENV TEM...

Page 117: ...tions and components the device function menu structure Table of contents Basic specifications A 2 Specification for ink A 3 Specification for cleaner and discharge liquid A 3 Moving the device A 4 Po...

Page 118: ...C Ink end detection function for C M Y K inks only Ink cartrige replacement system Capacity of ink cartridge 210 cc 5 cc per cartridge About 200 cc for each cartridge variable Max printing width 610 m...

Page 119: ...shall be avoided Specification for cleaner and discharge liquid Item Specifications Ink type Cleaner SPC 0422 Discharge liquid SPC 0409 Contents 220 cc per cartridge Shelf life Cleaner One year from...

Page 120: ...before moving the device Width Depth Height Gross weight 1660 mm 1070 mm 650 mm About 150 kg or less When moving the device not to apply excessive shock to it Hold up by at least four persons When mov...

Page 121: ...e warning label Be sure to fully understand the warning given on the labels In the case where any of the warning label has become so soiled that the warning message is illeg ible or has come off purch...

Page 122: ...A 6...

Page 123: ...iquid not filled up ENTER ENTER Left Valve Set DCG Right Valve Set CLOSE PLEASE WAIT Ink not filled up ENTER Ink Type TPig 4Color PLEASE WAIT Ink filled up Right Valve Set WASH ENTER Cleaner liquid fi...

Page 124: ...ORIGIN SET UP ORIGIN ENTER ORIGIN SET UP X Y HEAD GAP DATA CLEAR ENT DATA CLEAR ENTER ENTER ENTER CLEANING HEAD color ENTER CLEANING TYPE normal CLEANING ACTIVE TEST DRAW ENT TEST DRAW ENTER ENTER LO...

Page 125: ...lows FINE STD FAST HOST Display of warning messages and condition on the Remote Local display In case of occurring warning contents are displayed by END key Remote Local screen Warning screen Heater P...

Page 126: ...90 min Every 10 min 30min 60min 90min FINE FAST BI D OFF TYPE PRINT START ent TYPE PRINT HEAT ent TYPE PRINT HEAT 55 C TYPE C F ent TYPE C F C TYPE STANDBY ent TYPE STANDBY NONE TYPE OFF TIME ent TYPE...

Page 127: ...NK LAYERS ent TYPE DRYING TIME ent TYPE INK LAYERS 1 TYPE EACH LINE 0 0s TYPE PRIORITY ent TYPE FEED COMP HOST TYPE HEATER HOST TYPE PLOT MODE HOST TYPE INK LAYERS HOST TYPE DRYING TIME HOST TYPE REFR...

Page 128: ...CLEAN ent TYPE WORK CHANGE ent TYPE LED POINTER ent TYPE SETUP RESET ent TYPE RESET ent TYPE LED POINT POINT TYPE WORK CHANGE OFF TYPE AUTO CLEAN OFF TYPE TIME STAMP ent TYPE TIME STAMP OFF TYPE MM I...

Page 129: ...T FUNCTION HEAD GAP 2 5mm HEAD GAP HEAD GAP 3 0mm Fill Up Dcg Fill Up Wash Left Valve Set WASH Right Valve Set CLOSE FILL UP PLEASE WAIT Right Valve Set WASH Left Valve Set CLOSE FILL UP PLEASE WAIT L...

Page 130: ...NCE DATE DUMP ent MAINTENANCE WIPE LEVEL 1 1 MAINTENANCE DATA DUMP FUNCTION v FUNCTION v FUNCTION v MAINTENANCE HEAD WASH ent ENTER HEAD WASH WASH color ENTER HEAD WASH WASH dcg ENTER ENTER Left Valve...

Page 131: ...NANCE TIME SET ent MAINTENANCE DATA MAINTENANCE TIME MAINTENANCE DATA MAINTENANCE TIME 00 GP604D operation flow Maintenance 3 4 7 5 4 8 5 3 FUNCTION v v v Change the value by Move the figure by Set up...

Page 132: ...uage MAIN Ver I F Ver MAINTENANCE INFORMATION ent MAINTENANCE VERSION ent MAINTENANCE SERIAL No ent MAINTENANCE S N MAINTENANCE D N MAINTENANCE DEALER No ent FUNCTION DISPLAY ENT DISPLAY English ent G...

Page 133: ......
Page 134: ...PrintedinJapan MIMAKI ENGINEERING Co Ltd NH...

Reviews: