Milli-Q Direct 16 User Manual Download Page 108


108 

Milli-Q® Direct 8/16 System 

Alert information, 

Continued 


Minor Alert - 

after cancelling 

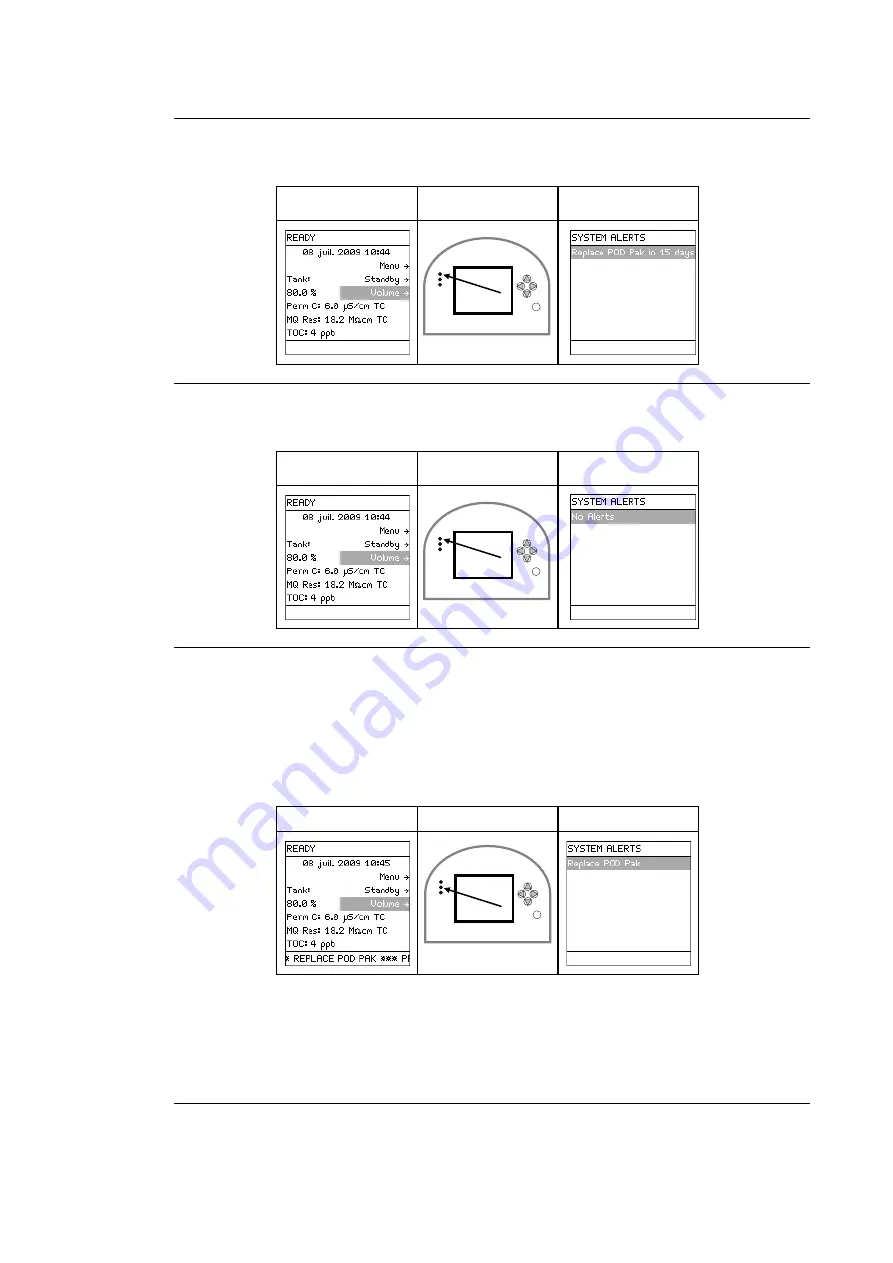
The Alert message has been cancelled but the cause of the message is still active. 
 

Main Display 

LEDs 

Main Display 


Minor Alert - 
consumable 

replaced 

The Alert message has been cancelled when the POD Pak has been replaced. 
 

Main Display 

LEDs 

Main Display 


Cancelling a 

Major Alert 

message -
procedure 

A Major Alert message can be cancelled by: 


performing the maintenance action (i.e. replace consumable), or 


using the Keypad.  This cancels the display of the Major Alert message for 24 hours. 

 
Example: Before cancelling, the Major Alert message is REPLACE POD PAK. 
 

Main Display 

LEDs 

Main Display 


A Major Alert message can be cancelled using the Keypad.  This is done in the same way 

that a Minor Alert message is cancelled. 
The display of the Major Alert is cancelled for 24 hours.  It appears again after 24 hours 
unless the maintenance action is performed. 

Continued on next page 

ê

ê

ê

Summary of Contents for Direct 16

Page 1: ...User Manual Milli Q Direct 8 16 System...

Page 2: ......

Page 3: ...tenance of the Water Purification System If this User Manual is not the correct one for your Water Purification System then please contact Millipore SAS Terminology The term Milli Q Direct Water Purif...

Page 4: ...listed in this publication may be found at http www millipore com ec cp3 terms within the Terms and Conditions of Sale applicable to your purchase transaction Trademarks BioPak EDS Pak Q Pak Milli Q M...

Page 5: ...to be used Protective glasses and gloves must be worn This UV RADIATION sticker is used to refer to a position on the water system Cabinet or inside of it where exposure to UV light is possible This D...

Page 6: ......

Page 7: ...nstalling a POD Pak 35 Registering UV Lamp timers 37 Registering PERFORM RO CL2 CLEANING message timer 39 Registering EXAMINE INLET STRAINER message timer 41 Calibrating the Flow rate 43 Performing a...

Page 8: ...acing a POD Pak 82 TOC Curve Check 85 Sanitising the RO Cartridge s 87 Cleaning the RO Cartridge s 90 Cleaning the Inlet Strainer 92 Calibrating the Flow rate 95 Alarms 96 Overview 96 Alarm Informatio...

Page 9: ...the System Some of the more important topics in this chapter are installation requirements consumable information and dimensions of various components of the System Contents This chapter contains the...

Page 10: ...Item Description Name A Point Of Delivery POD B POD Pak C Connections for tubings power cord level sensor and other cables D Q Pak Pack location E Sanitisation Port F Main Display G Progard Cartridge...

Page 11: ...em software Details of the Main Display Item Description 1 LEDs 2 Main LCD 3 Main Keypad Right The use of the Right Keypad button is shown below It is used to move to the next screen In this example t...

Page 12: ...e to the former screen Diagram 1 Action Diagram 2 Press Up The use of the Up Keypad button is shown below It is used to scroll up in a menu Diagram 1 Action Diagram 2 Press Down The use of the Down Ke...

Page 13: ...nit has a resistivity of 18 2 M cm is temperature compensated TC at 25 C and the TOC value is 4 ppb In this example there are no Milli Q water quality measurements to display The water quality is only...

Page 14: ...ow Item Description Item Description 1 RO Reject Port A Power Entry connection 100 240 V 2 Feed water Port B Accessories connection maximum 24 VDC 3 From Reservoir Port C Termination Plug Connection 4...

Page 15: ...Direct 8 16 System 15 Reservoir Information Millipore SAS recommends using a Reservoir having the following catalogue number Size Catalogue Numbers 30 Litre TANKPE030 60 Litre TANKPE060 100 Litre TAN...

Page 16: ...on of the RO Cartridge s UV 254 nm Lamp The UV 254 nm Lamp is optional It emits light at 254 nm It is used to kill bacteria UV 185 nm Lamp The dual wavelength UV 185 nm Lamp emits light at 185 nm and...

Page 17: ...ons may not be achieved at start up Weight The various weights are found in the table below System Operating Weight kg Dry Weight kg Shipping Weight kg Milli Q Direct 8 27 20 24 Milli Q Direct 16 28 2...

Page 18: ...16 System Specifications and requirements Continued Dimensions With POD Unit up With POD Unit down Materials of construction Please contact Millipore SAS for a list of the Materials of Construction Co...

Page 19: ...0 C Installation Category II Location The System is intended for indoor use only Pollution Degree 2 Relative humidity during storage and operation Maximum relative humidity 80 for temperatures up to 3...

Page 20: ...Flow rate 43 Performing a TOC Curve Check 45 Summary list The steps shown below outline the sequence and major actions of a System installation Please refer to this list throughout the installation S...

Page 21: ...gard Cartridge is detected by the Milli Q System To cancel the text display of this alarm message follow the instructions on the LCD Q PAK PACK OUT message This alarm occurs because the Q Pak Pack is...

Page 22: ...rated during installation Continued MILLI Q TOC SP This alarm occurs because the TOC indicator algorithm needs data after the Q Pak pack is fully rinsed out To cancel the text display of this alarm me...

Page 23: ...g the POD Unit Separating POD Arm and Point Of Delivery Separate the POD Arm and the Point Of Delivery by cutting and removing the tape that holds them together Placing the POD Arm Place the POD and P...

Page 24: ...ply tubing to Milli Q Direct system 3 Tubing connected here comes from the bottom of the Reservoir See the next section 4 Tubing connected here goes to the bottom of the Reservoir See the next section...

Page 25: ...eservoir connections The tubings from the Water System Ports 3 and 4 are connected to the Reservoir as shown here NOTE The valve where the tubing from Port 3 is connected must be opened Powering the s...

Page 26: ...ARTRIDGE OUT Cancel Alarms When an Alarm message is displayed follow the instructions on the screen to cancel the text display of the Alarm Check the date When the Alarm messages are cancelled check t...

Page 27: ...By following the instructions earlier in this manual the alarm was cancelled 2 Open the right door of the System Cabinet Remove the 2 protective caps located on the ports inside 3 Remove the covers on...

Page 28: ...Milli Q Direct 8 16 System Installing the Progard Cartridge Continued Procedure continued Step Action Diagram 6 Press 7 When the Progard Cartridge flush has finished the Water System goes to READY Mo...

Page 29: ...ram 1 Start in STANDBY Mode 2 Open the left door of the System Remove the 2 protective caps located on the ports inside 3 Remove the covers on the 2 ports of the Q Pak Pack Make sure the rubber O ring...

Page 30: ...e Q Pak Pack Continued Procedure continued Step Action Diagram 5 Push the bottom of the Q Pak Pack inwards 6 Push the pack locking handle down Close the left door 7 One minute later the Main LCD shows...

Page 31: ...and rinsed when the Milli Q System is installed Failure to do this results in poor water quality Procedure Follow the steps below to flush and rinse the RO Cartridge s Step Action Diagram 1 Start in...

Page 32: ...Cartridges Continued Procedure continued Step Action Diagram 5 Press 6 Press 7 Press 8 After 15 minutes the LCD looks like this 9 When the 225 minute RO rinse is finished the Milli Q System returns to...

Page 33: ...the steps below to rinse the Q Pak Pack Step Action Diagram 1 Locate the clear tubing and the barbed fitting from the System Accessories Bag Screw the barbed fitting onto the POD Unit Push one end of...

Page 34: ...Rinsing the Q Pak Pack Continued Procedure continued Step Action Diagram 4 Dispense water for at least 10 minutes 5 Push the POD Plunger all the way down and then release it to stop dispensing water L...

Page 35: ...it and registering the installation of a specific POD Pak Placing and flushing Follow the instructions delivered with the POD Pak Registering Follow the steps below to register the installation of the...

Page 36: ...36 Milli Q Direct 8 16 System Installing a POD Pak Continued Registering continued Step Action Diagram 5 Press 6 Press 7 In this example you choose Millipak Press 8 Press 9 Press 10 Press 3 times on...

Page 37: ...shown too early The UV Lamp timers need to be reset for the UV 185 nm Lamp and the UV 254 nm Lamp NOTE Before doing this make sure that the date and time have been checked for accuracy Procedure This...

Page 38: ...ng UV Lamp timers Continued Procedure continued Step Action Diagram 5 Press 6 Press 7 Press 8 Press 3 times on Reset UV 254nm Lamp timer After resetting the timer for the UV 185 nm Lamp timer reset th...

Page 39: ...the message PERFORM RO CL2 CLEANING is shown too early Note This is only done once at installation In the future this timer is reset automatically after an RO Cl2 cleaning is performed Procedure This...

Page 40: ...40 Milli Q Direct 8 16 System Registering PERFORM RO CL2 CLEANING message timer Continued Procedure continued Step Action Diagram 5 Press 6 Press 3 times on...

Page 41: ...System is installed If this is not done then the message indicating that the message EXAMINE INLET STRAINER is shown too early Procedure This procedure shows how to reset the timer used for the messag...

Page 42: ...42 Milli Q Direct 8 16 System Registering EXAMINE INLET STRAINER message timer Continued Procedure continued Step Action Diagram 5 Press 6 Press 7 Press 3 times on...

Page 43: ...installed A 1 Litre graduated cylinder is needed Procedure Follow the steps below to perform a Flow Calibration Step Action Diagram 1 Go to STANDBY Mode 2 Select Menu Press 3 Enter the Manager Menu Se...

Page 44: ...ed Cylinder under the POD Unit Press 7 Press 8 Water dispenses automatically from the POD Unit Wait until it stops dispensing water 9 Measure the amount of water in ml that was dispensed Suppose 870 m...

Page 45: ...with a TOC Curve Check In order to update this information perform a TOC Curve Check by following the steps below Procedure Follow the steps below to perform a TOC Curve Check Step Action Diagram 1 Go...

Page 46: ...re Overview Introduction The purpose of this chapter is to explain the various software used in the System Contents This chapter contains the following topics Topic See Page Software Map 47 Standby Mo...

Page 47: ...Milli Q Direct 8 16 System 47 Software Map Map...

Page 48: ...rect 8 16 System Standby Mode General information Purpose STANDBY mode is used primarily for maintenance actions and going to the Manager Menu Display READY Mode from STANDBY Mode Diagram 1 Action Dia...

Page 49: ...the Progard Cartridge exchange Install new RO Used to start a flush and rinse of a new RO Cartridge Install UV 254 Lamp Used to reset Alert message REPLACE 254 NM LAMP Install UV 185 Lamp Used to rese...

Page 50: ...O CL2 Cleaning Used to sanitise the RO Cartridge s RO pH Cleaning Used to clean the RO Cartridge s System Cleaning Contact Millipore SAS for more information Suitability Tests Diagram 1 Diagram 2 Item...

Page 51: ...t 8 16 System 51 Description of Standby Menu Continued Language Diagram 1 Diagram 2 Item Description Language Change the displayed language Manager Menu See the next section for information about the...

Page 52: ...ry to input a Login and a Password The Software Map indicates how to input a Login and a Password Change ID and Password Diagram 1 Diagram 2 Item Description Change ID Password Change the Login and Pa...

Page 53: ...olling the message RO REJECTION SP RO CL2 Cleaning Change set point for controlling the frequency of the message PERFORM RO CL2 CLEANING Permeate Cond Change set point controlling the message PERMEATE...

Page 54: ...n Pressure Change the displayed units of pressure Choices are bar psi and KPa Milli Q Product Change the displayed units of Milli Q Product Water quality Choices are M cm or S cm Tank Volume Change th...

Page 55: ...ously before it automatically stops Temp Comp Mode Change the Temperature Compensation Mode Flow Calibration Used for performing a flow calibration UV 254 nm Activation Used to activate or deactivate...

Page 56: ...am 2 Item Description Company Name Change the item Department Name Address Postal Code City Country Email History Summary Diagram 1 Diagram 2 Item Description History Summary Used to see the day by da...

Page 57: ...ay Action Result Press READY Mode water quality values The READY Mode screen display is explained below READY Mode screen Explanation In this example The permeate water filling the tank has a conducti...

Page 58: ...f the water filling the Reservoir Tank Level View the level of water in the Reservoir MQ Prod Quality View the quality of water obtained from the POD Unit Print Menu Diagram 1 Diagram 2 Item Descripti...

Page 59: ...erating mode status of pumps and status of UV Lamps System Alerts View a list of active Alert messages See the Alert Chapter for more information System Alarms View a list of active Alarm messages See...

Page 60: ...ed catalogue number and serial number NOTE Not all of this information is shown for each type of consumable item Progard UV 254 nm Lamp ASM UV Lamp UV 185 nm Lamp Q Pak POD Pak Call Millipore SAS Diag...

Page 61: ...NOTE This information is entered by a Millipore SAS Representative Repair Service Contract Contract Expires Next Service Next Calibration Next Qualification Information Diagram 1 Diagram 2 Item Descri...

Page 62: ...d TOC Curve Check Diagram 1 Diagram 2 Item Description TOC Curve Check The TOC Curve Check is used to determine data that is used for the TOC Indicator A manual TOC Curve Check can be initiated here O...

Page 63: ...urpose of this chapter is to explain various ways that water can be dispensed from the System and how to view information operating parameters and other things about the System Contents This chapter c...

Page 64: ...water press down on the POD Unit plunger while in READY Mode Position Water flow L Low Flow push slightly M Medium Flow push slightly H High Flow push down and hold release when done H Continuous high...

Page 65: ...rically dispense from the POD Unit Step Action Diagram 1 Make sure the System is in READY Mode 2 Select Volume Press 3 Adjust the volume of water to the required value using and Press 4 When the volum...

Page 66: ...low to view the water quality Step Action Diagram 1 Make sure the System is in READY Mode 2 Select Menu Press 3 Select Water Quality Press 4 Select the Water Quality to be viewed Press Note The term T...

Page 67: ...menu the following items can be selected System Operation System Alerts System Alarms and System Measures System Operation Follow the steps below to go to the System Operation menu Step Action Diagra...

Page 68: ...he timer for the UV 185 nm Lamp is reset then this Alert is no longer shown on the SYSTEM ALERTS LCD System Alarms An example Alarm is shown here This is an Alarm that is currently displayed on the Ma...

Page 69: ...ous consumables Procedure Follow the steps below to view Consumables Status Step Action Diagram 1 Start in READY Mode 2 Select Menu Press 3 Select Consumables Status Press 4 Select the consumable that...

Page 70: ...Millipore SAS Representative can enter this information into the System Procedure Follow the steps below to view information under Call Millipore SAS Step Action Diagram 1 Start in READY Mode 2 Selec...

Page 71: ...rsion information and serial number and other information Procedure Follow the steps below to see information about the System Step Action Diagram 1 Start in READY Mode 2 Select Menu Press 3 Select In...

Page 72: ...stem Information The Catalogue Number Serial Number and other information are shown here The Serial Number is something you should reference when you contact Millipore SAS This LCD shows information s...

Page 73: ...System Contents This chapter contains the following topics Topic See Page Maintenance Schedule 74 Replacing the Progard Cartridge and Vent Filter 75 Replacing the Q Pak Pack 78 Replacing a POD Pak 82...

Page 74: ...The instructions for replacing these lamps are not included in this User Manual The instructions are included with the replacement lamp Cleaning Sanitisation Item Maintenance needed When Inlet Strain...

Page 75: ...ilter When The Progard Cartridge and Tank Vent Filter should be replaced when the following Alert message is displayed Alert message REPLACE PROGARD CARTRIDGE AND TANK VENT FILTER Attention The Progar...

Page 76: ...idge Step Action Diagram 1 Place the System into STANDBY Mode 2 Push the POD Plunger down once to depressurise the System After water stops being dispensed push down the POD Plunger again 3 Open the S...

Page 77: ...idge Step Action Diagram 1 Remove the covers on the 2 ports of the Progard Cartridge Wet the O rings with water 2 Install the Progard Cartridge until it is fully seated Close the right door 3 When a n...

Page 78: ...SP REPLACE Q PAK Alert message REPLACE Q PAK PACK Removing Remove the used Q Pak Pack by following the steps below Step Action Diagram 1 Place the system into STANDBY Mode 2 Push the POD Plunger down...

Page 79: ...is removed in a few moments Placing Follow the steps below to install a new Q Pak Pack Step Action Diagram 1 Remove the covers on the 2 ports of the Q Pak Pack Look inside the ports Make sure the rubb...

Page 80: ...y installed needs to be rinsed This ensures optimal water quality Step Action Diagram 1 Locate the clear tubing and the barbed fitting from the System accessories bag Screw the barbed fitting onto the...

Page 81: ...of the System This also rinses off the purification media located in the Q Pak Pack 5 Leave the System in READY Mode when finished Manual TOC Curve Check A TOC Curve Check should be performed when th...

Page 82: ...pen the vent to see if there is any trapped air Close the vent after this Basing on LCD message The POD Pak needs replacement when the following Alert message is displayed Alert message REPLACE POD PA...

Page 83: ...3 Replacing a POD Pak Continued Registering continued Step Action Diagram 4 Scroll down to Install POD Pak by pressing 5 Press 6 Press 7 In this example the replacement POD Pak is a Millipak Press 8 P...

Page 84: ...Pak Continued Registering continued Step Action Diagram 9 Press 10 Press 3 times on Flow Rate Calibration The volumetric dispensing flow rate should be calibrated when a POD Pak has been replaced Refe...

Page 85: ...following the replacement and flushing of the Q Pak pack The System automatically performs a TOC Curve Check once per day So if the TOC Curve Check is not started manually following the consumables re...

Page 86: ...86 Milli Q Direct 8 16 System TOC Curve Check Continued Procedure continued Step Action Diagram 4 Press 5 After approximately 10 minutes the System returns to READY Mode...

Page 87: ...ty Glasses and Laboratory Gloves and other appropriate safety equipment when sanitising the RO Cartridge s Opening the Sanitisation Port Follow the steps below to open the Sanitisation Port Step Actio...

Page 88: ...s Continued Sanitising Follow the steps below to sanitise the RO Cartridge s Step Action Diagram 1 Place a chlorine tablet into the Sanitisation Port 2 Put the cap back on and hand tighten it 3 Go to...

Page 89: ...ued Sanitising continued Step Action Diagram 5 Select Sanitise Clean Press 6 Select RO CL2 Cleaning Press 7 Press The RO CL2 cleaning mode will last 19 minutes 8 When the cleaning is finished the Wate...

Page 90: ...priate safety equipment when cleaning the RO Cartridge s Cleaning Follow the steps below to clean the RO Cartridge s Step Action Diagram 1 Open the sanitisation port as described in the previous secti...

Page 91: ...inued Cleaning continued Step Action Diagram 5 Select Menu Press 6 Select Sanitise Clean Press 7 Select RO pH Cleaning Press 8 Press The RO pH cleaning will last 142 minutes 9 When the pH Cleaning is...

Page 92: ...t Strainer should also be cleaned whenever you suspect it is clogged Procedure Follow the steps below to clean the Inlet Strainer Step Action 1 Go to STANDBY Mode 2 Shut off the feed water supply 3 Un...

Page 93: ...ontinued Registering Follow the steps below to register the cleaning of the Inlet Strainer Step Action Diagram 1 Go to STANDBY Mode 2 Select Menu Press 3 Select Maintenance Press 4 Select Clean Strain...

Page 94: ...94 Milli Q Direct 8 16 System Cleaning the Inlet Strainer Continued Procedure continued Step Action Diagram 6 Press 7 Press 3 times on 8 Go to READY Mode...

Page 95: ...rate When The flow rate should be calibrated when a new consumable is installed such as POD Pak or Q Pak Pack a sensor or major component is changed volumetric dispensing is not accurate Procedure Fol...

Page 96: ...e Alarm messages shown on a System Specifically this chapter explains how an Alarm message is displayed to read an Alarm message to cancel an Alarm and a list of Alarm messages is shown Contents This...

Page 97: ...Alarms automatically stop the System from dispensing water An example of this is the Alarm message PROGARD CARTRIDGE OUT The text display of this type of Alarm can be cancelled for one hour by using...

Page 98: ...listed under the System Alarms LCD See the section View Operation for information on how to access this LCD Viewing an Alarm Message Follow the steps below to view an Alarm message Step Action Diagram...

Page 99: ...1 hour Alarm before cancelling In this example the Alarm message is MILLI Q T MAX Main Display LEDs Main Display Cancelling an Alarm message procedure Follow the steps below to cancel an Alarm message...

Page 100: ...stem Alarm Information Continued Alarm after cancelling the text display Main Display LEDs Main Display Alarm fixed Now suppose a Millipore SAS Service Representative fixes the cause of the Alarm Main...

Page 101: ...d Cartridge being installed Contact Millipore SAS INCORRECT Q PAK PACK This alarm stops the Milli Q portion of the system The System does not recognize the type of Q Pak Pack being installed Contact M...

Page 102: ...has been removed Verify that the Q Pak Pack is installed correctly Contact Millipore SAS if the problem continues TANK EMPTY This alarm stops the Milli Q portion of the system The System has detected...

Page 103: ...SP REPLACE Q PAK The Milli Q Water resistivity is below the set point Dispense water to eliminate any trapped air in the System If the issue persists replace the Q Pak Pack MILLI Q RES MAX The Milli...

Page 104: ...e Alert messages shown on a System Specifically this chapter explains how an Alert message is displayed to read an Alert message to cancel an Alert and a list of Alert messages is shown Contents This...

Page 105: ...o an immediate maintenance request Examples An example of a minor alert message would be REPLACE POD PAK IN 15 DAYS An example of a major alert message would be REPLACE POD PAK Main Display An Alert m...

Page 106: ...Step Action Diagram 1 Alert messages appear on the bottom line of the screen when the system is in READY mode or in STANDBY mode 2 Press as many times as required to reach the bottom line 3 Press to a...

Page 107: ...consumable using the Keypad see below or a Major Alert message is shown This eliminates the Minor Alert message Example Before cancelling the Minor Alert message is REPLACE POD PAK IN 15 DAYS Main Di...

Page 108: ...ocedure A Major Alert message can be cancelled by performing the maintenance action i e replace consumable or using the Keypad This cancels the display of the Major Alert message for 24 hours Example...

Page 109: ...rt after cancelling The Alert message has been cancelled but the cause of the message is still active Main Display LEDs Main Display Major Alert consumable replaced The Alert message has been cancelle...

Page 110: ...e message LOW RO PUMP PRESSURE The Water System has determined that the RO Pump Pressure is below specification Contact Millipore SAS NEXT CALIBRATION VISIT IN XX DAYS The System is prompting you that...

Page 111: ...that the ASM UV Lamp on the Reservoir should be replaced in XX days where XX is 15 1 Contact Millipore SAS REPLACE EXTERNAL PRETREATMENT The Water System has determined that the external pretreatment...

Page 112: ...ld be replaced in XX days where XX is 15 1 Replace the Progard Cartridge and the Vent Filter REPLACE UV 185 NM LAMP The System has determined that the UV 185 nm Lamp should be replaced Contact Millipo...

Page 113: ...Cable plugged into the System and the computer Restart the System THIS IP ADDRESS IS ALREADY USED BY ANOTHER SYSTEM Contact your network administrator Restart the System TOC 1 PPB Invalid TOC measure...

Page 114: ...UVLP01 UV 254 nm Lamp ZLXUVLP01 ASM Automatic Sanitisation Module UV Lamp ZLXUVLPL1 Accessories Item Catalogue Number Reservoir 30 Litre TANKPE030 Reservoir 60 Litre TANKPE060 Reservoir 100 Litre TANK...

Page 115: ......

Page 116: ...Milli Q Direct 8 16 System FTPF11486 V3 0 03 2013...

Reviews: