background image

8age 13 of 18                                                rev 1.00 091220                            Millennia Media HV-316 


Scene Window 


The Scene Window is found in the upper left corner 
of the screen.  A Scene remembers and recalls all 

parameters of the current software environment 

(gains, mutes, links, etc.).  Scenes are used for 

applications such as concerts or stage plays in which 

new acts or set changes require different microphone 

gains, mutes, links, metering, etc. 


There are a few physical aspects to the scene 

window worth noting before creating new scenes and 

projects: 


“Active Scene: ###”


The active scene number 

displays the number of the scene that is currently 

active. 


Scene Name Display 


Just below the active scene 

number 

is a text display that defaults to “Blan

Scene.”  This area displays the user designated 

name of the currently active scene. 


“000 Blank Scene”


The default scene that is 

automatically opened when the Ælogic is first loaded 

or when a Project, New or Saved, is opened.  The 

Blank Scene is to be used as a null starting point.  

Selecting scene 000 will force all parameters of all 

networked units 

to their “off” or “lowest” settings

.  

This default scene cannot be overwritten. 


The Scene List 


Scenes are arranged sequentially 

within the Scene Window (000, 001, 002, etc.). The 

Scene List is a scrollable list of all Scenes within the 

Scene Window. Left-clicking a Scene Number/Name 

will highlight it. No system functions will change until 

the Recall button is clicked or until the desired scene 

is double-clicked. 


Project and Scene Management 


Creating a Project 


Before anything (new scenes, 

changes to scenes, etc.) can be saved, a project 

itself must be created by doing a Save.  Use 

File>Save to name the Project and find a location to 

save it.  File>Save (ctrl-S) will save any updates or 

changes to the project unless a new name is desired 

(use File>Save As (shift+ctrl S)). 


Scene Window  


Underneath the Scene Window 

there are four buttons 

“Recall”, “New”, “Delete”, 

and “Lock.”

  The functions of these buttons are 

explained below.   


Safety Prompts 


In order to exercise caution when 

using the Scene Window Functions, safety prompts 
are available in case buttons are pressed 

accidentally.  Safety prompts can be enabled for: 


New Scene 


Recall Scene 


Scene Delete 


Scene Re-Ordering 


To turn safety prompts on and off go to 

Edit>

Preferences” in the pull

-down menus.  The 

section labeled “Scene Prompts” will have check 

boxes for the four choices. 


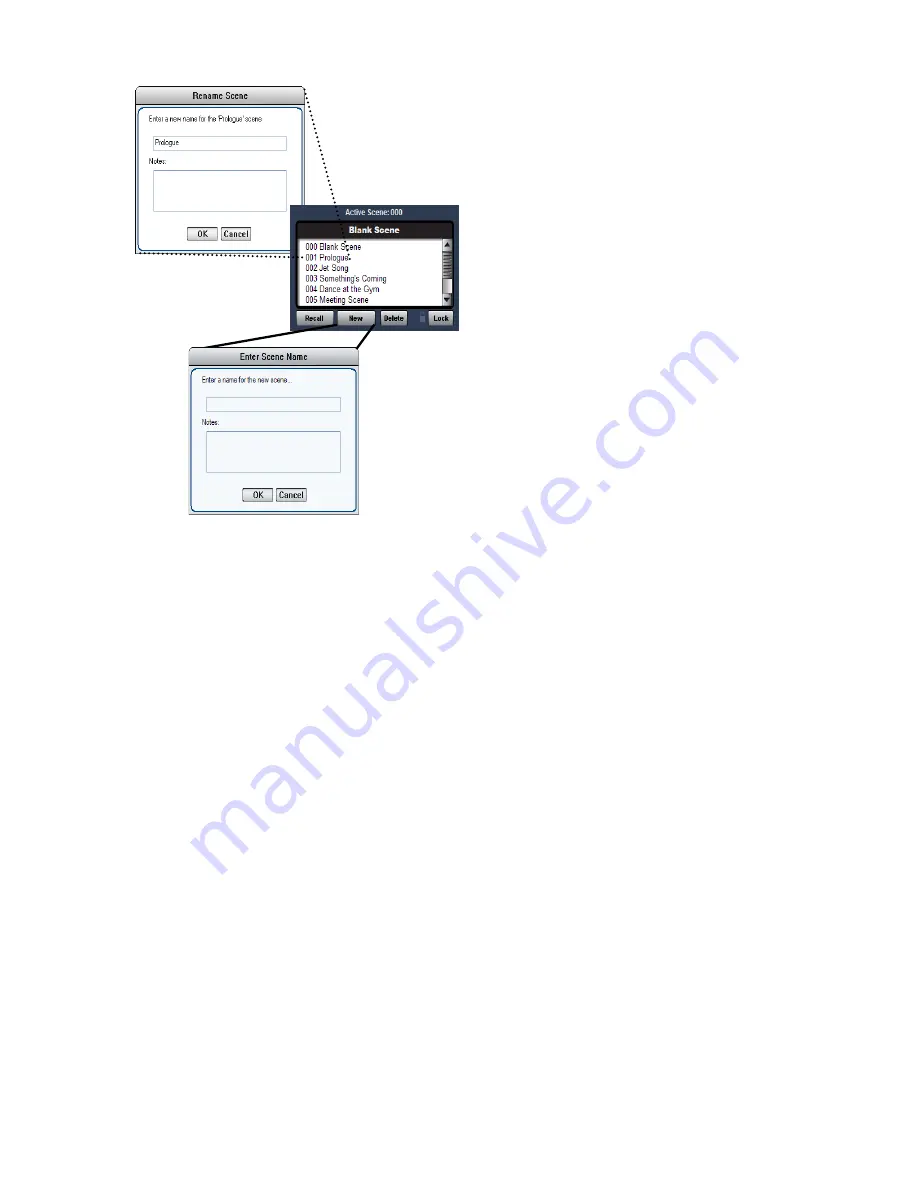
Creating New Scenes 


Scenes are created by 

using the 

“New”

 button below the scene window.  

Once this button is pressed the “Enter Scene Name” 

dialog box appears.   


The scene name can be entered in the upper text 

box and a section for Notes is also available to 

include any supplementary information about the 

scene.  Once the scene is named it will be appended 

to the Scene Window (next available scene number).   


A newly created scene will assume all parameters 

and settings of the active scene. Creating or naming 

a scene does not make it active. Only Recall or 

double-clicking can activate a scene. 
 

Renaming Scenes 


Once scenes are created, they 

can be renamed by right-clicking on them.  A dialog 

box labeled “Rename Scene” will appear with the 

same choices as the 

“Enter Scene Name” dialog

 box.  


Reordering Scenes 


Scenes are moved by 

left-clicking and dragging them to the desired 

location.  Once a scene is moved, Ælogic will 

automatically update the numbers in front of each 

scene name.   


Recalling Scenes 


Scenes can be recalled two 

different ways:  


1.


Highlight the desired scene and click the 

“Recall”


button. 

2.


Double click the scene name. 


The scene’s

 parameters will be transmitted to all  

of the units on the network. 

Summary of Contents for HV-316 Series

Page 1: ...Owner s Manual HV 316 Remote Controllable High Voltage Microphone Preamplifier Millennia Music Media Systems ...

Page 2: ...dow 9 Red Icon 9 Green Icon 9 Flashing Green Icon 9 Purple Icon 9 Flashing Blue Icon 9 Gray Icon 9 Unit Status Dialog 9 Overview 10 Control Section 10 Control Layout 10 Unit Naming and Unit Name Dialog Box 10 POLarity Flip 11 PAD 11 48V 11 MUTE 11 Channel Gain Faders Gain Display 11 Meter Preferences Dialog 11 SPLIT 11 SAFE 11 RBIN 11 HPF 11 Link Assignment 12 Scribble Strip 12 Link Matrix 12 Scen...

Page 3: ...pillage Do not attempt to use the HV 316 in near or around water or in unusually moist environments such as near a sink or swimming pool Prevent liquids or any other materials or objects from spilling or falling into the HV 316 unit Heat And Ventilation Be sure to allow adequate ventilation on both sides of the HV 316 and avoid blocking the fan air intake and exit vents Power Sources and Power Cor...

Page 4: ...s be honored more than 10 days after ship date Read this manual carefully and completely before attempting to use the HV 316 Improper operation could result in damage to product It is the user s responsibility to understand the safe use and operation of this device The shipping box of the HV 316 system will include Quick Start Guide UL approved power cord 110 V countries only except Japan The mate...

Page 5: ... 255 255 0 HV316 must be powered off Insert a small object onto the reset opening on the read of the unit You should feel a slight click when the reset button is depressed Turn on the unit while continuing to hold the reset button When the unit processor has reset it will display 00 in the Unit ID display on the front of the unit Release the reset switch on the rear The unit will continue to boot ...

Page 6: ...ed You need to allow Ælogic all permissions to access your network Failing to do so will prevent the software from seeing the Millennia Preamps connected If you are using WiFi turn it off and use the wired Ethernet connection to be sure all the permissions are applied to it so you connect the Millennia Preamp directly to your computer to initialize its IP address Extract the zipped files and Open ...

Page 7: ...s wired Ethernet connection is set to IP address 192 168 1 200 There are many ways to do this and Microsoft keeps changing the setup menus As of August 2020 this method gets you quickly to access setting the IP address Setting the Host Computer s IP Address Win 10 1 Press the Windows key and the R key at the same time to open the Run box Type ncpa cpl and hit Enter to access Network Connections im...

Page 8: ... Protocol DHCP is also an option for IP Address but we don t recommend using it unless you are familiar with networking and have the proper network hardware that supports it Ethernet and MIDI control cannot be used simultaneously only one remote control protocol can be used at a time in an HV 316 network The table below is a suggested addressing scheme IP Address Unit ID 192 168 1 200 Host Compute...

Page 9: ...er networking errors etc Green Icon Functioning Normally Remote unit functioning normally Flashing Green Icon HV 3R only Functioning Normally Local Mode Remote unit is functioning normally but is in the local mode HV 3R only If the unit is in Local mode when Ælogic is started it won t appear Be sure to change the unit to Remote mode so the software can recognize the HV 3R Purple Icon Unit ID Is Of...

Page 10: ...screen It allows the user to quickly scroll to any unit in the network You can also move the Control Section by using the Left and Right arrow keys on the keyboard Pressing an arrow key once corresponds to scrolling in that direction by one channel strip HV 3R only Ælogic is always the master control when the unit is in Remote Mode Any changes made in to the unit s front panel in the Local mode wi...

Page 11: ...efore 48V can be enabled Caution do not plug a mic in with the phantom power on It can damage the microphone and the preamp input MUTE Mutes channel output When channel is muted the meter will continue to operate allowing the user to view audio activity on that channel without passing live audio Mute parameter is linkable Button illuminates red Channel Gain Faders Gain Display A traditional lookin...

Page 12: ...ed the channel reverts to linked mode Linked Mute Linked Mute parameters will turn on and off together unless Mute linked channels is unchecked in the Preferences dialog box Setup Preferences Mute linked channels If this box is unchecked the mute parameters will act independently just like the other parameters Scribble Strip right click on scribble strip A text box in which channels can be named a...

Page 13: ...it File Save ctrl S will save any updates or changes to the project unless a new name is desired use File Save As shift ctrl S Scene Window Underneath the Scene Window there are four buttons Recall New Delete and Lock The functions of these buttons are explained below Safety Prompts In order to exercise caution when using the Scene Window Functions safety prompts are available in case buttons are ...

Page 14: ... engaged the other three functions will turn dark grey and will no longer be functional Parameters in the Control Section faders Links function buttons etc will still be functional Appending and Saving Scenes Whenever a change is made to any parameter or function an asterisk will appear next to the active scene in the Scene Window with the exception of the Blank Scene The asterisk will remain visi...

Page 15: ...trl Z Undo 10 levels Double Click Group Title in Link Matrix Lists channels that are members of the group Double Click on unit icon in Unit Status box Gives voltage temperature and network data of unit Double Click Scene name Loads Scene F1 Help Menu Left Right keys on controls Move channels one over Right Click Group title name in Link Matrix Edit name Right Click link box in Link Matrix Edit cha...

Page 16: ...m Solution Purple and Red Icons Trying to set up IDs and IP address while Ælogic is running Configure hardware before running the software Close Ælogic and restart it DHCP doesn t work You need to use a fixed IP address or install a DHCP server on your network ...

Page 17: ...0 Hz 40 kHz 34 dBu pad in Maximum Output Level 20 Hz 40 kHz analog output option 28 dBu analog option Phantom Input Impedance 1 kHz 6 750 ohms Output Impedance 24 3 Ohms analog option Phantom Powering 48 V dc 2 V dc 15 ma per channel Power Consumption 100 watts maximum AC Universal 90 240V 50 60 Hz DC 12V Dimensions Shipping Weight 19 W x 1 75 H x 16 D 10 lbs 16ch 9 lbs 8ch DANTE Physical Layer Et...

Page 18: ...accompanied by Windows based control software called ÆLogic offering visual access to hardware control functionality and scene management The device shall be the Millennia HV 316 Warranty US and Canada We will repair our products free of charge in the event of defect of materials or workmanship for one 1 year following date of purchase This limited warranty covers failures due only to defects in m...

Reviews: