6
I
NSTALLATION FOR
S
TAND
-A
LONE
K
EYBOARD
I
NTERFACE
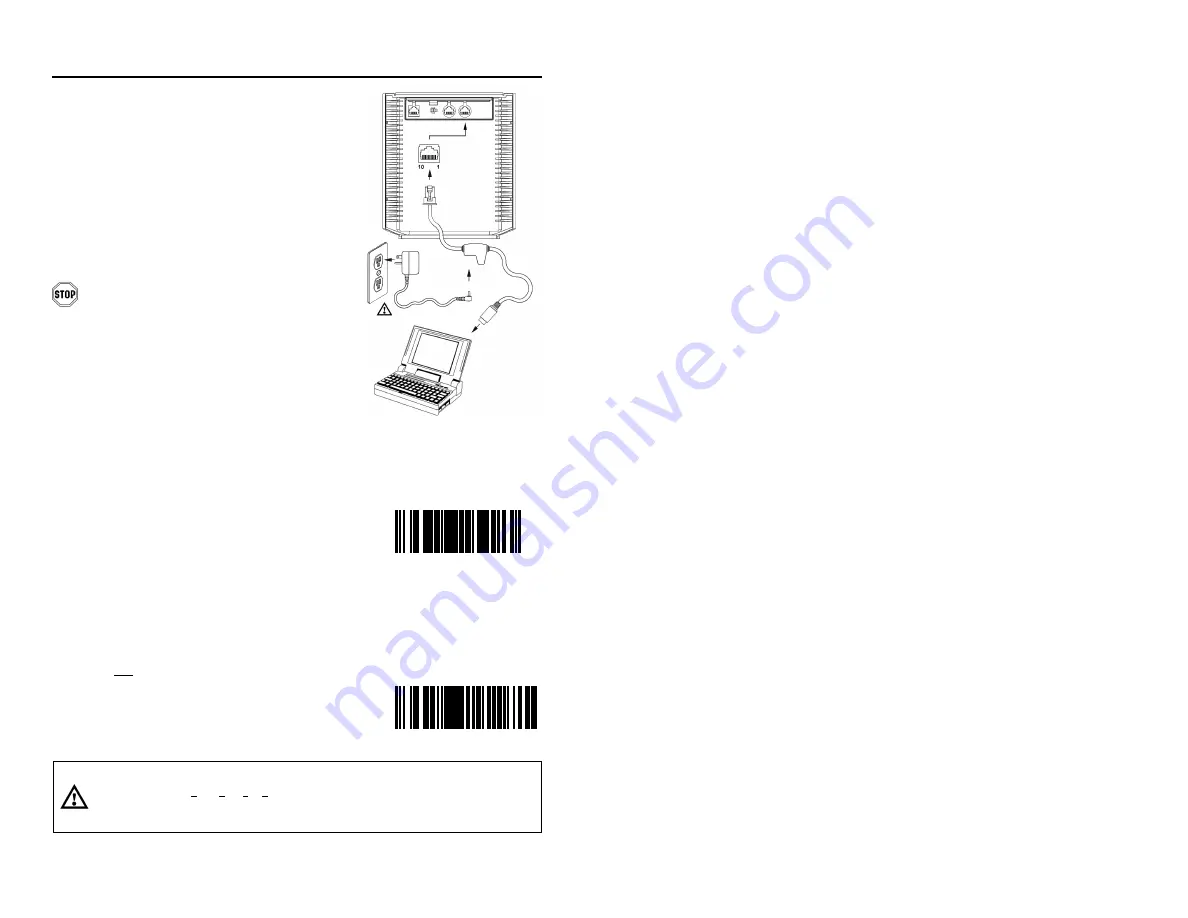
1. Turn off the host system.
2. Disconnect the keyboard from the host.
3. Connect the PowerLink cable to the 10-pin
Stand-Alone Keyboard interface jack. It is
the 2
nd
round
opening from the left side of
the MS7320
(see figure 3)
.
4. Connect the other end of the PowerLink
cable to the keyboard port on the host.
Before continuing verify that the
PowerLink cable is connected to the
appropriate interface jack on the scanner.
An incorrect cable connection can cause
communication problems or potential
damage to the scanner.
5. Connect the external power supply to the
power jack on the PowerLink cable.
6. Check the AC input requirements of the
power supply to make sure the voltage
matches the AC outlet.
7. Connect AC power to the transformer.
The outlet should be near the equipment
and easily accessible.
8. Scan the two bar codes in numbered
sequence in order to configure the
MS7320 for Stand-Alone Keyboard
communication.
Note:
When scanning the bar codes, cover the
code not being scanned to ensure the
codes are read in the proper sequence.
9. Turn on the host system.
10. Snap on the cable cover.
Caution:
To maintain compliance with applicable standards, all circuits connected to the scanner must meet the
requirements for SELV (Safety Extra Low Voltage) according to EN 60950.
To maintain compliance with standard CSA C22.2 No. 60950-00/UL 60950 and norm EN 60950, the power
source should meet applicable performance requirements for a limited power source.
³
9
9
9
9
9
4
Scan 1
St
Load Keyboard
Wedge Defaults
³
5 1 5
5 1 5
3
Scan 2
nd
Enable Stand-Alone
Keyboard Wedge
Figure 3:
Stand-Alone Keyboard
Interface
Summary of Contents for MS7320 InVista Series
Page 1: ...METROLOGIC INSTRUMENTS INC MS7320 InVista Series Installation and User s Guide...
Page 2: ......
Page 57: ...NOTES...
Page 58: ...NOTES...
Page 59: ......
Page 60: ...April 2002 Printed in the USA 0 0 0 2 8 9 6 A...


