background image


nadac.merging.com 

Page 31 


System Menu 

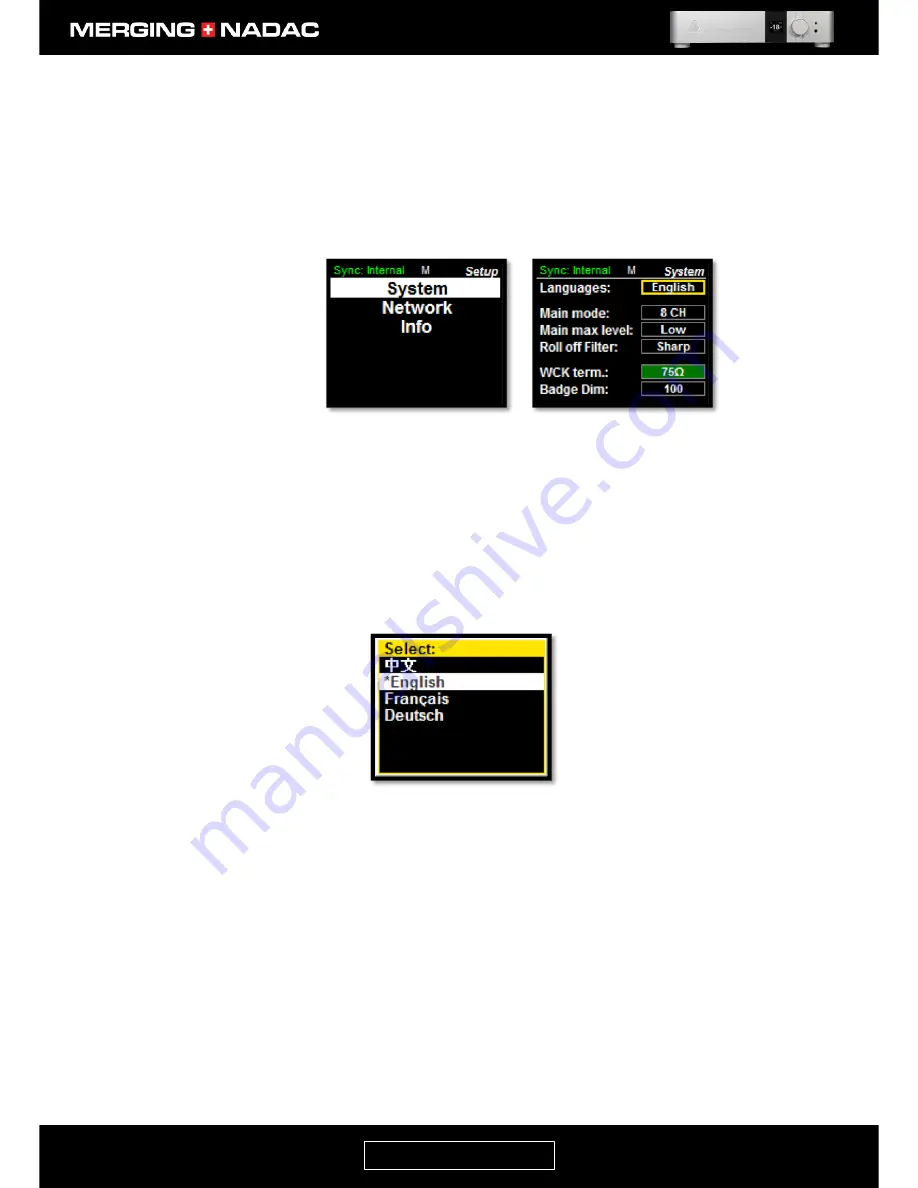
The System menu allows access to the system secondary settings:  display language, main mode (2 or 8-
channel operation – only applicable to the 8-channel unit (MC8)), maximum output level, roll-off filter, word 
clock termination and power switch illumination settings. 

To enter the System menu: From the home screen press and hold the Rotary Control until the Main menu top 
screen appears – Figure 20.  Use the Rotary Control to highlight 

Setup

, then briefly press the control.  This will 

open the Setup menu – Figure 24.  With 

System

 highlighted, briefly press the control again and the System 

menu will appear – Figure 25.   


Languages 

Allows you to select the language used on the unit’s screen

.  

Languages


available 

are:  Chinese, English, French, German, Norwegian, Japanese, Korean.


To change the system language, use the Rotary Control to outline the 

Languages


options box in Figure 25, then briefly press the Rotary Control and a list of the 
languages available will be displayed – Figure 26.  Use the Rotary Control to 
highlight the required language then briefly press the control.  The display will 
revert to the System menu, Figure 25, with the new system language shown in the 

Languages

 option box. 


Main Mode 

The 8-channel unit (MC8) can be switched to work in difference mode  


8-Channel mode: 

8 channels outputs

 (1-2-3-4-5-6-7-8)


Stereo mode: 

Combines the outputs of 4 D/A converters to drive each output 

channel.  This provides 

improved linearity, greater dynamic range and a lower noise 

floor. 

Stereo x4

: Under this mode the NADAC the main 1-2 can are duplicated to 4 output 

pairs (1-2/1-2/1-2/1-2) 


To change the Main Mode setting, use the Rotary Control to outline the current 
Main Mode setting, then briefly press the Rotary Control to open the Main Mode 
options menu – Figure 27.  Use the Rotary Control to highlight the required 

Main 

Figure 24.   Setup menu.  


Figure 25.   System menu.  


Figure 26.   System language 


Summary of Contents for MERGING+NADAC

Page 1: ...REFERENCE GUIDE ...

Page 2: ...How to Connect the MERGING NADAC 17 Connecting the RAVENNA Ethernet cable to the Network input 17 Connecting the NADAC using AES EBU and SPDIF digital interfaces 17 Connecting the word clock input 18 How to connect the balanced line output to an unbalanced input 19 Power Supply 20 Power supply options 20 Using an AC power source 20 Using a DC power source 20 Switching on your MERGING NADAC 21 MERG...

Page 3: ...for MAC OS X 53 The NADAC App MERGING NADAC Remote Control 59 To launch the MERGING NADAC Ap from Windows 60 To launch the MERGING NADAC Ap from Mac OS X 61 To launch the MERGING NADAC Ap from Apple iOS for iPad and iPhone 62 Troubleshooting Guide 65 Media player configuration recommendations 65 MERGING NADAC Discovery or RAVENNA I O connection problems 65 Other trouble shooting information 65 App...

Page 4: ... 4 This product either alone or in combination with an amplifier and speakers or headphones may be capable of producing sound levels that could cause permanent hearing loss Do not operate at a high volume level or at a level that is uncomfortable If you experience any hearing loss or ringing in the ears you should consult an audiologist 5 The product should be located so that its location or posit...

Page 5: ...ult in damage to your Merging hardware Please read this entire section of the manual carefully before installation STATIC ELECTRICITY DANGER NOTICE Please note that the NADAC contains delicate electronic components that can be damaged or even destroyed when exposed to static electricity Take all necessary precautions not to discharge static electricity into the equipment when touching any of the N...

Page 6: ...n This equipment generates uses and can radiate radio frequency energy and if not installed and used in accordance with the instructions may cause harmful interference to radio communications However there is no guarantee that interference will not occur in a particular installation If this equipment does cause harmful interference to radio or television reception which can be determined by turnin...

Page 7: ...not to exceed 10 degrees C per hour Non Operating Temperature 40 degrees C to 70 degrees C Non Operating Humidity 95 non condensing 30 degrees C Operating Shock No errors with a half sine wave shock of 2G with 11 millisecond duration Package Shock Operational after a free fall 60 cm depending on the weight ESD 8kV per Merging Technologies Environmental Test Specification ...

Page 8: ...tandards EN 55022 2010 EN 55032 2010 EN 55024 2010 EN61000 3 2 3 CISPR 22 2008 CISPR 32 2012 CISPR 24 2010 Detailed specifications of the tested and certified product are shown in the following Test Report Test report Ref No 15 MO 0081 E01 E02 Issued Date June 2015 by Electro Suisse Montena EMC SA The CE label is affixed on the bottom of the MERGING NADAC unit as per below Date 19 June 2015 Claude...

Page 9: ...ature or operation outside maximum rating 2 Products on which warranty stickers or product serial numbers have been removed altered or rendered illegible 3 The cost of installations removal or reinstallation 4 Damages caused to any other products 5 Do not attempt to service the equipment There are no user serviceable parts inside Please refer all servicing to an authorized Merging Technologies sal...

Page 10: ...s dealer as the product may also have sustained damage Please retain all the packing as this must be used should you need to ship the unit in the future The use of any other packing may result in the unit sustaining damage in transit which will not be covered by the warranty In addition to the user manual the carton should contain the items shown in Figure 1 If any of these is missing please conta...

Page 11: ...nd quality and electronic components are carefully selected based on their audio performance first and foremost The side benefit is that if equipment runs cool it is usually also guarantee of longevity and long term reliability Key Features Accepts 44 1kHz 384kHz PCM at 24 bit resolution DXD DSD64 DSD128 and DSD256 SPDIF RCA and Toslink and AES EBU inputs for conventional digital sources Ethernet ...

Page 12: ...ING NADAC The added bonus to using an advanced networking solution is being able to send and receive control information as well as audio data This opened up exciting possibilities in the studio and now you can enjoy these same benefits in your own home as in a networked system using multiple MERGING NADACs the remote control command data as well as the audio data are passed to the units via the n...

Page 13: ... 12 MERGING NADAC Hardware Front Panel Back Panel 2 Channel version ST2 Back Panel 8 Channel version MC8 Figure 3 2 Channel version ST2 back panel Figure 2 MERGING NADAC front panel Figure 4 8 Channel version MC8 back panel ...

Page 14: ...panel of the stereo version ST2 is identical to the MC8 with the exception that it only has 2 sets of balanced and unbalanced analogue outputs instead of 8 Figure 6 MERGING NADAC MC8 back panel detail Figure 5 MERGING NADAC front panel detail ...

Page 15: ...ax output Level 18 0 dBu 6 1 Vrms Output Impedance 40 Ω Dynamic Range ST 2 130 dB A weighted typ Dynamic Range MC 8 124 dB A weighted typ THD N 1 kHz ST 2 116 dB 0 00016 THD N 1 kHz MC 8 113 dB 0 00022 Gain Range software controlled dB to 0 dB Gain Step Precision 1dB 0 05 dB Unbalanced Analog Outputs Connector type Gold plated RCA jack Max output Level 8 8 dBu 2 1 Vrms Output Impedance 20 Ω Dynami...

Page 16: ...ontrolled dB to 0 dB Gain Step Precision 1dB 0 05 dB RAVENNA module RAVENNA GbE RJ45 Sample Rates 44 1 kHz 384 kHz DSD64 DSD128 and DSD256 AES EBU input Connector Gold plated female XLR AES Input Grounded and transformer coupled Input Impedance 110 Ω Sample Rates 44 1 kHz 192 kHz SPDIF inputs Optical Connector Toslink Coaxial Connector Gold plated RCA Coaxial Input Impedance 75 Ω Sample Rates 44 1...

Page 17: ...ations Windows Driver OS ASIO 2 2 Win7 64bit Win8 1 64bit Win10 64bit Mac Driver OS NADAC Core Audio MacOS 10 8 5 or higher Intel Linux Driver OS ALSA Please contact Merging Technologies for detail on supported specific Linux versions and build ...

Page 18: ... push the tab above the Network input connector down to release the lock then withdraw the connector Do not pull on the cable If the lock release tab is not pushed down sufficiently the cable cannot be removed Connecting the NADAC using AES EBU and SPDIF digital interfaces The NADAC also has one AES EBU and two SPDIF digital interfaces to allow it to be connected to sources such as CD players and ...

Page 19: ...stic impedance of 75 Ω To connect the cable offer it up so that the two diametrically opposed pins on the outside of the rear panel connector fit into the corresponding grooves in the inside of the cable connector s locking ring Push the cable in and turn the locking ring clockwise so that it locks firmly To remove the BNC cable push the cable connector forward slightly and turn it anti clockwise ...

Page 20: ...anced output circuit is symmetrical but not floating Failure to observe this instruction may result in damage to the MERGING NADAC which will not be covered by the warranty Note As unbalanced inputs are usually more sensitive than balanced inputs the 6dB drop in signal level that results when using only one half of the balanced output will reduce the likelihood of overdriving the unbalanced input ...

Page 21: ...re unsure about the suitability of the power outlet you propose to use Using a DC power source The MERGING NADAC may also be run from a DC power source This should be connected to the DC Input connector on the rear panel immediately to the left of the AC power inlet Figure11 The mating part for this connector is a Hirose HR10 7P 4P which can be ordered separately from your Merging Technologies res...

Page 22: ...ont panel power button light isn t steady but appears to flicker this may indicate a fault condition and the unit should be switched off If you cannot switch the unit off using the Shutdown command in the Exit menu page 38 press and hold down the power button until the unit switches off 4 When the display shows the Main output home screen the unit is ready for use Figure 14 shows an example of the...

Page 23: ...nadac merging com Page 22 MERGING NADAC Front Panel Display Interface MERGING NADAC Menu Tree Figure 15 MERGING NADAC menu tree ...

Page 24: ...vigated by pressing the control knob either briefly or for more than 1 second and by rotating the control Rotary Control Function Overview Rotary movement When a home screen is displayed see Figure 14 for an example turning the Rotary Control to the left or right will decrease or increase the volume level of the output it has been selected to control Continuously turning the control to the left wi...

Page 25: ...st the setting value or cycle through numeric characters A brief press of the Rotary Control will confirm the change and close the item Other items on that page can then be selected Long Push When a home screen is displayed holding the Rotary Control pushed for more than 1 second will open the Main Menu page 28 Further quick pushes will open successive levels in the Main Menu If a menu is already ...

Page 26: ...he display it will be will continuously scrolled across the bottom of the display If there is no valid data on the selected input the source or input name will be displayed in red rather than the screen main colour white for the Main output or amber for the Headphone output In the example shown in Figure 17 no input has been selected Polarity Audiophiles also refer to this as the absolute phase If...

Page 27: ...tary control once The display will change to the Headphone home screen which will be shown in amber Figure 19 Repeating the process will set the Rotary control back to adjusting the Main output volume level Polarity This is also known as the Absolute Phase It has two settings in phase and out of phase As shown in Figure 18 the polarity has been set to in phase i e normal and the text Out phase in ...

Page 28: ... Input Source area of the Home screen Shutdown This is the recommended method of shutting the unit down and ensures that any changes made to the unit s settings will be stored in the system s memory and recalled when it is next turned on Use the Rotary control to highlight the shutdown option then briefly press the Rotary control A new menu page will open Use the Rotary control to select the Yes o...

Page 29: ...as shown Briefly press the Rotary control A screen like the one shown in Figure 21 will appear This shows the sources currently selected for both outputs In this particular example the Main output is connected to a source on the network We have called this PC Name but a network source name can be whatever has been set up on the computer or device concerned In this example the headphone output has ...

Page 30: ...on box in Figure 21 then follow the same procedure as for the Main source selection above Note The name of your network source may appear twice in the menu Once in the form PC Name and also as PC Name _Headphone In this case the second version is the one to choose On the 8 channel version of the NADAC MC8 the headphone output can also be set to monitor each pair of the Main output channels i e 1 2...

Page 31: ...o confirm the setting briefly press the Rotary Control again The trim settings should normally set to 0dB For the stereo unit ST2 this setting can be used as a balance control To make the left channel sound louder reduce the channel 2 trim level To make the right channel sound louder reduce the channel 1 trim level Channel Polarity Use the Rotary Control to outline the symbol for the channel polar...

Page 32: ...tline the Languages options box in Figure 25 then briefly press the Rotary Control and a list of the languages available will be displayed Figure 26 Use the Rotary Control to highlight the required language then briefly press the control The display will revert to the System menu Figure 25 with the new system language shown in the Languages option box Main Mode The 8 channel unit MC8 can be switch...

Page 33: ...l to outline the Main max level options box in the System menu Figure 25 the briefly press the Rotary Control and the output levels available will be displayed Figure 28 The asterisk shows which level is currently selected Use the Rotary Control to highlight the required output level then briefly press it again to confirm the selection The display will revert to the System menu Figure 25 with the ...

Page 34: ... external World Clock generator were to be used We recommend that you try any such device before you commit to buying it Instructions on how to connect a Word Clock may be found on page 18 Also please see the notes on synchronization on page 40 When a professional grade Word Clock generator is used it is standard practice to connect a 75Ω resistor across the word clock input This is to ensure that...

Page 35: ...wer button illumination brightness Turning the Rotary Control clockwise will increase the number in the box and also increase the power button illumination brightness When the required illumination level has been set briefly press the Rotary Control to confirm the selection The display will revert to the System menu Figure 25 with the new power button illumination setting shown in the Badge Dim op...

Page 36: ... the IP settings to be set either manually or automatically If Auto is selected The IP address will be automatically attributed using ZeroConf Auto IP mechanism address range 169 254 xx xx if no DHCP server is present The Address and Netmask lines in the menu will be greyed out and the cursor will always skip these lines in the menu If Manual selected The user can enter a fixed IP address as shown...

Page 37: ...rently selected Netmask Use the control to highlight the required Netmask setting and briefly press the control again The display will revert to the Network menu Figure 31 with the new setting shown in the Netmask option box If you have changed the IP address or Netmask setting you must complete the next step Apply If you have made any changes to the network settings you must save the new settings...

Page 38: ...the Info menu From the home screen press and hold the Rotary Control until the Main menu top screen appears Figure 20 Use the Rotary Control to highlight Setup then briefly press the control This will open the Setup menu Figure 33 Use the Rotary Control to highlight Info briefly press the control again and the Info menu will appear Figure 34 Figure 33 Setup menu Figure 34 Info menu ...

Page 39: ...he Rotary Control This will open the Shutdown select page Figure 37 Use the Rotary Control to outline the Yes box then briefly press the Rotary Control The unit will then start to shut down This will take about 10 seconds Do not attempt to switch the unit off using the front panel power button or the switch on the rear panel power inlet as we cannot guarantee that the unit s settings will be corre...

Page 40: ...ight Reset to Factory in the Exit menu figure 40 then briefly press the Rotary Control This will open the Reset to Factory select page figure 41 Use the Rotary Control to outline the Yes box then briefly press the control The unit will then shut down and restart with the factory default settings Figure 40 Exit menu Figure 41 Factory reset select Figure 38 Exit menu Figure 39 Maintenance select ...

Page 41: ...he base sample rate for DSD The unit will automatically synchronize to an external word clock generator when the following conditions are met a An audio source connected via the Ethernet RAVENNA input has been selected b The base sample rate of the generator clock matches the base sample rate of the input audio data stream If the base sample rate does not match the unit will use its internal clock...

Page 42: ...hat the NADAC will meet its published specifications if Ethernet cables meeting at least CAT5E or CAT6 standards are used Please bear this in mind if you wish to use your own cable Using a lower quality cable may compromise the system s performance 2 Connect the Ethernet cable to the Network input socket on the rear of the unit Figure 6 If you are unfamiliar with connecting and removing network co...

Page 43: ... Figure 44 Use the Rotary Control to outline the Main source option box as shown 3 Briefly press the Rotary Control The source options menu will appear Figure 45 The example shown here is with the Zone menu in the MERGING NADAC Settings panel set to Main Headphone Note The name of your network source may appear twice in the Source options menu Once in the form PC Name and also as PC Name _Headphon...

Page 44: ...rst then select the network source for the headphone output If the network source name in the source options menu appears in red this indicates that the source is not valid Please verify the network connections and configuration Please also refer to the trouble shooting section of this manual on page 65 Configuration example Figure 46 Peer to peer configuration example ...

Page 45: ...e Networks as they cannot be guaranteed to provide the level of performance required 1 Find the Ethernet cable that was supplied with your MERGING NADAC 2 Connect the Ethernet cable to the network input socket on the rear of the unit Figure 6 If you are unfamiliar with connecting and removing network connectors please refer to the section on Connecting the RAVENNA Ethernet cable on page 17 of this...

Page 46: ...chnologies Emotion software PC Name is the arbitrary name given to the network source in this Illustration 8 Tap the NADAC icon on the Devices page and the NADAC App Home page will open Figure 49 The word None in the centre of the bottom edge of the screen in this illustration indicates that no source is currently selected Figure 48 NADAC Ap Devices page Figure 49 NADAC App Home page ...

Page 47: ...dge of the page Figure 51 Note The name of your network source may appear twice in the Select Source page Once in the form PC Name and also as PC Name _Headphone In this case choose the first version Note The NADAC App only allows you to select sources to feed the Main output To select a source to feed the Headphone output you must either use the front panel menu page 28 or the web control interfa...

Page 48: ...nadac merging com Page 47 Configuration Examples Figure 52 NADAC connected to a home Gigabit router Figure 53 NADAC connected to a home network ...

Page 49: ...ll Gigabit switches worked reliably in our application We now find that the vast majority of Gigabit switches currently available will work without problems Details of Gigabit switches that Merging has tested and found to work properly https confluence merging com display PUBLICDOC Network switches validated For more information on network configuration options please visit this page on the Mergin...

Page 50: ...you uninstall the old driver first and restart the computer before proceeding If you are unsure how to uninstall the old ASIO driver please consult your Merging Technologies reseller 2 Download the MERGING NADAC RAVENNA ASIO driver installer for Windows from here The file you want will be in the section titled LATEST DOWNLOADS and the file name will start with NADAC driver and have an exe extensio...

Page 51: ... make any changes If there is more than one select the network port that the MERGING NADAC is connected to Zones Two zones will be available These are Main Delivers a stereo stream to the Main output Main Headphone Delivers two different stereo outputs one to the Main output and the other to the Headphone output Select the zone setting that is appropriate for your application For most users this w...

Page 52: ...at the unit cannot be reached on the network Clicking on the NADAC icon will give the cause of the error Example 1 Not Reachable Figure 57 Check your set up connections and reboot the unit Example 2 Wrong firmware version Please see page 69 for details on how to update the firmware If you require assistance please contact your Merging Technologies reseller 8 Select the NADAC RAVENNA ASIO driver wi...

Page 53: ...tion menu will appear Figure 61 Use the Rotary Control to highlight the network source Note The name of your network source may appear twice in the Main menu One in the form PC Name and also as PC Name _Headphone In this case the first version is the one to choose If you start your music server playing you should now have music from the Main output If the network source name in the source options ...

Page 54: ...m 44 1kHz up to 8FS 384 kHz DXD DSD64 and DSD128 DSD256 The driver can be used as default device and System alert device Installation Procedure 1 Connect the NADAC to the computer using the network cable switch on the NADAC and wait for it to complete the boot up process 2 Download the MERGING NADAC RAVENNA Core Audio Installer for MacOS here 3 Open the MERGING NADAC RAVENNA Core Audio Installer d...

Page 55: ...omputer to shut down and restart 7 Once the computer has restarted and completed the boot up process open the System Preferences by clicking on the Apple icon on the top left corner of the screen and click on System Preferences This will open the System Preferences panel Figure 65 Click on the NADAC icon which has been outlined in red in the illustration This will open the MERGING NADAC RAVENNA Co...

Page 56: ... about the status of the connection between the unit and your computer There are only two settings on this panel and in most cases the user will not need to make any changes These settings and the meanings of all the displays within the panel are explained below Figure 65 System Preferences panel Figure 66 MERGING NADAC RAVENNA Core Audio panel ...

Page 57: ...kHz to 384kHz or DSD64 DSD128 or DSD256 Driver Indicates the current status of the driver Red No MERGING NADAC available on the network verify your Ethernet port connection Green Running properly or streaming PTP The Precision Time Protocol PTP2 or IEEE 1588 2008 is at the heart of the RAVENNA protocol ensuring an ultimate clock precision of one nanosecond Green PTP locked Yellow PTP locking Red P...

Page 58: ...o driver within the Media Player application you will use Please refer to our specific applications guides if you need further information on how to do this 5 Once the Core Audio driver is configured refer to the unit s front panel display This should be showing the Main home screen Figure 71 shows an example of what this may look like though the sample rate and volume setting may be different Fig...

Page 59: ...also as PC Name _Headphone In this case the first version is the one to choose 8 The source option menu will appear Figure 74 Use the Rotary Control to highlight the network source then briefly press the control If you start your music server playing you should have music from the main output If the network source name in the source options menu appears in red this indicates that the source is not...

Page 60: ...d It is supported under Windows 7 Windows 8 1 and Windows 10 64Bit OS Mac OS X The App is bundled in the MERGING NADAC Core Audio driver and is automatically installed when the Core Audio driver is installed Apple iOS Requires iOS 7 0 or later Compatible with iPhone iPad and iPod touch This software is available on the Apple Store free of charge Download from here https itunes apple com us app nad...

Page 61: ... All Apps Merging Technologies NADAC Panel It will be slightly different for earlier versions of Windows This will open the NADAC Ravenna ASIO panel Figure 76 There will be a NADAC icon shown in the Online RAVENNA Devices area at the bottom of the window for every unit on the network Click on the icon corresponding to the unit that you wish to control and the NADAC App Home page should open in a n...

Page 62: ...anel Figure 77 Click on the NADAC icon which has been outlined in red in the illustration This will open the MERGING NADAC RAVENNA Core Audio panel Figure 78 3 There will be a NADAC icon shown in the Online RAVENNA Devices area at the bottom of the window for every unit on the network Click on the icon corresponding to the unit that you wish to control and the NADAC App Home page should open in a ...

Page 63: ... iPad or iPhone is locked to the wireless signal from this router If all else fails close down file server software and the NADAC and then restart each in turn 3 In most cases the next window displayed will be the App Home page Figure 80 In this case go to step 4 Sometimes you will see the App s Devices page Figure 79 For each unit discovered on the network a NADAC icon showing the unit s serial n...

Page 64: ...n the icon is greyed out the absolute phase is normal and when it is shown in white it is inverted Change the source that the unit is connected to by clicking or tapping on the source name displayed just above page s bottom bar In Figure 80 this is shown as a source with the name EmotionPlayer_Stereo This will open the Select Source page Figure 81 Change the trim and polarity for each individual c...

Page 65: ...eft hand side of the page 7 The Trim Polarity page allows trim and polarity for each individual channel to be changed Figure 82 shows the page that will be displayed for an 8 channel unit For the stereo unit only 2 channels will be shown To change a channel trim move the slider horizontally To change a channel phase polarity click or tap the appropriate icon A grayed out icon indicates normal phas...

Page 66: ...ivirus and firewall applications you are using This should enable you to determine whether the problem is related to either of these types of applications Once you have finished these tests the antivirus software and firewall applications can be re enabled and the computer reconnected to the Internet If you find that the problem is related to either the antivirus or firewall application you are us...

Page 67: ...in order to use the web control interface Please contact nadac merging com for more information on this if needed 2 Make sure that your MERGING NADAC is connected to the same network as the system you wish to send the control and music data via and that it is configured with the correct IP settings In most cases this simply means ensuring that the IP Settings box in the front panel display Network...

Page 68: ...t bottom centre the sample rate of this source top right corner and the volume level setting screen centre Using the web interface The Web Interface allows you to Control the MERGING NADAC Main output volume level The Headphone output level can only be controlled via the front panel Rotary control Select the sources fed to the Main and Headphone outputs Adjusting the Main output volume level Ensur...

Page 69: ...lected and the screen will return to the sources screen Figure 85 Use the Back button in the bottom left hand corner of the screen to return to the main screen When a new source is selected the volume level will automatically be set to 20dB to avoid suddenly playing at an unexpectedly high level Headphone source Click on the Sources link at the bottom left corner of the main screen Figure 84 This ...

Page 70: ...the Main menu top screen appears Figure 87b Use the Rotary Control to select Exit then briefly press the Rotary Control to open the Exit menu Figure 87c Use the Rotary Control to select Maintenance then briefly press the Rotary Control to open the Maintenance menu Figure 87d Use the Rotary Control to outline the Yes box then briefly press the control to start the unit rebooting into Maintenance mo...

Page 71: ...he unit that you are about to perform a firmware update on Double click on this If you do not see a NADAC maintenance icon reboot the unit in Maintenance mode and check the Ethernet Connection between the unit and the computer you are using In this case you will have to shut the unit down by holding down the power button To use the Maintenance mode the unit must be set for automatic IP address sel...

Page 72: ...e by double clicking on the NADAC Maintenance Mode icon in either the NADAC RAVENNA ASIO Panel Figure 89 Windows systems or NADAC Core Audio Panel Figure 90 Mac systems 8 Click on the Select File button and choose the firmware file NADAC that you have previously downloaded and then click on the Open button 9 Wait a few seconds for the filename of the new firmware to appear in the update window as ...

Page 73: ...start The firmware update window on the computer will change to that shown in Figure 95 and the update progress will be shown by a progress bar on the unit s front panel display The unit s power button light will blink red during the update process During this procedure do not update or refresh your browser until the process is completed Pressing F5 on a Windows computer will refresh the browser T...

Page 74: ... again to your preferred IP address using the units Network menu see page 35 If the Firmware update procedure fails the screen shown in Figure 97 will usually be displayed Press the Try Again button to repeat the update process and follow these instructions starting at step 7 Alternatively use your browser s go back button to return to the screen shown in Figure 92 the firmware again and re update...

Page 75: ...nadac merging com Page 74 ...

Reviews: