background image

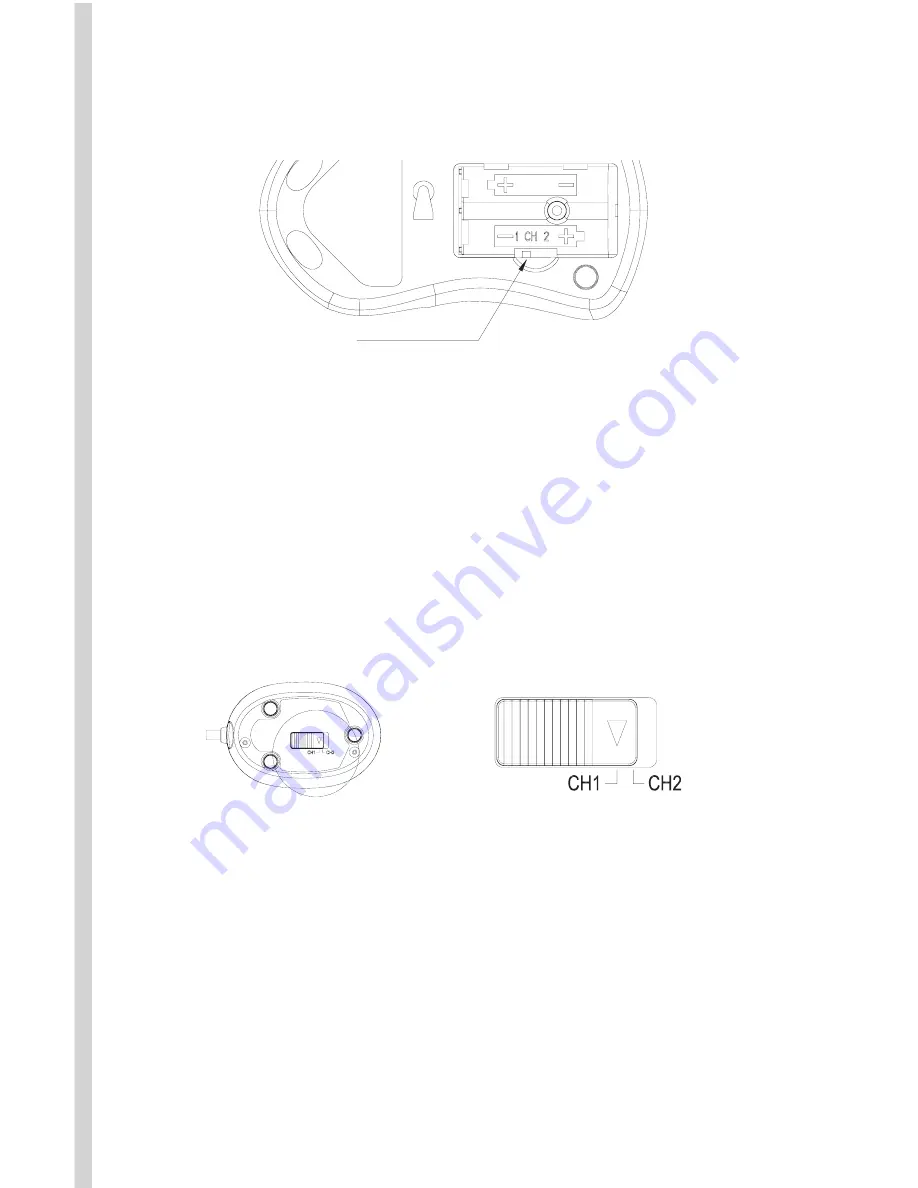
• Use the slide switch located inside the battery compartment to 

select either channel 1 or channel 2 for the RF transmission. 
Remember which channel you select, as the receiver switch will need
to be set to the same channel number a little later.

• Insert the two AAA  batteries (included) into the compartment. 

Follow the polarity signs (+ and -) in the battery compartment so the
batteries face the correct direction.  

• Replace the battery compartment cover by first inserting the two 

bottom tabs into their holes and lightly pressing down.

• To connect using a PS/2 Mouse Port:  

o  Attach the included green PS/2 adapter to the end of the 

receiver cable. 

o  Turn your computer off. 
o  Connect the receiver to the PC by plugging in the green PS/2 

connector at the end of the receiver to the mouse port of the 
computer. 

Channel Switch

Bottom View of Receiver 

Slide Switch Setting of Receiver 

Step 2:  Set up the Receiver

• Turn the receiver over and find the RF channel slide switch.  Select 

the same channel, either channel 1 or channel 2, that you selected 
on the mouse before you inserted the batteries.


Summary of Contents for Optical ScrollPro SE

Page 1: ...5 Button Programmable Mouse Wireless ScrollPro SE GUIDE user s user s Version 1 0 Optical Mouse USB PS 2 RF Wireless...

Page 2: ...reless Receiver ScrollPro Mouse Series Driver CD 2 AAA Batteries C System Requirements IBM or compatible PC PS 2 Mouse Port or USB port CD ROM or DVD drive for driver installation Users without an opt...

Page 3: ...cover by first inserting the two bottom tabs into their holes and lightly pressing down To connect using a PS 2 Mouse Port o Attach the included green PS 2 adapter to the end of the receiver cable o...

Page 4: ...xt step is to match the IDs of the mouse and receiver through the synchronization process so that they can communicate with each other The receiver and the mouse each contain two chan nels and each ch...

Page 5: ...well but will not be able to use the special Speed Zoom In and button features These additional features require the installation of the drivers on the ScrollPro Mouse Series Driver CD Follow the step...

Page 6: ...tab look for the MOUSE listing under the devices Double click on MOUSE then right click on the device that is listed Select REMOVE to delete the driver If there is more than one mouse device remove t...

Page 7: ...ming options wheel and button Wheel Choose the Wheel Mode you prefer o The System default Intelli Mouse mode setting is standard scrolling up and down with the scroll wheel o Enhanced scroll mode allo...

Page 8: ...re three buttons that can be programmed button 3 4 and 5 Clicking on one of the choices will display a number on the picture of the mouse to identify the number with the button it represents Each butt...

Page 9: ...to place the receiver at least 8 inches away from the monitor and other electronic devices in order to prevent signal disturbances Place the receiver on non metallic surfaces for the best reception g...

Page 10: ......

Page 11: ...of the FCC Rules These limits are designed to provide reasonable protection against harmful interference in a residential installation This equipment generates uses and can radiate radio frequency ene...

Reviews: