background image

20298 Aldi ES Final Cover.FH11   Wed Nov 03 16:44:39 2010      Seite 1     

Schwarz

C

M

Y

CM

MY

CY CMY

K

Manual de instrucciones & lista de códigos

Instruction manual & codelist

Bedienungsanleitung & Codeliste

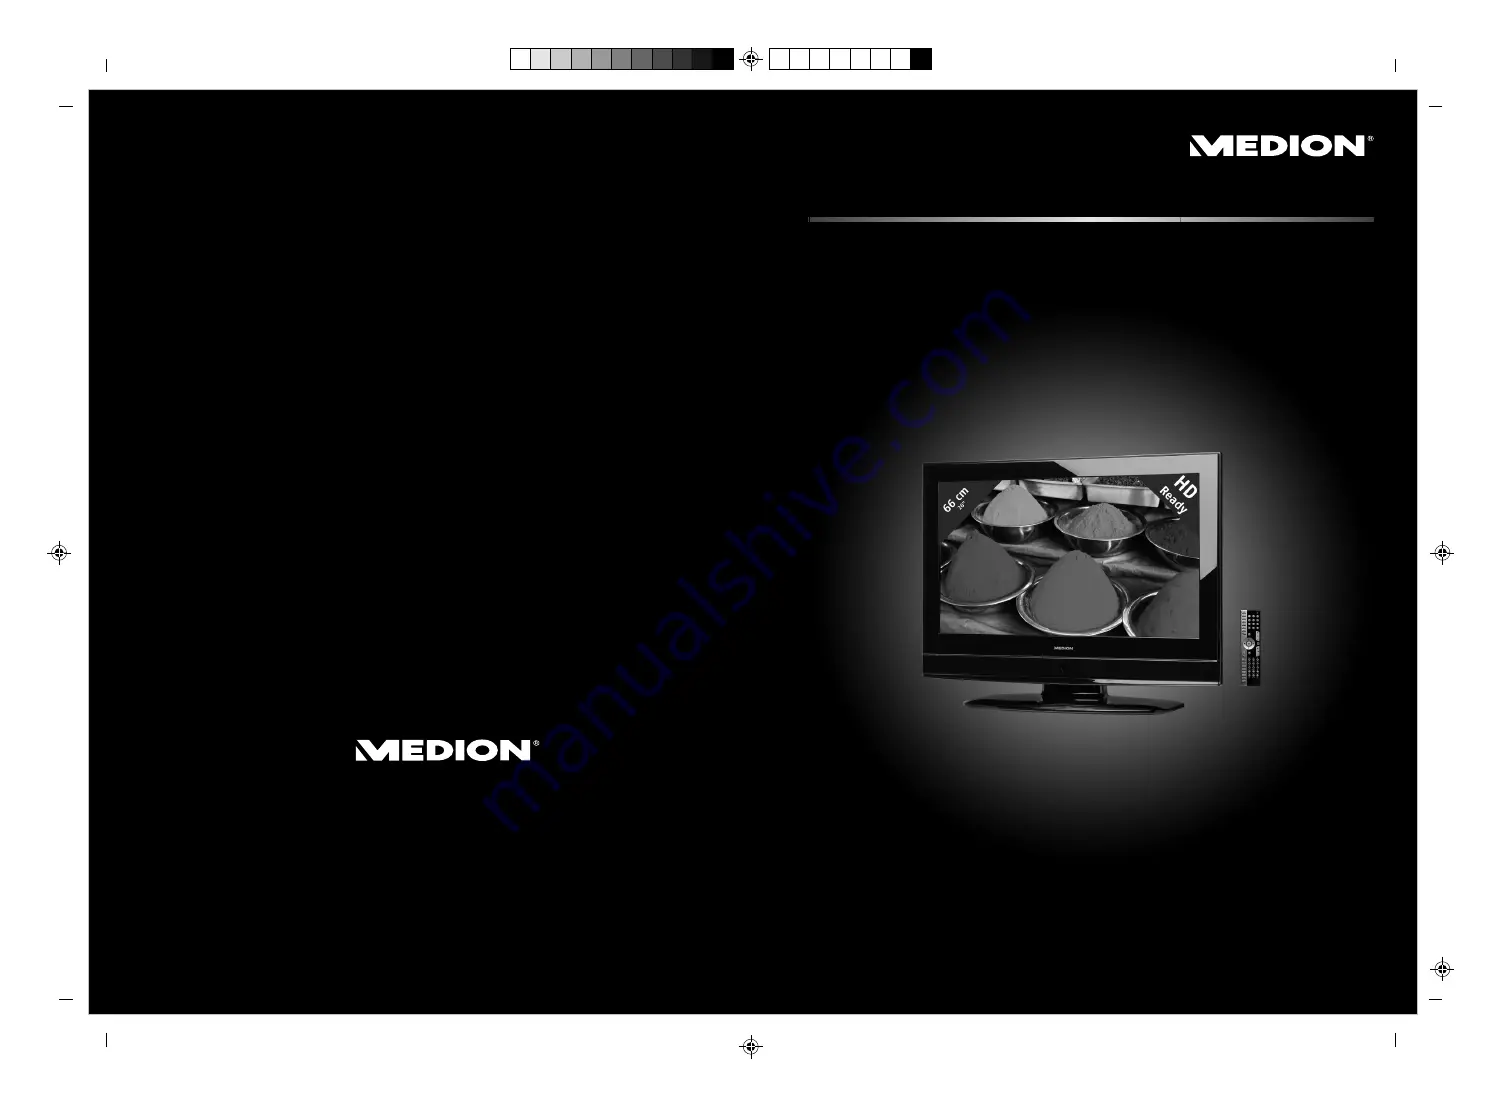
Televisor LCD de diseño de 66 cm/26"

con sintonizador HD TDT integrado

MEDION

®

 LIFE

®


E14008 (MD 20298)

IIIa/12/10

Medion Service Center

Visonic S.A.

c/ Miguel Faraday, 6

Parque Empresarial "La Carpetania", N-IV Km. 13

E-28906 Getafe, Madrid

España

Hotline: 902196437

Fax: 914604772

[email protected]

www.medion.es

Summary of Contents for LIFE E14008

Page 1: ...nual codelist Bedienungsanleitung Codeliste Televisor LCD de diseño de 66 cm 26 con sintonizador HD TDT integrado MEDION LIFE E14008 MD 20298 IIIa 12 10 Medion Service Center Visonic S A c Miguel Faraday 6 Parque Empresarial La Carpetania N IV Km 13 E 28906 Getafe Madrid España Hotline 902196437 Fax 914604772 service spain medion com www medion es ...

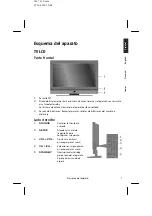
Page 2: ...ina de color azul cuando el aparato está conectado 3 Sensor de infrarrojos Receptor para las señales de infrarrojos del mando a distancia Lado derecho 1 SOURCE Cambiar la fuente de entrada 2 SETUP Acceder al menú de la pantalla para configurar su aparato 3 VOL VOL Ajustar el volumen o navegar por el menú 4 CH CH Seleccionar un programa o navegar por el menú 5 STANDBY Interruptor de standby para en...

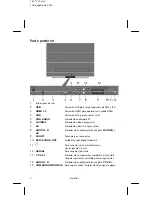
Page 3: ...7 AV Entrada de vídeo cinch amarillo 8 AUDIO L R Entradas de audio rojo blanco para S VIDEO y AV 9 SCART Toma para euroconector 10 SPDIF COAX OUT Salida de audio digital coaxial 11 Para conectar unos auriculares con clavija jack de 3 5 mm 12 AERIAL Para conectar la antena 13 Y Pb Pr Entradas de componentes verde azul rojo para conectar aparatos con salida para componentes 14 AUDIO L R Entradas de ...

Page 4: ...143 210 mm 27 10 2010 10 24 Esquema del aparato 3 Español English Deutsch Codes Mando a distancia ...

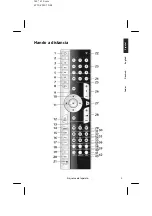
Page 5: ... Abrir y cerrar el menú de DVD 15 D DISPLAY DVD Muestra información del DVD insertado como capítulos tiempo reproducido etc 16 PROG Tecla roja DVD Programar la lista de reproducción del reproductor de DVD Tecla de color para el teletexto 17 INTRO Tecla verde DVD Función de reproducción de los primeros segundos de cada título Tecla de color para el teletexto 18 REPEAT Tecla amarilla DVD Ajustar el ...

Page 6: ...n de grabación 35 HOLD Teletexto Detener página DVD Próximo título próximo capítulo 36 FAV Emisora favorita anterior DVD Tecla STOP finalizar reproducción grabación 37 TEXT Activar o desactivar teletexto DVD Título anterior capítulo anterior 38 LANG AUDIO Ajustar norma de sonido en TV analógica DVD Selección de idioma en la reproducción de DVD 39 SUBPAGE ZOOM Teletexto Abrir subpágina DVD Función ...

Page 7: ...e emplazamiento 11 Reparación 11 Entorno previsto 12 Alimentación de corriente 12 Manejo de las pilas 13 Notas sobre la conformidad 13 Mando a distancia universal 14 Uso 14 Programar códigos de aparato 14 Introducir el código de aparato de la lista de códigos 14 Búsqueda manual de códigos 15 Búsqueda automática de códigos 15 Cada segundo o cada 3 segundos 16 Búsqueda decódigos por marcas 16 Identi...

Page 8: ...s de la primera conexión 21 Selección de programa 21 Ajustes de sonido 22 Ajustes de imagen 22 Visualizar información 23 Abrir listas de favoritos 23 Selección de la fuente 23 El modo multimedia 24 Formatos compatibles 24 Notas sobre el uso de USB 24 Cambiar del modo TV al modo multimedia 24 Sistema de menús multimedia 24 Teletexto 25 El control del teletexto 25 Seleccionar páginas 25 Teclas de co...

Page 9: ... grabadora de DVD o vídeo y un receptor SAT 39 Conectar una videocámara 40 Aparato con salida HDMI o DVI 40 Conectar un PC 41 Solución de problemas 42 Necesita más ayuda 44 Errores de píxeles en los TVs LCD 44 Limpieza 45 Eliminación 46 Especificaciones técnicas 47 Copyright 2010 Reservados todos los derechos Este manual está sujeto a la reserva de los derechos de autor Reservados todos los derech...

Page 10: ...do para ser utilizado únicamente en espacios interiores secos Este aparato no es adecuado como pantalla de datos para puestos de trabajo en oficinas Este aparato está previsto exclusivamente para el uso privado y no con fines industriales o comerciales El uso bajo condiciones ambientales extremas puede causar daños en su aparato HD ready Su TV LCD dispone de la característica HD ready Esto signifi...

Page 11: ... ranuras y aperturas descarga eléctrica cortocircuito y peligro de incendio Las ranuras y aperturas del TV LCD sirven para su ventilación No tape estas aberturas sobrecalentamiento peligro de incendio No ejerza presión sobre la pantalla Existe el peligro de que la pantalla se rompa El mando a distancia dispone de un diodo de infrarrojos de la clase 1 No mire el LED con aparatos ópticos Atención Si...

Page 12: ...obre el aparato El recipiente podría volcar y el líquido podría perjudicar la seguridad eléctrica No utilice el aparato cerca del agua ni lo coloque cerca de p ej lavabos fregaderos bañeras etc ATENCIÓN En todo momento hay que mantener velas y otras llamas alejadas de este producto para evitar que se propague el fuego Procure que haya una distancia suficiente dentro del mueble de pared Guarde una ...

Page 13: ...e antena de la toma de antena Alimentación de corriente Tenga en cuenta lo siguiente Aunque el interruptor de red esté apagado algunas piezas del aparato se encuentran bajo tensión Para interrumpir la alimentación eléctrica a su TV LCD o desconectar el aparato completamente desenchúfelo de la red eléctrica Enchufe el TV LCD exclusivamente a fuentes de corriente de 220 240 V 50 Hz y con toma de tie...

Page 14: ...inmediatamente las zonas afectadas con abundante agua limpia y consultar inmediatamente a un médico Evite golpes fuertes y sacudidas Tenga en cuenta la polaridad de las pilas Preste atención a que los polos positivo y negativo estén colocados correctamente para evitar cortocircuitos No deben mezclarse pilas nuevas y viejas o pilas de diferentes tipos Esto podría provocar causar fallos en el funcio...

Page 15: ... mando a distancia universal en una de las teclas de fuente STB DVD VCR AUX respectivamente Las indicaciones en las teclas solamente sirven como ayuda para recordarlas A excepción de la tecla TV se puede programar cada tecla con cualquier aparato Modo Flex La tecla TV no se puede reprogramar Si desea programar una grabadora de vídeo como aparato inserte primero una cinta de vídeo Introducir el cód...

Page 16: ...igos preprogramados En determinados casos es posible que sólo estén disponibles las funciones principales más usuales En algunos modelos especiales de aparatos puede que no surta efecto el procedimiento descrito Búsqueda automática de códigos Si el aparato no responde al mando a distancia incluso después de haber probado todos los códigos correspondientes al tipo de aparato y a la marca en cuestió...

Page 17: ... le ofrece la posibilidad de buscar por marcas comerciales Las marcas comerciales se encuentran en la lista siguiente Proceda del siguiente modo Encienda manualmente el aparato en cuestión Pulse brevemente la tecla de fuente STB DVD VCR AUX que desee programar Mantenga pulsada la tecla CODE durante aprox 3 segundos hasta que el LED azul se quede encendido Introduzca el código de una cifra de acuer...

Page 18: ...ul se apagará en cuanto se haya pulsado la tecla de la cuarta cifra La identificación del código está concluida Funcionamiento normal Controlar aparatos por separado Cuando haya concluido la programación del mando a distancia para sus aparatos de audio vídeo el mando a distancia controlará las funciones principales más usuales igual que el mando original del respectivo aparato Oriente el mando a d...

Page 19: ...y apagar con la tecla Los aparatos que se hayan apagado de este modo se encenderán al ejecutar la función APAGAR TODO EPG Programación electrónica La tecla EPG EPG Electronic Program Guide tiene varias funciones según con qué código se ejecute En el caso de los códigos de televisores o receptores de satélite p ej SAT TV o TDT la tecla abre la guía electrónica de programación EPG En el caso de códi...

Page 20: ...o de que las traguen Rogamos guarde el material de embalaje y utilice sólo este mismo para transportar el televisor Atención No permita que los niños pequeños jueguen con el plástico Existe peligro de asfixia Colocación de las pilas en el mando a distancia Abra la tapa del compartimento de las pilas en la parte posterior del mando a distancia Coloque dos pilas del tipo R03 AAA 1 5 V en el comparti...

Page 21: ...tar la tarjeta de su proveedor A este respecto lea también la descripción en la página 28 Conexión de la antena de TDT Conecte la clavija de una antena de TDT a la toma de antena del aparato Conexión a la toma de corriente Conecte el enchufe a una toma de corriente de 220 240 V 50 Hz bien accesible Encender y apagar el TV LCD Coloque el interruptor de red en la posición I para suministrar corrient...

Page 22: ...a configuración del país influye en el orden en el que se guardan los programas Pulse OK Se iniciará la búsqueda Se buscarán los distintos tipos de emisiones siguiendo un orden Espere a que finalice el proceso Con la tecla MENU puede cancelar la búsqueda antes de tiempo Nota Si busca programas digitales no olvide conectar una antena de TDT Selección de programa Para seleccionar un programa pulse u...

Page 23: ...ido Ajustes de imagen Con la tecla PMODE se pueden seleccionar los siguientes modos de imagen Dinámico Estándar Leve Usuario El ajuste Usuario se puede definir en el menú IMAGEN Modo de imagen En función de la emisión actual las imágenes se transmitirán en formato 4 3 ó 16 9 Con la tecla SIZE se puede ajustar el formato de imagen Automática El formato emitido se ajusta automáticamente a la señal d...

Page 24: ...arezca la lista de favoritos Seleccione un programa con las teclas de dirección o con las teclas FAV FAV Selección de la fuente Con la tecla AV INPUT se accede a la lista de selección de fuentes Están a su disposición las siguientes fuentes ATV Funcionamiento del TV señal de antena analógica TDT Funcionamiento del TV señal de antena digital Media Medio en la conexión USB AV Aparato en la entrada A...

Page 25: ... desconecte el aparato USB varias veces seguidas A causa de ello podrían producirse daños físicos en el aparato USB y especialmente en el propio TV LCD Cambiar del modo TV al modo multimedia Con la tecla AV INPUT se accede a la lista de selección de fuentes Utilice las teclas de dirección para ir a Media Confirme su selección con la tecla OK Si desea regresar al modo TV repita este procedimiento y...

Page 26: ... el número de la página de teletexto deseada indicando las tres cifras directamente con las teclas numéricas El número de página seleccionado aparece en la esquina superior izquierda de la pantalla El contador de teletexto buscará hasta que haya encontrado el número de página seleccionado Con las teclas de dirección se hojea hacia delante y atrás a través de las páginas de teletexto Teclas de colo...

Page 27: ...cambio de página automático está interrumpido Vuelva a pulsar la tecla HOLD para volver a permitir el cambio de página automático REVELAR Para que se muestre la información oculta como p ej las soluciones de adivinanzas puzzles o concursos de preguntas y respuestas pulse la tecla REVEAL Al volver a pulsar la tecla REVEAL se vuelven a ocultar las respuestas TAMAÑO Esta función muestra la informació...

Page 28: ...tecla de dirección se abre un submenú no disponible en todos los menús Con la tecla LCD MENU se vuelve al menú superior Con las teclas de dirección se ajusta un valor deseado o se elige otra opción Con la tecla LCD MENU se cierra el menú confirmando a la vez la selección Tenga en cuenta que el menú se cierra automáticamente tras unos segundos si no se pulsa ninguna tecla Se pueden seleccionar los ...

Page 29: ...l Permite programar manualmente cada una de las emisoras en modo ATV Canal actual Seleccione aquí la emisora que desee editar Sistema de colores PAL SECAM Auto Para España está ajustado el sistema de color PAL Sistema de son BG DK L I Para España está ajustado el sistema de sonido BG Ajuste fino Con pueden realizarse ajustes finos AFC Ajuste la sintonización fina automática a Activada si desea que...

Page 30: ...cla de dirección a la letra siguiente etc Al final pulse otra vez la tecla verde INTRO para guardar el nombre Mover Seleccione el programa y pulse la tecla amarilla REPEAT Desplace el programa con a la posición deseada y vuelva a pulsar otra vez la tecla amarilla REPEAT Los otros programas también se desplazan en correspondencia Saltar Seleccione el programa que desee omitir al saltar por los prog...

Page 31: ...o está en modo STANDBY o desconectado de la red eléctrica El módulo CAM debe estar orientado correctamente Si se orienta al revés no se puede insertar El módulo CAM o el televisor se pueden dañar si intenta insertar el módulo CAM a la fuerza Enchufe el televisor a la red eléctrica enciéndalo y espere un momento a que se reconozca la tarjeta En el caso de algunos módulos CAM es necesario realizar a...

Page 32: ...traste Reducir o aumentar el contraste escala 0 100 Brillo Reducir o aumentar el brillo escala 0 100 Color Reducir o aumentar el color escala 0 100 Matiz Los ajustes del tono de color sólo están disponibles para la recepción NTSC Nitidez Reducir o aumentar la nitidez escala 0 10 Temperatura de color Selección de la temperatura de color Fría Normal y Cálida Reducción de reuido Con esta función se p...

Page 33: ...os Reducir o aumentar los graves escala 0 100 Equilibrio Permite ajustar el balance entre el altavoz izquierdo y el derecho Volumen automático La función AVL Automatic Volume Limiting compensa los diferentes volúmenes de sonido de los distintos programas emitidos Con el ajuste Desactivado se oye el volumen original Con el ajuste Activada se oye un volumen uniforme Sonido Surround Permite activar d...

Page 34: ... Permite ajustar la zona horaria Esta opción sólo está disponible en modo TDT Temp dormir Elija un periodo de tiempo tras el cual el aparato se apagará automáticamente Seleccione Desactivado para desactivar la función Desconexión autom Ajuste la hora tras la cual se apagará automáticamente el TV LCD Tiempo OSD Aquí se puede ajustar el tiempo tras el cual el menú OSD se cierra automáticamente ...

Page 35: ...ábrica es 0000 Introducir contraseña nueva Introduzca una nueva contraseña de cuatro cifras Confirmar nueva contraseña Vuelva a introducir la nueva contraseña Aparecerá un mensaje correspondiente En caso de olvidar la contraseña deberá ejecutar una primera instalación para restablecer los ajustes de fábrica Bloquear programa Defina aquí las emisoras que desee bloquear Indicación de la edad Aquí se...

Page 36: ...e audio especiales para sordos la opción se puede ajustar a Activada para recibir estas señales Esta opción sólo está disponible en modo DTV Relación asp Permite ajustar el formato de imagen Esta función corresponde a la tecla SIZE Pantalla azur Cuando el TV LCD no recibe ninguna señal aparece un fondo azul en lugar de la imagen de nieve o una pantalla negra Instalación de tiempo primero Aquí se a...

Page 37: ...puede dañar su capacidad auditiva Amplificador digital con conexión coaxial Con la conexión SPDIF Coax OUT tiene la posibilidad de reproducir la señal de audio del TV LCD mediante un amplificador digital Para ello deberá conectar un cable coaxial con la toma SPDIF Coax OUT del TV LCD y la entrada correspondiente del amplificador Conectar un reproductor de DVD Para conectar un reproductor de DVD di...

Page 38: ...blanca a las entradas AUDIO L R 4 Con un cable HDMI Si su aparato externo dispone de una salida HDMI conecte un cable HDMI no incluido en el suministro con la entrada HDMI del TV LCD y la salida HDMI del aparato externo Conectar una grabadora de vídeo Conecte un cable de antena con la toma de antena del TV LCD y la salida de antena de la grabadora de vídeo Conecte otro cable de antena con la entra...

Page 39: ...das AUDIO L R Alternativa Si su grabadora de DVD dispone de una salida HDMI conecte un cable HDMI no incluido en el suministro con la entrada HDMI del TV LCD y la salida HDMI del aparato externo Conectar un receptor SAT TDT descodificador etc Tiene varias posibilidades para conectar al TV LCD un aparato que funcione como receptor para el televisor p ej receptor SAT receptor TDT descodificador 1 Co...

Page 40: ...una salida HDMI conecte un cable HDMI no incluido en el suministro con la entrada HDMI del TV LCD y la salida HDMI del aparato externo Conectar una grabadora de DVD o vídeo y un receptor SAT Si se conectan simultáneamente una grabadora de DVD o de vídeo y un receptor SAT se puede emplear el siguiente tipo de conexión Conecte el receptor como se describe anteriormente Conecte ahora el receptor con ...

Page 41: ... conocidos en la actualidad incluido HDTV High Definition Television y por ello es también capaz de representar las resoluciones de 1080i sin pérdida de calidad Muchos aparatos electrónicos recreativos como los reproductores de DVD están actualmente equipados con salidas HDMI Conectar un aparato externo con salida HDMI Apague los dos aparatos Conecte un cable HDMI no incluido en el suministro a la...

Page 42: ...ca del PC o del ordenador portátil Apriete los tornillos del cable de pantalla con los dedos de tal manera que las clavijas queden bien sujetas en las tomas Si también desea transmitir el sonido conecte un cable de audio a la toma PC AUDIO IN y a la salida de audio del PC portátil Primero encienda el TV LCD A continuación encienda el PC ordenador portátil Si utiliza el TV LCD como segunda pantalla...

Page 43: ...be si el contraste y el brillo están correctamente ajustados Compruebe si todos los aparatos externos están correctamente conectados Compruebe si está seleccionada la fuente AV correcta No se oye ningún sonido Asegúrese de que el volumen no esté ajustado al mínimo Asegúrese de que la función sin sonido no está activada No se recibe ninguna imagen o ningún sonido Pero se oyen ruidos Posiblemente la...

Page 44: ... pilas del mando a distancia están cargadas y colocadas con las polaridades correctas Asegúrese de que la ventana del sensor no esté expuesta a una radiación de luz demasiado fuerte Apague el aparato con el interruptor del adaptador de red y vuelva a encenderlo Compruebe si la función TV está activada pulsando la tecla TV del mando a distancia Para la marca de mi aparato hay listados varios código...

Page 45: ...iva con una resolución de 1366 x 768 píxeles que están compuestos por tres subpíxeles cada uno rojo verde azul en total se emplean aprox 3 2 millones de elementos de excitación Debido al enorme número de transistores y del proceso de fabricación especialmente complejo que éste conlleva en pocos casos se pueden producir fallos o una excitación errónea de píxeles o de determinados subpíxeles Descrip...

Page 46: ...abrillantadas estén sucias elimine primero el polvo A continuación pase un paño suavemente Si no elimina primero el polvo o si frota con demasiada fuerza la superficie pulida ésta podría arrañarse No utilice disolventes productos de limpieza cáusticos o aerosoles Limpie la pantalla con un paño suave que no suelte pelusas Procure que no queden gotas de agua en el TV LCD El agua puede causar una dec...

Page 47: ...harse de forma respetuosa con el medio ambiente y ser devueltos al circuito de reciclaje Aparato No tire bajo ningún concepto el aparato al final de su vida útil a la basura doméstica normal Infórmese sobre las posibilidades de las que dispone para eliminarlo de forma respetuosa con el medio ambiente Pilas No tire las pilas usadas a la basura doméstica Deben ser depositadas en un punto de recogida...

Page 48: ...éreo Nicam Posiciones de presintonía 199 ATV 400 DTV Entrada de antena 75 ohmios Conexiones Toma de antena analógica digital Conexión USB Vídeo 3 entradas HDMI con decodificación HDCP 1 euroconector 1 VGA D Sub de 15 pins Entrada de vídeo compuesto cinch Entrada de S Video Entrada de vídeo componente YUV 3 cinch Audio Entrada de audio estéreo para vídeo componentes YUV S Video cinch Entrada de aud...

Page 49: ... 5 V AAA R03 LR03 Tenga en cuenta que Si ocurriera que por una combinación de acciones no prevista un intercambio erróneo de datos o una descarga electrostática Electro Static Discharge no se puede controlar el TV LCD desconéctelo en este caso de la toma de corriente eléctrica y a continuación vuelva a ponerlo en funcionamiento ...

Page 50: ...ue when the appliance is switched on 3 Infrared sensor reception field for the infrared remote control signals Right side 1 SOURCE Change input source 2 SETUP Call up on screen menu to make the settings on your device 3 VOL VOL Adjust the volume or navigate in the menu 4 CH CH Choose a channel or navigate in the menu 5 STANDBY Standby switch switch on the device or switch to standby mode ...

Page 51: ...composite 7 AV Video input cinch yellow 8 AUDIO L R Audio inputs red white for S VIDEO and AV 9 SCART SCART socket 10 SPDIF COAX OUT Digital audio output coax 11 Connection facility for headphones with 3 5mm jack plug 12 AERIAL Aerial connection facility 13 Y Pb Pr Component inputs green blue red to connect devices with component output 14 AUDIO L R Audio inputs red white for Y Pb Pr 15 COMMON INT...

Page 52: ...143 210 mm 17 Aug 2010 Overview of the device 3 Español English Deutsch Codes Remote control ...

Page 53: ...pen and close DVD menu 15 D DISPLAY DVD Displays information on DVD currently inserted e g section playback time elapsed etc 16 PROG Red button DVD Program playback list of DVD player Colour button for use in videotext 17 INTRO Green button DVD Introduction function Colour button for use in videotext 18 REPEAT Yellow button DVD Setting the playback mode Colour button for use in videotext 19 A B Bl...

Page 54: ... DVD Recording function 35 HOLD Videotext Stop page DVD Next title next section 36 FAV Previous favourites station DVD STOP button end playback recording 37 TEXT Switch videotext on and off DVD Previous title previous section 38 LANG AUDIO Set sound standard in analogue TV DVD Language selection in DVD playback 39 SUBPAGE ZOOM Videotext Open subpage DVD Zoom function for DVD player 40 REVEAL ANGLE...

Page 55: ...on 11 Repairs 11 Intended environment 12 Power supply 12 Handling the batteries 13 Notes on conformity 13 Universal remote control 14 Using the remote control 14 Device codes 14 Entering the device code according to code list 14 Manual code search 15 Automatic code search 15 One second or three second intervals 16 Code search by brand name 16 Code identification 17 Normal operation 17 Operating in...

Page 56: ...f 20 After switching on the device for the first time 21 Programme selection 21 Sound settings 22 Picture settings 22 Display information 23 Opening the favourites list 23 Selecting the source 23 Media mode 24 Supported formats 24 Notes on using USB 24 Switching between TV mode and media mode 24 Media menu system 24 Videotext 25 Using the videotext 25 Selecting pages 25 Colour buttons 25 SUBPAGE 2...

Page 57: ... decoder etc 37 Connecting a DVD or video recorder and SAT receiver 38 Connecting a camcorder 39 Device with HDMI or DVI output 39 Connecting a PC 40 Troubleshooting 41 Do you need more help 43 Pixel faults with LCD TVs 43 Cleaning 44 Disposal 45 Technical data 46 Copyright 2010 All rights reserved This manual is protected by copyright All rights reserved Mechanical electronic and any other form o...

Page 58: ...doors in dry conditions This device is not suitable for use as a data monitor for office workplaces This device is solely intended for private use and not for industrial or commercial use The device may be damaged if used in extreme environmental conditions HD ready Your LCD TV is equipped with the HD ready feature This means in principle that it can play back high resolution television programmes...

Page 59: ... the inside of the LCD TV risk of electric shock short circuit and fire hazard The slots and openings on the LCD TV are for ventilation purposes Do not cover these openings overheating fire risk Do not put any pressure on the screen There is a risk that the screen may break The universal remote control has a class 1 infrared diode Do not use optical devices to look at the LED Caution There is a ri...

Page 60: ...illed with water such as vases on the device The vessel might tip over and the liquid might impair the electrical safety of the product Do not operate the device near water and do not set it up near a sink washbasin or bath etc CAUTION Candles and other naked flames must be kept away from this product at all times to prevent fire from spreading Make sure that there is enough clearance in the wall ...

Page 61: ...he mains socket and the aerial cable from the aerial socket Power supply Please note Even when the mains switch is off some components of the device are live In order to disconnect the power to your LCD TV or to completely isolate the device from voltage sources remove the mains plug from the mains socket Only plug the LCD TV into an earthed socket with 100 240 V 50 60 Hz Contact your electricity ...

Page 62: ...your doctor without delay Avoid heavy impacts and vibrations Always observe the correct polarity Make sure that the plus and minus poles are correctly inserted to avoid short circuits Do not mix up new and old batteries or different types of batteries This could cause your device to malfunction In addition the weaker batteries would discharge too much Remove flat batteries from the device immediat...

Page 63: ...device flex mode The TV button cannot be reprogrammed If you would like to program a video recorder as a device then insert a video cassette beforehand Entering the device code according to code list The codes of the corresponding devices can be found in the list of codes enclosed with these operating instructions Proceed as follows Switch on the relevant device manually Briefly press the required...

Page 64: ...evice type and the relevant brand then try using the automatic search This will enable you to find codes for brands that were not included in the device code list If you would like to program the source buttons STB DVD VCR or AUX with a different device than specified then you will have to first program a code of the desired device type during the automatic search For example You would like to use...

Page 65: ...lly Briefly press the required source button STB DVD VCR AUX Keep the CODE button pressed for approx three seconds until the blue LED stays lit Enter the one digit code according to the list Here s an excerpt Button 1 TEVION MEDION Button 2 Philips Radiola Philco Erres Pye Button 3 Sony Akai Panasonic JVC Sharp Toshiba Daewoo Button 4 Thomson Brandt Button 5 Saba Nordmende Telefunken Button 6 Grun...

Page 66: ...ourth number The blue LED will go out as soon as the button for the fourth number has been pressed The code identification process has now been completed Normal operation Operating individual devices After you have finished programming your remote control for your audio video devices the remote control will work in the most common functions just like the original remote control of the respective d...

Page 67: ...hed on and off with the button Devices switched off in this manner will be switched back on after carrying out the ALL OFF function EPG Electronic Programme Guide The EPG button EPG Electronic Program Guide has various functions depending on which code is being used With TV and satellite codes e g SAT TV or DVB T the button opens the Electronic Programme Guide EPG With DVD codes the button opens t...

Page 68: ...the parts are easy to swallow Store the packaging material in a safe place only use this box to transport the TV Caution Do not let small children play with the plastic wrapping This poses a risk of suffocation Inserting batteries in the remote control Open the battery compartment cover on the back of the remote control Insert two R03 AAA 1 5V batteries in the battery compartment of the remote con...

Page 69: ... into the CAM module If you plan to do this please read the instructions on page 27 Connecting the DVB T aerial Insert the plug of a DVB T aerial in the aerial socket of the device Connecting the power supply Plug the mains plug into a readily accessible 100 240 V 50 60 Hz mains socket Switching the LCD TV on and off Set the mains switch to I to supply the LCD TV with power The device switches to ...

Page 70: ...ect the country The country setting will affect the sequence in which the channels will be stored Press OK The search starts Searching occurs in the order of the various programme types Wait for it to finish You can use the MENU button to cancel the search prematurely Note Remember to connect a DVB T aerial if you are searching for digital programmes Programme selection To select a programme eithe...

Page 71: ...s defined in the menu SOUND Sound Mode Picture settings Use the PMODE button to switch between the following picture modes Dynamic Standard Mild Personal The Personal setting is defined in the menu PICTURE Picture Mode Depending on the programme the pictures are displayed in 4 3 or 16 9 format Use the SIZE button to adjust the picture format Auto The format displayed is automatically adjusted to m...

Page 72: ... Programme Edit see page 34 Press the button FAV to display the favourites list Use the direction buttons or the buttons FAV FAV to select a channel Selecting the source Use AV INPUT to call up the source selection list The following sources are available ATV TV mode analogue aerial signal DTV TV mode digital aerial signal Media Medium to USB connection AV Device at AV input PC Device at PC input ...

Page 73: ...vice in quick succession several times in a row This could physically damage the USB device and the LCD TV itself in particular Switching between TV mode and media mode Use AV INPUT to call up the source selection list Use the direction buttons to go to Media Confirm your selection by pressing OK Repeat this process to return to TV mode but instead of selecting Media choose the ATV or DTV option d...

Page 74: ...ree digit number of the required videotext page The selected page number is displayed in the top left corner of the screen The videotext counter searches as long as it takes to find the selected page number Use the direction buttons to scroll forwards or backwards through the videotext pages Colour buttons If colour text entries are displayed at the lower edge of the screen you can select the cont...

Page 75: ...bol is displayed in the top left hand corner of the screen and prevents the page from changing automatically Press the HOLD button once more to allow the pages to change automatically REVEAL Press the REVEAL button once to display hidden information such as the solutions to puzzles or quizzes Press the REVEAL button again to hide the answers SIZE This function displays the videotext information in...

Page 76: ...Use the direction button to access a sub menu not every menu has a sub menu option Press LCD MENU to return to the next higher menu Use the direction buttons to enter a required value or to make another selection Press LCD MENU to close the menu and also to confirm your selection Please remember that the menu closes automatically after a few seconds if you do not press any buttons You can select t...

Page 77: ...rogram individual channels in ATV mode manually here Current CH Use this to select the channel you would like to address Color System PAL SECAM Auto For Germany the colour system is set to PAL Sound System BG DK L I For Germany the sound system is set to BG Fine Tune Press to carry out the fine adjustment AFC Set the automatic fine adjustment to Ein if this is your continuous choice Search Start t...

Page 78: ...yellow button REPEAT again The other channels will be rearranged accordingly Skip Select the channel you would like to skip while scrolling through the channels using the buttons P and then press the blue button A B You can still select this channel by using the number buttons Fav To save a station to a favourites list highlight it and press the button FAV Call up the favourites list by using the ...

Page 79: ...mation menu Manually storing the video recorder You can use the manual programme search to adjust a video recorder to the LCD TV for example After connecting the LCD TV with the video recorder using the aerial cable see connecting the video recorder page 36 set your video recorder to the test signal Perform a manual channel search with the LCD TV PICTURE menu Menu item Setting Picture Mode Select ...

Page 80: ...ard Music Movie Sports Personal This function corresponds to the SMODE button The Personal setting lets you set the Treble Bass and Balance yourself The other parameters are defined Treble Increase or decrease treble on a scale of 0 100 Bass Increase or decrease bass on a scale of 0 100 Balance Set the balance between the left and right speakers Auto Volume The function AVL Automatic Volume Limiti...

Page 81: ...zone This option is only available in DTV mode Sleep Timer Select a time after which the device should switch itself off automatically Select Off to end the function Auto Standby Set the time by which the LCD TV will switch itself off automatically here OSD Timer Here you can set the time after which the OSD menu will close automatically ...

Page 82: ... enter the existing password Delivery state 0000 Please enter new password Enter a new four digit password Confirm new password Enter the new password again The appropriate message will appear If you forget the password you will have to go through the initial settings procedure again to restore the delivery state Block Program Specify here which stations should be blocked Parental Guidance Here yo...

Page 83: ...hearing impaired you can set the setting to On to receive these signals This option is only available in DTV mode Aspect Ratio Set the picture format here This function corresponds to the button SIZE Blue Screen If the LCD TV is not receiving a signal the screen will turn blue instead of displaying the snow or a black background First Time Installation Here you can access the menu for the initial ...

Page 84: ...period can damage your hearing Digital amplifier via coaxial connection The SPDIF Coax OUT connection lets you play back the audio signal of your LCD TV through a digital amplifier To do so connect a coaxial cable to the SPDIF Coax OUT connection on the LCD TV and to the corresponding input of the amplifier Connecting a DVD player There are a number of options for connecting a DVD player 1 With a ...

Page 85: ...mission 4 With an HDMI cable If the external device has an HDMI output connect an HDMI cable not supplied between the HDMI input on the LCD TV and the HDMI output on the external device Connecting a video recorder Connect an aerial cable between the aerial socket on the LCD TV and the output on the video recorder Connect an additional aerial cable between the aerial input on the video recorder and...

Page 86: ... AUDIO L R inputs for sound transmission Alternative If the DVD recorder has an HDMI output connect an HDMI cable not supplied between the HDMI input on the LCD TV and the HDMI output on the external appliance Connecting a receiver SAT DVB T decoder etc There are different options for connecting a receiver e g SAT receiver DVB T receiver decoder set top box to your LCD TV 1 With a SCART cable Use ...

Page 87: ...MI cable not supplied between the HDMI input on the LCD TV and the HDMI output on the external device Connecting a DVD or video recorder and SAT receiver If you want to connect a DVD recorder or video recorder and a SAT receiver at the same time you can do so as follows Connect the receiver as described above Now connect the receiver using a SCART cable plugged into the SCART output on the DVD rec...

Page 88: ...image and sound formats currently in use including HDTV High Definition TV which means it can also display resolutions of 1080i without any loss in quality Many consumer electronic devices e g DVD players are now equipped with HDMI outputs Connecting an external device with HDMI output Switch off both devices Connect an HDMI cable not supplied to the HDMI input of the LCD TV and to the HDMI output...

Page 89: ...ut of the PC or notebook Tighten up the screws of the monitor cable with your fingers so that the plug is correctly seated in the socket If you want to transmit a sound signal connect an audio cable from the PC AUDIO IN socket and PC notebook Audio output First switch on the LCD TV Then switch on the PC notebook If you use the LCD TV as a second monitor for your PC you might have to change the dis...

Page 90: ... no AV picture Check to ensure the contrast and brightness settings are correct Check if all external devices have been connected properly Check to ensure you have selected the correct AV source There is no sound Ensure that the volume has not been set to the minimum level Ensure that the mute setting is not active There is no picture and no sound I can hear noise though The reception might be poo...

Page 91: ...g Check if the batteries are fully charged and have been inserted in the right direction Ensure that the sensor field is not exposed to strong light Switch off the device at the power socket and then on again Check if the TV function is active by pressing the TV button on the remote control There are several device codes listed under the brand name of my device How do I determine the correct devic...

Page 92: ... or multiple pixel drop outs dead pixels For active matrix TFTs with a resolution of 1366 x 768 pixels which are each made up of three sub pixels red green blue there are a total of approx 3 2 million control elements in use Occasionally one or more pixels can fail or be controlled incorrectly because of this very high number of transistors and the extremely complex manufacturing process associate...

Page 93: ...with a cleaning cloth If you do not wipe off the dust first or if you apply too much pressure when wiping down the high gloss finish you could scratch the high gloss finish Do not use solvents caustic agents or aerosol detergent to clean the product Clean the screen with a soft lint free cloth Ensure that no water droplets remain on the LCD TV Water droplets may result in permanent discolouration ...

Page 94: ...ing is made of environmentally friendly material which can be recycled Device At the end of its service life the device should not be disposed of with the household rubbish Please enquire about the options for environmentally friendly disposal Batteries Do not dispose of used batteries in the household rubbish They should be taken to a collection point for used batteries ...

Page 95: ...udio Stereo Nicam Channel positions 199 ATV 400 DTV Aerial input 75 ohm Connections Aerial connection analogue digital USB connection Video 3X HDMI In with HDCP decoding 1x SCART 1x VGA 15 pin D Sub Composite Video In Cinch S video In Component Video In YUV 3 Cinch Audio Stereo Audio In for Component Video YUV S Video Cinch Stereo Audio In for PC Cinch Headphone output 3 5 mm jack Digital Audio Ou...

Page 96: ... classification 1 Battery type 2x 1 5V AAA R03 LR03 Please note If as a result of an unforeseeable combination of operating steps faulty data transfer or electrostatic discharge the LCD TV can no longer be operated always unplug the power cable from the mains and then reconnect and switch on the device ...

Page 97: ...143 210 mm 17 Aug 2010 English 48 ...

Page 98: ... das Gerät eingeschaltet ist 3 Infrarot Sensor Empfangsfeld für die Infrarot Signale der Fernbedienung Rechte Seite 1 SOURCE Eingabequelle wechseln 2 SETUP das Bildschirm Menü aufrufen um Einstellungen an Ihrem Gerät vorzunehmen 3 VOL VOL die Lautstärke einstellen oder im Menü navigieren 4 CH CH ein Programm auswählen oder im Menü navigieren 5 STANDBY Standby Schalter das Gerät einschalten oder in...

Page 99: ...osite 7 AV Video Eingang Cinch gelb 8 AUDIO L R Audio Eingänge rot weiß für S VIDEO und AV 9 SCART SCART Buchse 10 SPDIF COAX OUT Digitaler Audio Ausgang koaxial 11 Zum Anschluss eines Kopfhörers mit 3 5 mm Klinkenstecker 12 AERIAL Zum Anschluss der Antenne 13 Y Pb Pr Komponenten Eingänge grün blau rot zum Anschluss von Geräten mit Komponenten Ausgang 14 AUDIO L R Audio Eingänge rot weiß für Y Pb ...

Page 100: ...143 210 mm 27 10 2010 10 24 Geräteübersicht 3 Español English Deutsch Codes Fernbedienung ...

Page 101: ...enü öffnen und schließen 15 D DISPLAY DVD zeigt Informationen der eingelegten DVD an wie z B Kapitel abgespielte Zeit etc 16 PROG Rote Taste DVD Abspielliste des DVD Players programmieren Farbtaste für die Benutzung im Videotext 17 INTRO Grüne Taste DVD Anspielfunktion Farbtaste für die Benutzung im Videotext 18 REPEAT Gelbe Taste DVD Wiedergabemodus des einstellen Farbtaste für die Benutzung im V...

Page 102: ...HOLD Videotext Seite anhalten DVD nächster Titel nächstes Kapitel 36 FAV vorheriger Favoritensender DVD STOP Taste Wiedergabe Aufnahme beenden 37 TEXT Videotext ein und ausschalten DVD Vorheriger Titel vorheriges Kapitel 38 LANG AUDIO Tonnorm im analog TV einstellen DVD Sprachauswahl in der DVD Wiedergabe 39 SUBPAGE ZOOM Videotext Unterseite öffnen DVD Zoomfunktion beim DVD Player 40 REVEAL ANGLE ...

Page 103: ...tellort 11 Reparatur 11 Vorgesehene Umgebung 12 Stromversorgung 12 Umgang mit Batterien 13 Hinweise zur Konformität 13 Universalfernbedienung 14 Anwendung 14 Gerätecodes programmieren 14 Gerätecode nach Code Liste eingeben 14 Manueller Code Suchlauf 15 Automatischer Code Suchlauf 15 1 Sekunden oder 3 Sekundentakt 16 Code Suche nach Handelsname 16 Code Identifizierung 17 Normaler Betrieb 17 Einzelg...

Page 104: ...sschalten 20 Nach dem ersten Einschalten 21 Programmauswahl 21 Toneinstellungen 22 Bildeinstellungen 22 Infos anzeigen lassen 23 Favoritenlisten öffnen 23 Quelle wählen 23 Der Media Modus 24 Unterstützte Formate 24 Hinweise zur USB Nutzung 24 Vom TV zum Media Modus wechseln 24 Media Menüsystem 24 Videotext 25 Die Bedienung des Videotexts 25 Seiten anwählen 25 Farbtasten 25 SUBPAGE 25 Nützliche Vid...

Page 105: ... DVD oder Videorekorder und SAT Receiver anschließen 39 Camcorder anschließen 40 Gerät mit HDMI oder DVI Ausgang 40 PC anschließen 41 Problembehebung 42 Benötigen Sie weitere Unterstützung 44 Pixelfehler bei LCD TVs 44 Reinigung 45 Entsorgung 46 Technische Daten 47 Copyright 2010 Alle Rechte vorbehalten Dieses Handbuch ist urheberrechtlich geschützt Alle Rechte vorbehalten Vervielfältigung in mech...

Page 106: ...Gebrauch in trockenen Innenräumen geeignet Dieses Gerät ist nicht als Datenmonitor für Büroarbeitsplätze geeignet Dieses Gerät ist ausschließlich für den Privatgebrauch gedacht und nicht für industrielle oder kommerzielle Nutzung vorgesehen Die Nutzung unter extremen Umgebungsbedingungen kann die Beschädigung Ihres Gerätes zur Folge haben HD ready Ihr LCD TV ist mit dem Merkmal HD ready ausgestatt...

Page 107: ...e des LCD TVs elektrischer Schlag Kurzschluss und Brandgefahr Schlitze und Öffnungen des LCD TVs dienen der Belüftung Decken Sie diese Öffnungen nicht ab Überhitzung Brandgefahr Üben Sie keinen Druck auf das Display aus Es besteht die Gefahr dass der Bildschirm bricht Die Fernbedienung besitzt eine Infrarot Diode der Klasse 1 Betrachten Sie die LED nicht mit optischen Geräten Achtung Bei gebrochen...

Page 108: ...en und die Flüssigkeit kann die elektrische Sicherheit beeinträchtigen Betreiben Sie das Gerät nicht in der Nähe von Wasser und platzieren Sie es nicht in der Nähe von z B Waschbecken Spülbecken Badewannen etc ACHTUNG Kerzen und andere offenen Flammen müssen zu jeder Zeit von diesem Produkt fern gehalten werden um das Ausbreiten von Feuer zu verhindern Achten Sie auf genügend große Abstände in der...

Page 109: ...tennenkabel aus der Antennenbuchse Stromversorgung Bitte beachten Sie Auch bei ausgeschaltetem Netzschalter sind Teile des Gerätes unter Spannung Um die Stromversorgung zu Ihrem LCD TV zu unterbrechen oder das Gerät gänzlich von Spannung frei zuschalten trennen Sie das Gerät vollständig vom Netz Betreiben Sie das LCD TV nur an geerdeten Steckdosen mit 220 240 V 50 Hz Wenn Sie sich der Stromversorg...

Page 110: ...umgehend Ihren Arzt Vermeiden Sie starke Stöße und Erschütterungen Vertauschen Sie niemals die Polarität Achten Sie darauf dass die Pole Plus und Minus korrekt eingesetzt sind um Kurzschlüsse zu vermeiden Vermischen Sie keine neuen und alten Batterien oder Batterien unterschiedlichen Typs Dies könnte bei Ihrem Gerät zu Fehlfunktionen führen Darüber hinaus würde sich die schwächere Batterie zu star...

Page 111: ...rät be legen Flex Mode Die Taste TV kann nicht umprogrammiert werden Wollen Sie einen Videorekorder als Gerät programmieren legen Sie vorher eine Videokassette ein Gerätecode nach Code Liste eingeben Die Codes der entsprechenden Geräte sind der Codeliste die dieser Bedienungsanleitung beiliegt zu entnehmen So gehen Sie vor Schalten Sie das betreffende Gerät manuell ein Drücken Sie die gewünschte Q...

Page 112: ...ühren Automatischer Code Suchlauf Wenn Ihr Gerät nicht auf die Fernbedienung anspricht obwohl Sie alle für Ihren Gerätetyp und die entsprechende Marke aufgeführten Codes ausprobiert haben versuchen Sie es mit dem automatischen Suchlauf Hierdurch können Sie auch Codes solcher Marken finden die in der Geräte Codeliste nicht aufgeführt sind Wenn Sie die Quellentasten STB DVD VCR oder AUX mit einem an...

Page 113: ...uchen Die Handelsnamen finden Sie in der untenstehenden Liste Gehen Sie wie folgt vor Schalten Sie das betreffende Gerät manuell ein Drücken Sie die gewünschte Quellentaste STB DVD VCR AUX kurz Halten Sie die Taste CODE für ca 3 Sekunden gedrückt bis die blaue LED dauerhaft aufleuchtet Geben Sie den einstelligen Code laut der Liste ein Nachstehend ein Auszug Taste 1 TEVION MEDION Taste 2 Philips R...

Page 114: ...rte Zahl Die blaue LED erlischt sobald die Taste für die vierte Zahl gedrückt wurde Die Code Identifizierung ist jetzt abgeschlossen Normaler Betrieb Einzelgeräte bedienen Nachdem Sie die Programmierung Ihrer Fernbedienung für Ihre Audio Video Geräte vorgenommen haben arbeitet die Fernbedienung in den gebräuchlichsten Hauptfunktionen wie die Original Fernbedienung des jeweiligen Gerätes Richten Si...

Page 115: ...und ausschalten Solche ausgeschalteten Geräte werden nach der Durchführung der ALLES AUS Funktion eingeschaltet EPG Elektronisches Programm Die Taste EPG EPG Electronic Program Guide hat verschiedene Funktionen je nachdem auf welchen Code sie angewendet wird Bei TV und Satellitencodes z B SAT TV oder DVB T öffnet die Taste das elektronische Fernsehprogramm EPG Bei DVD Codes öffnet die Taste das Ti...

Page 116: ...t die Gefahr des Verschluckens Bewahren Sie das Verpackungsmaterial bitte gut auf und benutzen Sie ausschließlich dieses um den Fernseher zu transportieren Achtung Lassen Sie kleine Kinder nicht mit Folie spielen Es besteht Erstickungsgefahr Batterien in die Fernbedienung einlegen Öffnen Sie die Batteriefachabdeckung auf der Rückseite der Fernbedienung Legen Sie zwei Batterien vom Typ R03 AAA 1 5 ...

Page 117: ... das CAM Modul stecken Sie anschließend die Karte Ihres Anbieters Lesen Sie dazu auch die Beschreibung auf Seite 28 DVB T Antenne anschließen Stecken Sie den Stecker einer DVB T Antenne in die Antennenbuchse des Gerätes Stromversorgung anschließen Verbinden Sie den Netzstecker mit einer gut erreichbaren Netzsteckdose 220 240 V 50 Hz LCD TV ein und ausschalten Stellen Sie den Netzschalter auf die S...

Page 118: ...Einfluss auf die Reihenfolge in der die Programme gespeichert werden Drücken Sie OK Die Suche startet Es wird der Reihe nach nach den unterschiedlichen Sendungstypen gesucht Warten Sie das Ende ab Mit der Taste MENU können Sie die Suche vorzeitig abbrechen Hinweis Denken Sie daran eine DVB T Antenne anzuschließen wenn Sie nach digitalen Programmen suchen Programmauswahl Um ein Programm auszuwählen...

Page 119: ...iniert Bildeinstellungen Mit der Taste PMODE wählen Sie zwischen den Bildmodi Dynamisch Standard Mild Persönlich Die Einstellung Persönlich wird im Menü BILD Bildmodus definiert Abhängig von der Sendung werden Bilder im Format 4 3 oder 16 9 übertragen Mit der Taste SIZE können Sie das Bildformat anpassen Automatisch Das wiedergegebene Format wird automatisch auf das Eingangssignal eingestellt 4 3 ...

Page 120: ...Drücken Sie die Taste FAV um sich die Favoritenliste anzeigen zu lassen Wählen Sie mit den Richtungstasten oder mit den Tasten FAV FAV ein Programm aus Quelle wählen Mit der Taste AV INPUT rufen Sie die Auswahlliste der Quellen an Folgende Quellen stehen Ihnen zur Verfügung ATV TV Betrieb analoges Antennensignal DTV TV Betrieb digitales Antennensignal Media Medium am USB Anschluss AV Gerät am AV E...

Page 121: ... ein und wieder abstecken Dadurch könnten physische Schäden am USB Gerät und besonders am LCD TV selbst entstehen Vom TV zum Media Modus wechseln Mit der Taste AV INPUT rufen Sie die Auswahlliste der Quellen auf Über die Richtungstasten gehen Sie zu Media Bestätigen Sie Ihre Wahl mit der Taste OK Wenn Sie zum TV Modus zurückkehren wollen wiederholen Sie diesen Vorgang und wählen statt Media die Op...

Page 122: ...V Modus zu wechseln Seiten anwählen Geben Sie die gewünschte Videotextseite als dreistellige Nummer direkt mit den Zifferntasten ein Die gewählte Seitenzahl wird in der linken oberen Ecke des Bildschirms angezeigt Der Videotextzähler sucht solange bis die gewählte Seitennummer gefunden ist Mit den Richtungstasten blättern Sie vor und zurück durch die Videotextseiten Farbtasten Wenn am unteren Bild...

Page 123: ...el zu verhindern Der automatische Seitenwechsel ist unterbrochen Drücken Sie erneut die Taste HOLD um den automatischen Seitenwechsel wieder zuzulassen REVEAL Um verborgene Information wie z B die Lösungen von Rätseln Puzzle oder Quiz anzuzeigen drücken Sie einmal auf die Taste REVEAL Nochmaliges Drücken der Taste REVEAL verbirgt die Antworten wieder SIZE Diese Funktion zeigt die Videotextinformat...

Page 124: ...en Sie ein Untermenü nicht in jedem Menü vorhanden Mit der Taste LCD MENU kommen Sie in das übergeordnete Menü zurück Mit den Richtungstasten stellen Sie einen gewünschten Wert ein oder treffen eine andere Auswahl Mit der Taste LCD MENU schließen Sie das Menü und bestätigen gleichzeitig die Auswahl Bitte beachten Sie dass sich das Menü automatisch nach einigen Sekunden schließt wenn keine Taste ge...

Page 125: ...n Sie eine manuelle Programmierung für einzelne Sender im ATV Modus durchführen Aktueller Sender Wählen Sie hierüber den Sender den Sie bearbeiten möchten Farbsystem PAL SECAM Auto Für Deutschland ist das Farb System PAL eingestellt Tonsystem BG DK L I Für Deutschland ist das Ton System BG eingestellt Feinabstimmung Führen Sie mit die Feinabstimmung durch AFC Stellen Sie die automatische Feinabsti...

Page 126: ...htungstaste auf den nächsten Buchstaben usw Am Ende drücken Sie noch einmal die grüne Taste INTRO um den Namen zu speichern Bewegen Wählen Sie das Programm an und drücken Sie die gelbe Taste REPEAT Verschieben Sie das Programm mit auf den gewünschten Platz und drücken Sie die gelbe Taste REPEAT ein weiteres Mal Die anderen Programme werden entsprechend mit verschoben Überspringen Wählen Sie das Pr...

Page 127: ...ich das Gerät im STANDBY Modus befindet oder vom Stromnetz getrennt ist Das CAM Modul muss richtig herum eingesetzt werden falsch herum lässt es sich nicht einschieben CAM Modul oder Fernsehgerät können beschädigt werden falls Sie versuchen das CAM Modul mit Gewalt einzuschieben Verbinden Sie das Fernsehgerät mit der Stromversorgung schalten Sie es ein und warten Sie einen Moment bis die Karte erk...

Page 128: ... definiert Kontrast Kontrast verringern bzw erhöhen Skala 0 100 Helligkeit Helligkeit verringern bzw erhöhen Skala 0 100 Farbe Farbe verringern bzw erhöhen Skala 0 100 Farbton Farbton Einstellungen nur bei NTSC Empfang verfügbar Schärfe Schärfe verringern bzw erhöhen Skala 0 10 Farbtemperatur Farbtemperatur wählen Kalt Normal und Warm Rauschreduktion Mit dieser Funktion können Sie das Bildrauschen...

Page 129: ...rringern bzw erhöhen Skala 0 100 Balance Stellen Sie die Balance zwischen dem linken und rechten Lautsprecher ein Autom Lautstärke Die Funktion AVL Automatic Volume Limiting gleicht die unterschiedlichen Lautstärken der verschiedenen Sendungen aus Stellen Sie auf Aus so hören Sie die Originallautstärken Stellen Sie auf Ein so hören Sie eine gleichmäßige Lautstärke Surround Sound Surround Effekt ei...

Page 130: ...önnen Sie die Zeitzone einstellen Diese Option steht nur im DTV Modus zur Verfügung Einschlaf Timer Wählen Sie eine Zeit nach der sich das Gerät selbständig ausschaltet Wählen Sie Aus um die Funktion zu beenden Autom Abschaltung Stellen Sie hier die Zeit ein wonach sich der LCD TV automatisch ausschaltet OSD Zeit Hier können Sie die Zeit einstellen nach der das OSD Menü sich automatisch schließt ...

Page 131: ...stand 0000 Bitte neues Passwort eingeben Geben Sie ein neues vierstelliges Passwort ein Neues Passwort wiederholen Geben Sie das neue Passwort noch mal ein Es erfolgt eine entsprechende Meldung Falls Sie das Passwort vergessen haben sollten müssen Sie eine Erstinstallation durchführen um den Auslieferungseinstellung wieder herzustellen Sender sperren Legen Sie hier fest welche Sender gesperrt werd...

Page 132: ...te überträgt können Sie die Einstellung auf Ein stellen um diese Signale zu empfangen Diese Option steht nur im DTV Modus zur Verfügung Seitenverhältnis Stellen Sie hier das Bildformat ein Diese Funktion entspricht der Taste SIZE Blauer Bildschirm Wenn das LCD TV kein Signal empfängt erscheint statt des Schnee oder des schwarzen Bildes ein blauer Hintergrund Erste Installation Hier können Sie das ...

Page 133: ...ich die Lautstärke erhöhen und damit zu bleibenden Hörschäden führen Wenn ein Gerät längere Zeit mit erhöhter Lautstärke über einen Kopfhörer betrieben wird kann das Schäden am Hörvermögen des Zuhörers verursachen Digitaler Verstärker über Koaxialanschluss Über den SPDIF Coax OUT Anschluss haben Sie die Möglichkeit das Audiosignal Ihres LCD TVs über einen digitalen Verstärker wiederzugeben Verbind...

Page 134: ...onentenkabel Cinch Kabel grün blau rot an die Komponenteneingänge Y Pb Pr des LCD TVs anzuschließen Für die Tonübertragung schließen Sie ein Stereo Cinch Kabel roter und weißer Stecker an die AUDIO L R Eingänge an 4 Mit einem HDMI Kabel Sofern Ihr externes Gerät über einen HDMI Ausgang verfügt schließen Sie ein HDMI Kabel nicht im Lieferumfang an den HDMI Eingang des LCD TVs und den HDMI Ausgang d...

Page 135: ... Sofern Ihr DVD Rekorder über einen HDMI Ausgang verfügt schließen Sie ein HDMI Kabel nicht im Lieferumfang an den HDMI Eingang des LCD TVs und den HDMI Ausgang des externen Geräts an Receiver SAT DVB T Decoder etc anschließen Sie haben verschiedene Möglichkeiten ein Gerät das als Empfänger für das LCD TV eingesetzt werden soll z B SAT Receiver DVB T Receiver Decoder Set Top Box an Ihr LCD TV anzu...

Page 136: ...DMI Ausgang verfügt schließen Sie ein HDMI Kabel nicht im Lieferumfang an den HDMI Eingang des LCD TVs und den HDMI Ausgang des externen Geräts an DVD oder Videorekorder und SAT Receiver anschließen Wenn Sie gleichzeitig einen DVD oder Videorekorder und einen SAT Receiver anschließen möchten können Sie folgende Anschlussart verwenden Schließen Sie den Receiver wie oben beschrieben an Verbinden Sie...

Page 137: ... einschließlich HDTV High Definition Television und kann somit auch die Auflösung von 1080i ohne Qualitätsverlust darstellen Viele Geräte der Unterhaltungselektronik z B DVD Player sind heute mit HDMI Ausgängen ausgestattet Externes Gerät mit HDMI Ausgang anschließen Schalten Sie beide Geräte aus Schließen Sie ein HDMI Kabel nicht im Lieferumfang an den HDMI Eingang des LCD TVs und den HDMI Ausgan...

Page 138: ...s oder Notebooks an Ziehen Sie die Schrauben des Monitorkabels mit den Fingern fest so dass die Stecker richtig in den Buchsen sitzen Falls Sie auch den Ton übertragen möchten verbinden Sie ein Audio Kabel mit der PC AUDIO IN Buchse und dem Audio Ausgang des PC Notebooks Schalten Sie zuerst das LCD TV ein Schalten Sie erst danach den PC das Notebook ein Wenn Sie das LCD TV als zweiten Monitor an I...

Page 139: ...ngestellt sind Überprüfen Sie ob alle externen Geräte korrekt angeschlossen sind Überprüfen Sie ob die richtige AV Quelle angewählt ist Es ist kein Ton zu hören Vergewissern Sie sich dass die Lautstärke nicht auf Minimum steht Vergewissern Sie sich dass die Stummschaltung nicht aktiviert ist Es gibt kein Bild oder keinen Ton Es sind aber Geräusche zu hören Der Empfang ist möglicherweise schlecht K...

Page 140: ...icht Überprüfen Sie ob die Batterien in der Fernbedienung geladen und richtig eingelegt sind Vergewissern Sie sich dass das Sensorfenster nicht starker Lichteinstrahlung ausgesetzt ist Schalten Sie das Gerät mit dem Schalter am Netzteil aus und wieder ein Überprüfen Sie ob die TV Funktion aktiviert ist durch Drücken der TV Taste auf der Fernbedienung Es sind mehrere Geräte Codes unter dem Markenna...

Page 141: ...ällen von einzelnen oder mehreren Leuchtpunkten kommen Bei Aktiv Matrix TFTs mit einer Auflösung von 1366 x 768 Pixel welche sich aus je drei Sub Pixel Rot Grün Blau zusammensetzen kommen insgesamt ca 3 2 Mio Ansteuerelemente zum Einsatz Aufgrund dieser sehr hohen Anzahl von Transistoren und des damit verbundenen äußerst komplexen Fertigungsprozesses kann es vereinzelt zu einem Ausfall oder zur fä...

Page 142: ...einigungstuch nach Wenn Sie nicht erst den Staub abwischen oder Sie die Hochglanzpolierung zu stark abwischen könnte die Hochglanzpolierung zerkratzt werden Verwenden Sie keine Lösungsmittel ätzende oder gasförmige Reinigungsmittel Reinigen Sie den Bildschirm mit einem weichen fusselfreien Tuch Achten Sie darauf dass keine Wassertröpfchen auf dem LCD TV zurückbleiben Wasser kann dauerhafte Verfärb...

Page 143: ... die umweltschonend entsorgt und einem fachgerechten Recycling zugeführt werden können Gerät Werfen Sie das Gerät am Ende seiner Lebenszeit keinesfalls in den normalen Hausmüll Erkundigen Sie sich nach Möglichkeiten einer umweltgerechten Entsorgung Batterien Verbrauchte Batterien gehören nicht in den Hausmüll Sie müssen bei einer Sammelstelle für Altbatterien abgegeben werden ...

Page 144: ...S21 S41 DVB T free to air Audio Stereo Nicam Programmplätze 199 ATV 400 DTV Antenneneingang 75 Ohm Anschlüsse Antennenanschluss analog digital USB Anschluss Video 3 x HDMI In mit HDCP Entschlüsselung 1 x SCART 1 x VGA 15 Pin D Sub Composite Video In Cinch S Video In Component Video In YUV 3 Cinch Audio Stereo Audio in für Component Video YUV S Video Cinch Stereo Audio in für PC Cinch Kopfhörerausg...

Page 145: ...LR03 Bitte beachten Sie Sollte es vorkommen dass durch unvorhergesehene Bedienkombinationen fehlerhaftem Datenaustausch oder elektrostatischer Entladung Electro Static Discharge der LCD TV nicht mehr bedient werden kann ziehen Sie in diesem Fall den Netzstecker und nehmen Sie das Gerät im Anschluss wieder in Betrieb ...

Page 146: ...C 0012 0008 ADMIRAL 0019 0108 0002 0001 0047 0000 ADYSON 0003 AGAZI 0002 AGB 0123 AIKO 0003 0009 0004 AIWA 0184 0248 0291 AKAI 1410 0011 0086 0009 0068 0004 0006 0008 0051 0061 0088 0169 0200 0133 0141 0069 AKIBA 0011 AKURA 0169 0074 0002 0009 0011 0071 ALBA 0028 0027 0009 0011 0003 0068 0083 0169 0047 0245 0248 0162 0062 ALBIRAL 0037 ALKOS 0164 ALLORGAN 0157 0026 ALLSTAR 0051 ALTUS 0042 AMPLIVISI...

Page 147: ...46 BRION VEGA 0051 0169 0000 BRITANNIA 0003 BROKSONIC 0920 BRUNS 0000 0007 BSR 0131 0026 BTC 0011 BUSH 0028 0027 0032 0009 0011 0019 0205 0039 0051 0068 0169 0107 0115 0131 0139 0167 0245 0248 0024 0132 0120 0062 C CAPSONIC 0002 CARREFOUR 0027 CASCADE 0009 CATHAY 0051 0169 CENTRUM 0168 0205 CENTURION 0051 0169 CENTURY 0000 CGE 0129 0047 0131 0043 CIMLINE 0009 0028 CITY 0009 CLARIVOX 0169 0037 CLAT...

Page 148: ...EY 0148 DIXI 0009 0169 0051 DTS 0009 DUAL 0177 0038 0171 0002 0009 0206 0207 0208 0169 0042 0044 0127 0047 0061 0063 0067 0068 0003 0103 0107 0115 0126 0131 0139 0154 0160 0168 0210 0228 0343 0924 0933 0248 0291 0125 0089 DUAL TEC 0009 0131 0003 DUMONT 0003 0014 0017 0018 0000 DURABRAND 0228 1006 1007 1008 1009 0933 1088 DUX 0169 DYNATRON 0051 0169 E ELBE 0108 0157 0037 ELCIT 0000 ELECTRO TECH 000...

Page 149: ...X 0002 0003 HAMPTON 0003 HANSEATIC 0009 0003 0027 0169 0051 0083 0118 0131 0141 0007 0026 HANSOL 1019 HANTAREX 0009 0123 HARWOOD 0171 HCM 0002 0003 0009 0074 0120 HIFIVOX 0139 HINARI 0171 0009 0011 0027 0051 0006 0169 0248 0043 0137 HISAWA 0011 0113 0120 HISENSE 1486 1485 1417 1416 1415 0204 0156 HITACHI 0027 0019 0085 0134 0153 0213 0140 0144 0003 0118 0004 0016 0023 0041 0045 0047 0131 0133 0138...

Page 150: ... 0068 0103 0107 0111 0115 0154 0168 0169 0171 0177 0205 0291 LIFETEC 0177 0038 0171 0002 0009 0206 0205 0207 0208 0210 0211 0169 0015 0042 0044 0047 0048 0049 0061 0063 0067 0068 0087 0103 0107 0115 0127 0154 0155 0168 0170 0185 0228 0229 0209 0218 1005 0894 0343 0924 0933 0248 0291 LOEWE 1399 0097 0098 0051 0169 0000 LOGIK 0030 LS ELECTRONIK 0042 LUMA 0019 0169 0141 0157 LUMATRON 0002 0171 0019 0...

Page 151: ...15 0101 0135 MINOKA 0051 MITSUBISHI 0000 0027 0030 0051 0054 0057 0060 0098 0101 0135 0205 MIVAR 0055 0083 0003 0093 0123 0043 MOTION 0043 MT LOGIC 0090 MTC 0132 MULTI SYSTEM 0169 MULTITECH 0003 0009 0014 0019 0169 0027 0045 0129 0131 0043 MURPHY 0003 0133 0018 N NAD 0141 NAIKO 0099 NAONIS 0019 0108 NATIONAL 0064 0101 NEC 1482 1483 0185 0027 0056 NECKERMANN 0003 0169 0008 0019 0022 0051 0083 0118 ...

Page 152: ...206 0200 0205 0207 0208 0210 0211 0169 0015 0042 0044 0047 0048 0049 0061 0063 0067 0068 0087 0103 0107 0115 0127 0154 0155 0168 0170 0185 0228 0229 0209 0218 1005 0894 0343 0924 0933 0248 0291 PROFEX 0009 0141 0043 PROFILO 0171 PROFI TRONIC 0051 PROLINE 0004 0051 0062 PROSONIC 0161 0169 0003 0015 0042 0088 0107 0200 0068 0245 PROTECH 0002 0003 0009 0169 0014 0051 0129 0131 0132 0113 PROVIEW 1419 ...

Page 153: ...026 SIAREM 0014 0131 0000 0123 SICATEL 0037 SIEMENS 0008 0022 0200 0135 0029 SIERRA 0051 SIESTA 0160 SILVER 0027 SINGER 0014 0131 0129 0228 0000 SINUDYNE 0014 0131 0169 0028 0015 0000 0075 0013 0026 SKANTIC 0138 0021 SKYMASTER 0016 SKYWORTH 0228 SLIDING 0015 SOLAVOX 0092 0021 SONITRON 0006 0031 SONOKO 0009 0002 0169 0003 0051 0245 SONOLOR 0006 0021 SONTEC 0051 0169 0160 SONY 0165 0130 0183 0106 00...

Page 154: ...51 0052 0126 0139 0163 0185 0245 0046 THORN 0004 0018 0169 0035 0054 0111 0127 0141 0164 0037 TOKAI 0004 0051 TOKYO 0003 TOMASHI 0120 TOSHIBA 1482 0117 0164 0189 0027 0146 0017 0920 0082 TOWADA 0131 0021 TRIUMPH 0013 0123 0082 U UHER 0051 0157 0021 0043 ULTRAVOX 0003 0014 0129 0131 0133 0000 UNITED 0088 0169 UNITED QUICK STAR 0245 UNIVERSUM 0102 0002 0016 0018 0051 0061 0169 0083 0110 0122 0129 01...

Page 155: ... 0325 0271 BLUESKY 0248 BONDSTEC 0250 BRANDT 0303 0305 BROKSONIC 0277 0967 BUSH 0275 0233 0245 0248 0246 0247 0288 C CATRON 0250 CGE 0231 0293 CIMLINE 0275 0233 CINEVISION 0256 CLATRONIC 0250 COMBITECH 0248 CONDOR 0250 0245 CROWN 0275 0250 0245 CYBERCOM 0233 0311 0262 0269 0319 0256 0248 0291 0338 0905 0906 CYBERMAXX 0233 0311 0262 0269 0319 0256 0248 0291 0338 0905 0906 CYTRON 0233 0311 0262 0269...

Page 156: ...TIC 0257 0256 HCM 0275 0288 HINARI 0275 0233 0248 0288 0301 HISAWA 0233 HITACHI 0266 0257 0268 0231 0293 0387 HYPSON 0233 0275 I IMPEGO 0250 IMPERIAL 0231 INNO HIT 0250 0257 0275 0245 INNOVATION 0233 0311 0262 0248 0291 INTERBUY 0256 INTERFUNK 0257 0258 INTERVISION 0231 IRRADIO 0275 0256 ITT 0237 0293 0258 0292 ITV 0256 0245 J JVC 0294 0295 0293 0400 K KAISUI 0275 KARCHER 0257 KENDO 0233 0250 0265...

Page 157: ...UM 0275 0300 0256 0271 0293 PANASONIC 0262 0267 0260 0314 0321 0325 0970 PATHE CINEMA 0301 PATHE MARCONI 0293 PENTAX 0266 PERDIO 0231 PHILCO 0299 PHILIPS 0235 0257 0290 0315 0327 0286 0285 0242 0271 0293 0969 PHONOLA 0257 PIONEER 0294 0257 1084 POLAROID 0949 PORTLAND 0250 0245 PRINZ 0231 PRO2 0233 0311 0262 0269 0319 0256 0248 0291 0338 0905 0906 PROFEX 0275 PROLINE 0231 0288 PROSONIC 0233 0245 PY...

Page 158: ...ICS 0262 0260 TELEAVIA 0293 TELEFUNKEN 0306 0294 0324 0295 0323 0280 0293 0303 0305 TENOSAL 0275 TENSAI 0275 0231 0256 TEVION 0233 0311 0262 0269 0319 0256 0248 0291 0338 0905 0906 THOMSON 0294 0324 0295 0323 0326 0245 0242 0293 0305 THORN 0258 0293 0301 TIVO 0242 TOKAI 0275 0256 TONSAI 0275 TOSHIBA 0320 0257 0265 0298 0319 0362 0293 TOWADA 0275 TOWIKA 0275 TRIUMPH 0301 TVA 0250 U UHER 0256 UNITED...

Page 159: ...L 1772 0894 CRITERION 0344 CROWN 0373 0382 C TECH 0341 CURTIS 0950 0948 CYBERCOM 0356 0930 0932 0330 0335 0339 0340 0341 0342 0345 0352 0358 0371 0923 0375 0343 0924 0933 0338 0334 0344 0664 0372 0373 CYBERHOME 0347 0912 0985 1075 CYBERLINK 1101 CYBERMAXX 0356 0930 0373 0932 0330 0335 0339 0340 0341 0342 0345 0352 0358 0371 0895 0896 0897 0898 0899 0900 0901 0902 0903 0904 0923 0893 0959 1069 1070...

Page 160: ...T 0960 FERGUSON 0373 FINLUX 0375 0357 0351 FINTEC 0350 FIRSTLINE 0373 FISHER 0378 FUNAI 0339 G GE 0384 GERICOM 1064 GOLDEN SPHERE 0341 GOLDSTAR 0375 0907 0972 GOODMANS 0373 0382 0350 0333 0351 GO VIDEO 0383 1059 1061 0338 0367 0971 0351 GPX 0910 GRADIENTE 1794 1793 0373 GRAETZ 0392 GRAN PRIX 0356 GRANDIN 0357 GRUNDIG 0385 0370 0380 0373 0378 0376 0350 0333 H H B 0350 0343 HAAZ 0341 0342 HANSEATIC ...

Page 161: ...375 0362 MARK 0350 MASTEC 0335 MATSUI 0373 0357 0350 MAXDORF 0894 MAXIM 0331 0350 MBO 0396 0383 0382 MEDIENCOM 0342 MEDION 1800 1798 1001 0356 0930 0373 0932 0330 0335 0339 0340 0341 0342 0345 0352 0358 0371 0351 0895 0896 0897 0898 0899 0900 0901 0902 0903 0904 0923 0893 0959 1069 1070 1071 1067 1066 1068 1115 1116 1117 1118 0905 0343 0924 0933 0375 0906 0338 0372 0334 0344 0664 0894 MEMOREX 0356...

Page 162: ...9 0980 0981 0362 1080 1123 1128 0969 0339 PHOCUS 1063 1064 PHONOTREND 0916 PIONEER 1109 1108 0368 0977 0922 0968 0976 1084 POLAROID 0957 0949 PORTLAND 0382 PRINZ 0356 PRISM 0335 PRO2 0356 0930 0373 0932 0330 0335 0339 0340 0341 0342 0345 0352 0358 0371 0895 0896 0897 0898 0899 0900 0901 0902 0903 0904 0923 0893 0959 1069 1070 1071 1067 1066 1068 0905 0343 0924 0933 0375 0906 0338 0372 0334 0344 06...

Page 163: ...1115 0959 0891 1117 0972 1094 1121 0907 TCM 0900 0356 0930 0373 0932 0330 0335 0339 0340 0333 0341 0342 0345 0352 0358 0371 0923 1119 0343 0924 0933 0338 0372 0334 0344 0664 TEAC 0368 0333 0341 0384 0375 TECHNICS 0364 0399 TECHNIKA 0356 TECHWOOD 0394 0350 0370 TECO 0923 0895 TEDELEX 0382 TELEDEVICE 1051 TELEFUNKEN 0894 0333 TELETECH 0350 TENSAI 0373 0382 TERAPIN 0943 TEVION 0356 0930 0373 0932 033...

Page 164: ... C CARRERA 0663 CLASSIC 0807 CONDOR 0860 CYBERCOM 0843 0664 0668 0674 0675 0694 0730 0742 0743 0744 0745 0746 0747 0801 0802 0803 0807 0809 0818 0819 CYBERMAXX 0843 0664 0668 0674 0675 0694 0730 0742 0743 0744 0745 0746 0747 0801 0802 0803 0807 0809 0818 0819 CYTRON 0843 0664 0668 0674 0675 0694 0730 0742 0743 0744 0745 0746 0747 0801 0802 0803 0807 0809 0818 0819 D DENON 0665 0666 DUAL 0843 0848 ...

Page 165: ...0747 0801 0802 0803 0807 0809 0818 0819 MICROMEGA 0732 MICROSTAR 0843 0664 0668 0674 0675 0694 0730 0742 0743 0744 0745 0746 0747 0801 0802 0803 0807 0809 0818 0819 MISSION 0732 N NAD 0671 0733 0735 0736 0737 0800 NAIM 0732 NAKAMICHI 0699 0700 NUVO 0866 O ONKYO 0840 0701 0702 0703 0785 0792 P PANASONIC 0661 0705 PHILIPS 0847 0706 0732 PHILIPS CD V 0840 PIONEER 0673 0677 0753 PRO2 0843 0664 0668 06...

Page 166: ...DVB T Empfänger DTV Freeview iDTV etc A SAT 1147 SKY 1138 ADECQ 1340 AKAI 0552 ALBA 0508 0562 0405 0407 ALDES 0408 0409 ALLSAT 0462 0410 0552 ALLSONIC 0408 0428 AMPERE 0422 AMSTRAD 0584 0555 0541 0415 0416 0417 0419 ANKARO 0408 0428 0424 ANTTRON 0405 0407 APOLLO 0405 ARCOM 1174 1165 ARCON 0415 0422 1155 1144 1153 0424 0463 1154 ARENA 1222 ARION 1238 ARMSTRONG 0419 ARNION 1147 ASAT 0552 ASCI 1138 A...

Page 167: ... 0604 DECCA 0460 DEW 0456 DIAMOND 0461 DIGIALITY 0640 DIGIQUEST 1147 0485 0427 DIGITAL M SERIE 1249 DISKXPRESS 0424 0454 DITRISTRAD 0462 DMT 0412 DNT 0438 0552 DONG WOO 0501 DRAKE 0557 0463 DREAM MULTIMEDIA 0685 DREAMBOX 0658 DStv 0602 DUAL 0412 0413 0423 0428 0493 0504 0511 0566 0583 0586 0587 0618 0514 E ECHOSTAR 0640 0581 0586 0425 0481 0578 0579 0580 0657 0659 0464 0465 0467 EINHELL 0408 0417 ...

Page 168: ...1222 1223 1162 HOUSTON 0462 HUMAX 1260 1259 1258 1250 0485 0517 0582 HUTH 0408 0411 0444 0462 0419 0491 HYUNDAI 0486 I ID DIGITAL 0485 IMPERIAL 0562 INNOVATION 0428 0493 0504 0511 0583 0586 0587 0618 INTERTRONIC 0419 INTERVISION 0462 IRDETO 0602 ITT NOKIA 0429 0508 0548 0454 0487 0537 J JOHANSSON 0444 JSR 0462 JVC 0483 K KAON 1147 KATHREIN 1221 1197 0549 0617 0631 0607 0635 0439 0459 0496 0507 055...

Page 169: ...0650 0652 0653 1130 1139 1138 1137 MICROSTAR 0412 0413 0423 0428 0442 0466 0478 0484 0493 0504 0511 0514 0535 0546 0566 0583 0586 0587 0618 0619 0644 0650 0652 0653 1130 1138 1137 MINERVA 0483 0439 MITSUBISHI 0508 0439 0574 MITSUMI 0502 MORETV 0644 0423 1130 1181 MORGAN SYDNEY 0611 MORGANS 0611 0419 0502 0552 MULTICHOICE 0602 MULTISTAR 0496 MULTITEC 0586 0587 MURATTO 0437 0489 N NAVEX 0444 NEC 050...

Page 170: ...POINT 0432 REDSTAR 0428 RFT 0408 0552 RUEFACH 0503 S SAB 1137 1144 1145 1146 1147 SABA 0472 0508 0543 0556 0562 0565 0571 0572 0573 0574 0575 0409 0468 SABRE 0508 SAGEM 0570 0604 0599 0603 0648 SAKURA 0456 SALORA 0429 0527 0509 0520 SAMSUNG 0426 0405 0506 SAT 0415 0435 0437 SAT 0546 1137 SATCOM 0640 0504 0523 SATEC 0508 SATPARTNER 0444 0405 0407 0409 0489 0491 SCHAUB LORENZ 1147 1162 1214 1215 121...

Page 171: ...73 1147 1131 TECO 0419 0502 TELASAT 0640 TELEFUNKEN 0560 0508 0565 0566 0567 0574 0405 TELEKA 0438 0640 0407 0419 TELEMASTER 0409 TELESAT 0504 TELESTAR 1138 0479 0569 TELEVES 0508 0610 0611 TELEWIRE 0462 TEN HAAFT 0423 TEVION 0412 0413 0423 0428 0442 0466 0478 0484 0493 0504 0511 0514 0535 0546 0566 0583 0586 0587 0618 0619 0644 0650 0652 0653 1130 1140 1138 1137 THOMSON 0472 0601 0570 0574 0492 0...

Page 172: ... 0923 ASPIRE 0952 B BLUE NOVA INTERNATIONAL 1051 C CENTRIOS 0951 CMI 0923 COBY 1051 CYBERCOM 0923 CYBERHOME 0912 CYBERMAXX 0895 0905 0906 0923 0959 1071 1117 CYTRON 0895 0905 0906 0923 0959 1071 1117 D DENVER 1051 DUAL 0923 E ELTAX 1051 EMERSON 1057 G GO VIDEO 0383 1059 1061 H HB 1089 HITACHI 0387 I ILO 0959 J JVC 1058 1072 K KENDO 0923 L LG 0907 LIFE 1117 LIFETEC 0895 0905 0906 0923 0959 1071 111...

Page 173: ...1 TEVION 0890 0891 0895 0905 0906 0923 0959 1065 1071 1117 THOMSON 0360 0359 1078 TINY 1051 TOSHIBA 0973 0983 0362 1111 TRANS CONTINENTS 1051 Y YAKUMO 0905 YAMAHA 0979 0980 Z ZENITH 0907 Decoder A AUSTAR 1224 0494 B BMB 0636 BT 0554 C CABLE AND WIRELESS 0606 CABLECRYPT 0474 CABLETIME 0448 0449 0450 CANAL PLUS 0474 CLYDE CABLEVISION 0452 COMCRYPT 0474 CRYPTOVISION 0458 E EURODEC 0603 F FILMNET 0474...

Page 174: ...0551 T TELE 1 0474 TELEPIU 0474 TELEWEST 0606 0554 THOMSON 1189 U UNITED 0554 UPC 1143 1175 1184 V VIRGIN MEDIA 0606 VISIONETICS 1185 VISIOSAT 0487 HDD DVR HDD Digitale Videorekorder Hard Disk Drive DVR PVR etc A AMSTRAD 0555 ARCON 1144 ARION 1238 B BSKYB 0555 BUSH 1261 C CANAL SATELLITE 0599 CANAL 0599 COMAG 1231 CONRAD 1156 CYBERCOM 0412 0423 0514 CYBERMAXX 0905 0412 0423 0514 0644 0653 1130 095...

Page 175: ...653 1130 0959 1071 1139 1115 1181 1117 MICROMAXX 0905 0412 0423 0514 0644 0653 1130 0959 1071 1139 1117 MICROSTAR 0905 0412 0423 0514 0644 0653 1130 0959 1071 1117 MORETV 0644 1130 1181 N NEUF TELECOM 1196 NEUF TV 1196 P PACE 1225 0555 0453 PACKARD BELL 1052 PANASONIC 0403 PHILIPS 1775 1128 0242 PHOCUS 1063 PINNACLE 0654 PIONEER 0977 PRO2 0905 0412 0423 0514 0644 0653 1130 0959 1071 PROCASTER 0905...

Page 176: ...LE 1262 WYSI 1156 Y YAKUMO 0905 TV VCR Kombinationen A AIWA 0248 0291 ALBA 0245 0248 B BAIRD 0245 BASIC LINE 0245 BESTAR 0245 BLACK PANTHER LINE 0245 BUSH 0245 0248 C COMBITECH 0248 CONDOR 0245 CROWN 0245 CYBERCOM 0248 0291 CYBERMAXX 0248 0291 CYTRON 0248 0291 D DAEWOO 0245 DAYTRON 0245 DUAL 0248 0291 E ESC 0245 G GENERAL TECHNIC 0248 GOLDSTAR 0261 GOODMANS 0245 0283 GRANDIN 0245 H HINARI 0248 I I...

Page 177: ... 0248 TV DVD Kombinationen TV DVD Kombinationen benötigen einen DVD Code oder einen DVD TV Code DVD TV A AKAI 1082 1410 AUDIOSONIC 1062 0090 B BEKO 1064 BROKSONIC 0920 C CYBERCOM 0343 0228 0924 0210 0933 0228 CYBERMAXX 0894 0343 0228 0924 0210 0933 0228 CYTRON 0894 0343 0228 0924 0210 0933 0228 D DUAL 0343 0228 0924 0210 0933 0228 DURABRAND 0933 0228 1085 1006 1085 1007 1086 1008 1087 1008 1088 10...

Page 178: ...OVIEW 1001 S SANSUI 0920 SCHAUB LORENZ 1089 1011 T TCM 0343 0228 0924 0210 0933 0228 1119 TEVION 0894 0343 0228 0924 0210 0933 0228 1064 TOSHIBA 0920 V VESTEL 1771 0215 DVD VCR Kombinationen DVD VCR Kombinationen benötigen einen DVD Code oder einen DVD VCR Code DVD VCR A APEX 0949 B BROKSONIC 0920 0967 C CINEVISION 0375 0256 CYBERCOM 0338 0375 0256 CYBERMAXX 0338 0896 0906 0375 0256 CYTRON 0338 08...

Page 179: ...IONEER 1084 POLAROID 0949 PRO2 0338 0896 0906 0375 0256 S SAMSUNG 0338 0963 SANSUI 0920 SANYO 0378 0258 SILVERCREST 0256 SONY 0402 SYLVANIA 0339 0231 T TARGA 0375 0256 0907 0375 1041 TCM 0338 0375 0256 TEVION 0338 0896 0906 0375 0256 TOSHIBA 0362 Z ZENITH 0375 0256 HTIB Home Cinema Systeme benötigen einen einzelnen DVD Code oder einen DVD Audio Code DVD AUDIO A AIWA 0377 AMW 1054 C CENTRUM 0927 CO...

Page 180: ...64 K KOSS 0373 L LENCO 1774 LENOXX 0931 LG 0972 LIFE 1118 LIFETEC 0334 0372 0344 0775 1069 1066 1118 M MEDION 0334 0372 0344 0775 1069 1066 1118 MICROMAXX 0334 0372 0344 0775 1069 1066 1118 MICROSTAR 0334 0372 0344 0775 1069 1066 1118 N NORCENT 0948 O ONKYO 0975 P PANASONIC 0974 PHILIPS 0370 0734 PIONEER 0968 0976 PRO2 0334 0372 0344 0775 1069 1066 S SAMSUNG 0919 SONY 0986 T TARGA 0972 0375 1041 T...

Page 181: ...ELEFONICA 1227 THOMSON 0603 Media Receiver SONY NETWORK MEDIA RECEIVER 0446 Scart Switch Box COUNTRYMAN 1168 FUNK 1170 MARMITEK 0641 SKARDIN 1169 SKYMASTER 1169 VIVANCO 0684 Digital Set Top Box ADECQ 1340 ECHOSTAR 0657 SKYMASTER 1166 TEVION 0650 0645 0423 YUNG FU 1166 Sonstige Set Top Box PARDY LIGHT BOX 1171 Entertainment Box EMTEC 1096 1097 HOME SERVER 1228 DMA 1228 MEDION 1228 Video On Demand M...

Page 182: ...US 0645 DIGIFUSION 0647 DIGIHOME 1262 DIGIO2 1150 DIGIPAL 1218 DMT 0412 DURABRAND 0526 E ECHOSTAR 0657 EMTECH 0476 F FREEBOX 1182 FREEVIEW 0447 0451 0453 0457 0482 0512 0513 0519 0526 0532 0600 0646 0647 0648 0649 0651 G GbSAT 0476 GERICOM 0443 GOODMANS 1261 0526 0451 GOODWAY 1163 1164 GRUNDIG 0512 1172 H HAUPPAUGE 0482 HB 1011 1211 1213 0476 HITACHI 1262 0526 HOMECAST 0476 HUMAX 0651 I INTERSTAR ...

Page 183: ...2 0656 1165 1163 1164 SONY 0447 T TCM 1413 1017 1119 TECHNIKA 1262 TECHNISAT 1218 TECHNOTREND 1173 TELEVES 0476 TEVION 0645 0650 THOMSON 0427 0532 TOPFIELD 1204 0506 TOP UP TV 0527 0531 0657 TVONICS 1263 W WHARFEDALE 1262 WORLDSAT 0476 Y YUNG FU 1166 Sonstige Audio Verstärker Tuner Receiver CENTRUM 0692 CRITERION 0775 CYBERCOM 0841 0775 0776 CYBERMAXX 0841 0775 0776 CYTRON 0841 0775 0776 DENON 104...

Page 184: ...852 0858 0704 0745 0808 0810 0811 0812 0820 0819 CYTRON 0852 0858 0704 0745 0808 0810 0811 0812 0820 0819 DUAL 0852 0858 0704 0745 0797 0820 0819 E BENCH 0811 ELTA 0693 0745 GRUNDIG 0707 INSIGNIA 0731 INTERTRONIC 0811 LIFE 0879 0823 0811 LIFETEC 0879 0823 0852 0858 0704 0745 0808 0810 0811 0812 0820 0819 MEDION 0879 0823 0731 0728 0852 0858 0704 0745 0808 0810 0811 0812 0820 0819 MICROMAXX 0852 08...

Page 185: ...LEFUNKEN SABA NORMENDE FERGUSON BAIRD 6 GRUNDIG BLAUPUNKT 7 NOKIA FINLUX ITT VCR 1 MEDION LIFETEC MICROMAXX MICROSTAR TEVION TCM GENERAL TECHNIC INNOVATION 2 PHILIPS PHILCO 3 SONY AKAI PANASONIC SHARP TOSHIBA JVC DAEWOO 4 THOMSON BRANDT 5 TELEFUNKEN SABA CORMENDE FERGUSON 6 GRUNDIG BLAUPUNKT 7 NOKIA FINLUX ITT SAT 1 MEDION LIFETEC MICROMAXX MICROSTAR INNOVATION GALAXIS 2 PHILIPS PHILCO 3 PACE ECHO...

Page 186: ...nual codelist Bedienungsanleitung Codeliste Televisor LCD de diseño de 66 cm 26 con sintonizador HD TDT integrado MEDION LIFE E14008 MD 20298 IIIa 12 10 Medion Service Center Visonic S A c Miguel Faraday 6 Parque Empresarial La Carpetania N IV Km 13 E 28906 Getafe Madrid España Hotline 902196437 Fax 914604772 service spain medion com www medion es ...

Reviews: