background image


After Sales Support        

Telephone: 1300 884 987     

Internet: www.medion.com.au 

12 

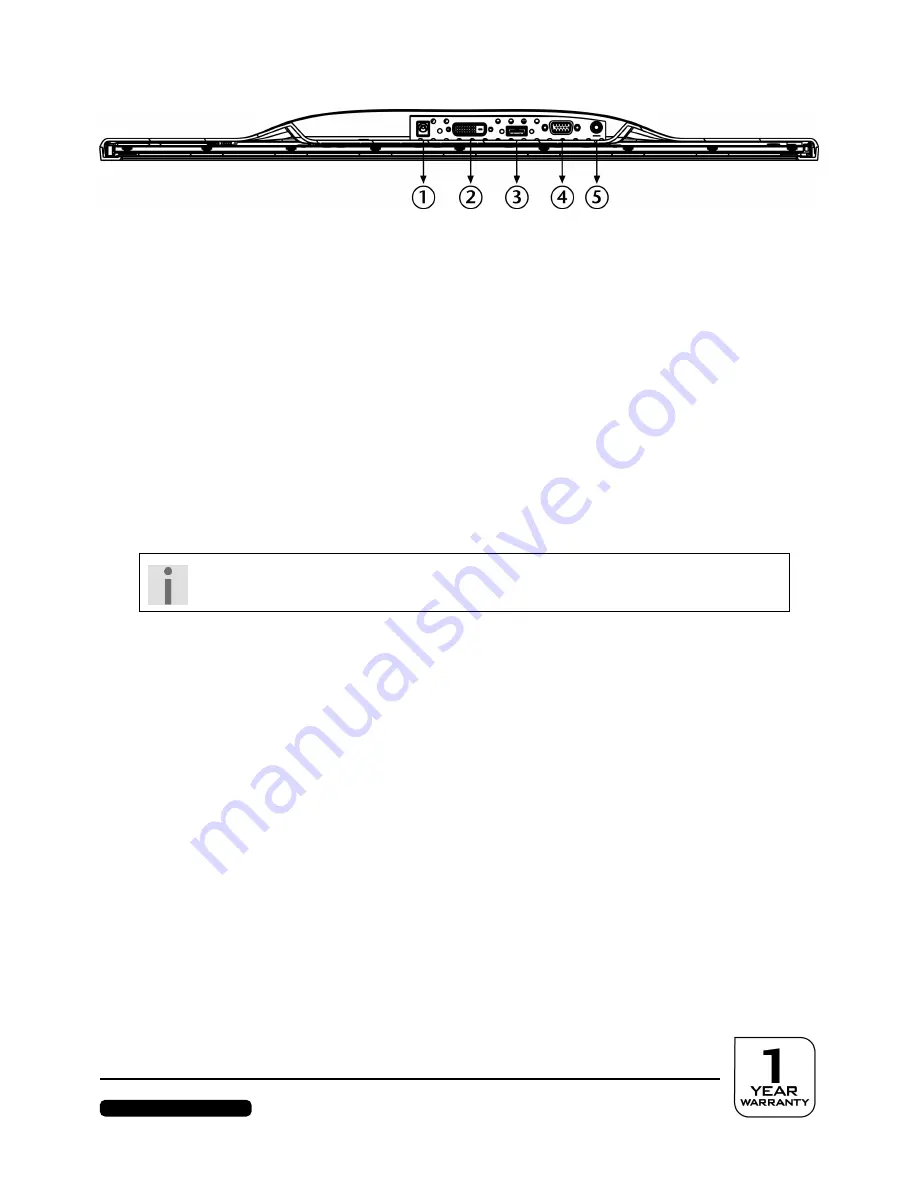
Connections On The Back 


(Ill.: Rear of the monitor) 

1.


Power supply (POWER IN) 

2.


DVI-D 24-Pin connection (DVI) 

3.


HDMI connection (HDMI) 

4.


Mini 15-pin D-sub connection (VGA) 

5.


3.5 mm stereo jack audio connection (AUDIO IN) 

Connecting The Monitor  


Prepare your computer for the monitor if necessary, so that the correct settings for it will be 
present.  


Ensure that the monitor has not yet been connected to the electricity supply (mains plug not yet 
plugged in) and that neither the monitor nor the computer has been switched on.  

1 Connect Signal Cable  


Plug the signal cable into the appropriate VGA, HDMI or DVI connections on the computer and 
the monitor.  

Important!   

Only use ONE of these alternative connection types at a time. 


2 Connect Audio Cable   


Plug the audio cable into the appropriate audio sockets on the computer and the monitor.  

3 Connect The Power Supply 


Connect the power cable of the power pack to the electricity supply connection.  
Now, connect one end of the mains cable to the power pack and connect the other end to a 
suitable socket. The mains socket must be in the vicinity of the monitor and be easily accessible 
(use the same electricity circuit as for the PC).  

4 Switch On The Monitor 


Switch your monitor on at the Standby/On switch on the front of the device. Finally, switch your 
computer on. 

Summary of Contents for Akoya X55000

Page 1: ...Manual MEDION AKOYA X55000 MD 20144 58 4 cm 23 Widescreen LCD Monitor with LED backlight technology N26968 ...

Page 2: ...iod of 12 months from date of purchase Defects that occur within this warranty period under normal use and care will be repaired replaced or refunded at our discretion solely at our option with no charge for parts and labour The benefits conferred by this warranty are in addition to all rights and remedies in respect of the product that the consumer has under the Trade Practices Act and similar st...

Page 3: ...8 Supported Monitor Settings 9 Supports Settings In The DVI And HDMI Video Mode 9 Monitor Settings Under Windows XP 10 Monitor Settings Under Windows Vista 11 Monitor Settings Under Windows 7 11 Connections On The Back 12 Connecting The Monitor 12 1 Connect Signal Cable 12 2 Connect Audio Cable 12 3 Connect The Power Supply 12 4 Switch On The Monitor 12 The Video Workstation 13 Operating Elements ...

Page 4: ...he subject of Customer Service starting on page 18 of these Operating Instructions The Symbols And Signal Words Used In These Instructions Danger Observe the regulation to avoid an electric shock There will be mortal danger Warning Observe the regulation to avoid physical injury Caution Observe the regulation to avoid damage to property and devices Important Further information about the use of th...

Page 5: ...ved in the box and inform us within 14 days from purchase if anything is missing Your statutory rights are not affected You should receive the following items 1x LED LCD Monitor 1x VGA Cable 1x DVI Cable 1x Audio Cable 1x Power Cord 1x External Power Supply 1x Manual 1x Warranty Certificate 2x Warranty Sticker ...

Page 6: ...p because it cannot be excluded that chemicals can escape Do not touch the screen with objects with points or sharp edges in order to avoid damage Contact Customer Service on 1300 884 987 if The mains cable has been damaged Liquids have leaked into the monitor The monitor is not functioning correctly The monitor has been dropped or the casing is damaged Caution Pay Attention To The Set Up Location...

Page 7: ...ns switch has been switched off Pull the mains plug from the socket to interrupt the power supply to your monitor or to release the device from voltage completely Only operate the monitor at an earthed socket with 100 240V 50 60 Hz Ask your energy supplier if you are not sure about the power supply at the set up location We recommend the use of a surge protector against excess voltage for addition...

Page 8: ...ite of modern manufacturing processes because of the highly complex technology Please refer to page 21 Information About Conformity The device complies with the C Tick requirements This monitor is ENERGY STAR compliant As an ENERGY STAR Partner MEDION ensures that this device complies with the ENERGY STAR guidelines for optimal power consumption ...

Page 9: ...nitor on your computer up to now This will be necessary if your current monitor has been operated with settings that are not supported by your new screen The screen has a fixed native or physical resolution of 1920 x 1080 pixels picture elements The aspect ratio ratio of width to height is 16 9 LCD screens produce the best image quality when the image sent from the PC is the same resolution and as...

Page 10: ...48 0 kHz 72 Hz 800 x 600 46 87 kHz 75 Hz 832 x 624 48 67 kHz 75 Hz 1024 x 768 48 36 kHz 60 Hz 1024 x 768 56 48 kHz 70 Hz 1024 x 768 60 0 kHz 75 Hz 1152 x 864 67 0 kHz 75 Hz 1152 x 870 45 0 kHz 75 Hz 1280 x 768 47 0 kHz 60 Hz 1280 x 960 60 0 kHz 60 Hz 1280 x 1024 63 98 kHz 60 Hz 1280 x 1024 80 0 kHz 75 Hz 1440 x 900 56 0 kHz 60 Hz 1440 x 900 71 0 kHz 75 Hz 1400 x 1050 65 1 kHz 60 Hz 1600x 1200 75 0...

Page 11: ... can set the depth of colour number of the colours represented under Colour quality Your monitor will support a depth of colour of a maximum of 16 million colours which corresponds to 32 bits or Real Color The image refresh frequency can be set under Advanced A Window with the characteristics of your graphics card will appear according to the configuration of your computer To set the required valu...

Page 12: ...sic View double click the Personalization icon then click Display Settings Ill Personalize appearance and sounds Monitor Settings Under Windows 7 Make the screen settings in the Appearance and Personalization Windows program under Windows 7 The program can be started as follows Right mouse click on the Windows interface Desktop and left mouse click on Personalize or Through Start Control Panel App...

Page 13: ...on 1 Connect Signal Cable Plug the signal cable into the appropriate VGA HDMI or DVI connections on the computer and the monitor Important Only use ONE of these alternative connection types at a time 2 Connect Audio Cable Plug the audio cable into the appropriate audio sockets on the computer and the monitor 3 Connect The Power Supply Connect the power cable of the power pack to the electricity su...

Page 14: ...cs Position the monitor to avoid glare and reflections from sunlight or other light sources Adjust the brightness and contrast to suit the operating environment Ill Setting up of the monitor Ill Video workstation Surface supporting the hands 5 10 cm Highest monitor line at eye level or somewhat below it Viewing distance 40 to 70 cm Leg room vertical At least 65 cm Leg room horizontal At least 60 c...

Page 15: ...ompletely to activate de activate the block A corresponding message will appear on the screen Select a parameter and reduce its value with this button when the OSD is switched on If you are not in the OSD Direct call up of the Contrast Brightness menu Select a parameter and increase its value with this button when the OSD is switched on If you are not in the OSD Direct call up of the Picture Mode ...

Page 16: ... in order to activate the OSD 2 Select the options from the Main Menu with the sensor keys 3 Confirm your selection with the sensor key 4 Touch the sensor key in order to leave the OSD Important The OSD will be faded out automatically if you have not operated any button on the monitor for the pre set time The OSD Menu The main functions or possible settings through the OSD are explained in the fol...

Page 17: ...or creating a cooler white Normal Adds green to the monitor creating a darker colour tone Warm Adds red to the monitor creating a warmer white and a brighter red User colour Individual settings for red R green G and blue B Information Displays information about the current input signal of the graphics card of your computer Manual Image Adjust Horizontal size H V position fine tune sharpness video ...

Page 18: ... to be switched on and off Memory Recall To recreate the factory settings for controlling video and audio Energy Saving Properties This monitor will switch to various energy saving statuses set in advance by the respective computer operating system This complies with the current requirements to reduce energy consumption The monitor supports the following types of energy saving mode Status Power no...

Page 19: ...ut computer or other device is switched on and the connection cables are sitting firmly in the sockets Image refresh frequencies The current image refresh frequency must be suitable for the monitor Energy saving mode Press any button or move the mouse to deactivate the mode Screen saver Press a button on the keyboard or move the mouse if the screen saver of the computer is activated Signal plugs P...

Page 20: ... on a white background e g Windows Explorer Internet Explorer or Word be opened to aid in optimising the image quality as blurry or discoloured text will indicate the settings still need adjustment Driver Information No driver installation is necessary for the functioning of your monitor You will be able to download the driver program file from the internet website listed below if the operating sy...

Page 21: ...on the monitor Water can cause long lasting discolouration Do not subject the screen to strong and or direct sunlight Only use suitable cleaning substances such as glass cleaner or screen cleaner available in specialist shops to clean the screen Please keep the packaging material and use this exclusively to transport the monitor Disposal Packaging Your device has been packaged to protect it from s...

Page 22: ...ndling of guarantees for all display products for this reason Among other matters the 13406 2 ISO Standard defines generally applicable guidelines in relation to pixel errors The pixel errors are categorised into four error classes and three types of error Each individual pixel is composed in its turn of three sub pixels each with a basic colour red green blue Types of pixel error Type 1 Pixels sh...

Page 23: ...e 2 073600 6 220800 4 4 10 4 1920 x 1200 25 wide 2 304000 6 912000 4 4 10 4 Error Class I is only used in the case of special applications e g in the medical sector and is associated with corresponding supplementary costs Error Class II has become established as the standard for manufacturers conscious of quality and with very good display units Example A 23 display unit consists of 1920 horizonta...

Page 24: ...r control Power ON OFF OSD Temperatures In operation 0 C 35 C Not in operation 20 C 60 C Moisture In operation 80 Non condensing Not in operation 90 Weight with stand approx 3 5 kg Dimensions WxHxD approx 543 x 410 x 218 mm Power consumption Stand by Less than 1 Watt Power consumption operation Less than 30 Watt Power supply Model 036 RHC Maker FSP Input voltage 100 240V 50 60 Hz 1 2 A Output volt...

Page 25: ...M ME 5 W w MEDION Australia Pty Ltd St Leonards NSW 2065 Australia MEDION Help Desk 1300 884 987 australia medion com www medion com au 07 11 ...

Reviews: