background image

Multitest 0.5dV, 1dV & 2.5dV 

Service and Repair Manual


Number 022-780 


Issue Number: 02 

Page 6 of 32 


5.  Transformer removal and Replacement 

6. 

Remove the base plate as per 4, Instructions 1 to 4 


7. 

Locate the transformer as 
identified in the photograph 


8. 

Remove the grey/blue/brown/mauve 
transformer connections to the mains 
inlet filter. Removing the two screws 
securing the mains inlet filter will aid 
removal. 


9. 

Remove the yellow/orange 
transformer connections to the PCB 

NOTE - record the connections before 
removing 


10. 

Remove  the 4-off M4x10 csk socket cap screws retaining the transformer 
mounting plate to the motor assembly 


11. 

Lift out the transformer. Unscrew nylon nut, Remove transformer from plate. 
 

NOTE

: The transformer 

must 

be insulated from its mounting plate. An insulating 

gasket is supplied with the transformer for this purpose 

– 

make sure it is fitted


Refitting of the Transformer is the reverse of the above procedure


Summary of Contents for MultiTest 0.5-dV

Page 1: ...dV 2 5dV Service and Repair Manual Number 022 780 Issue Number 02 Page 1 of 32 PDF copy stored in approved location by click on signature for validation Paper copy printed from approved PDF source by Name Signature Date ...

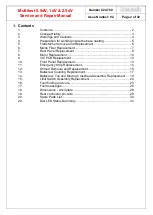
Page 2: ...ent 7 7 Rear Panel Replacement 8 8 Motor Replacement 10 9 VIC PCB Replacement 12 10 Front Panel Replacement 13 11 Emergency Stop Replacement 14 12 Shroud Removal and Replacement 15 13 Ballscrew Coupling Replacement 17 14 Ballscrew Top and Moving Crosshead Assembly Replacement 19 15 Limit Switch Assembly Replacement 20 16 Fault finding and cure 23 17 Fault messages 26 18 Dimensions Anvil plate 28 1...

Page 3: ...e 0A 11 01 16 SL Initial Draft Instruction 0B 11 03 16 2548 SL Motor mounting changed 01 10 11 16 GG 4 x unknown serial No markers replaced with date indicators New front panel part No corrected Spare Parts aligned with Spare Parts Price List 02 02 02 17 2724 GG PED Open Issue 10068 Update service manual change history table to include Sno Mechanical change columns 910 427 added to SPPL DCR 2724 ...

Page 4: ...l Number 022 780 Issue Number 02 Page 4 of 32 3 Warnings and Cautions General anti static precautions should be observed whilst following this service instruction Anti static precautions must be taken when performing any repairs to electronic equipment ...

Page 5: ...he test stand safely in an inverted position 3 Remove 4 off rubber feet 22mm dia x 10mm retained by countersunk screws 4 Remove base plate retained by 4 off M4x12mm pan pozi taptite screws into the base casting and 2 off M4x6mm pan pozi screws into the rear panel 5 Lift the base panel clear of the base casting access to all components within the base casting is now available Refitting of the Base ...

Page 6: ...ing the mains inlet filter will aid removal 9 Remove the yellow orange transformer connections to the PCB NOTE record the connections before removing 10 Remove the 4 off M4x10 csk socket cap screws retaining the transformer mounting plate to the motor assembly 11 Lift out the transformer Unscrew nylon nut Remove transformer from plate NOTE The transformer must be insulated from its mounting plate ...

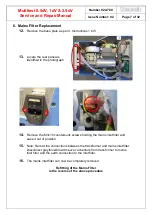
Page 7: ...aph 14 Remove the M3x10 countersunk screws holding the mains inlet filter and ease it out of position 15 Note Record the connections between the transformer and mains inlet filter Disconnect grey blue brown mauve connectors from transformer to mains inlet filter and the earth connection to the inlet filter 16 The mains inlet filter can now be completely removed Refitting of the Mains Filter is the...

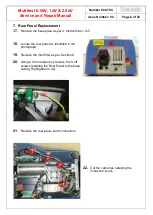
Page 8: ...late as per 4 Instructions 1 to 5 18 Locate the rear panel as identified in the photograph 19 Remove the inlet filter as per Section 6 20 Using a 2 5mm allen key remove the 3 off screws retaining the Rear Panel to the base casing Highlighted in red 21 Remove the rear panel earth connection 22 Cut the cable ties retaining the connector looms ...

Page 9: ...ay loom x10 and the RJ11 6 way loom X3 24 Disconnect the digital I O loom 352 248 rear panel I O from PL1 EXPANSION I O on the VIC board 25 The complete rear panel can now be lifted out for replacement as an assembly or the replacement of the panel itself or any of the connectors looms Refitting of the Rear Panel is the reverse of the above procedure ...

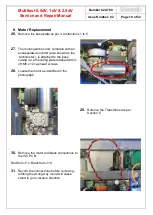
Page 10: ...encoder also known as the tachometer is attached to the base casing via a mounting plate retained with 3 off M6 x 12 cap head screws 28 Locate the motor as identified in the photograph 29 Remove the Transformer as per Section 5 30 Remove the motor red black connections to the VIC PCB Red from J11 Black from J10 31 Record the connections before removing refitting the wrong way round will cause stan...

Page 11: ... motor using 4 off M4 x 12 screw skt cap and 4 off 35mm hexagon spacers Test Stands From 31 05 16 This is fixed with 4 off M4 x 45 skt cap screws through 4 off 35mm long stainless steel spacers Remove the drive coupling from the old motor drive shaft and fit to the new motor using note that in the picture the motor mounting plate and pillars have been removed for clarity using 2 off M4 x 5 dog poi...

Page 12: ...s 1 to 5 37 Locate the Vic PCB as identified in the photograph 38 Remove the transformer as per 5 39 Remove the motor as per Section 9 40 Remove all loom connections to the PCB 41 NOTE record the connections before removing 42 Remove the 4 off M3x6 pan head pozi drive screws retaining the control PCB on to the hex pillars and lift out the PCB Refitting the PCBs is the reverse of the above procedur...

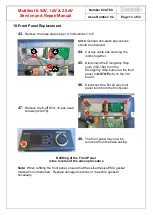
Page 13: ... Stop loom 352 188 from the Emergency Stop button on the front panel to E STOP x8 on the VIC board 46 Disconnect the DV 20 way front panel loom from the front panel 47 Remove the 6 off M3 x 16 pan head screws 420 478 48 The front panel may now be removed from the base casing Refitting of the Front Panel is the reverse of the above procedure Note When refitting the front panel ensure that the self ...
Page 14: ...m connection take care excessive force can break the lug 50 Pull off loom connection 51 Note the orientation of the switch and maintain this orientation on re assembly 52 Using a suitable tool unscrew the collar retaining the Emergency Stop button and remove completely enabling the Emergency Stop to be withdrawn through the front of the front panel 53 Fit replacement Emergency Stop Refitting the E...

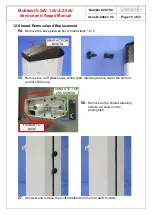
Page 15: ...Remove the base plate as per 4 Instructions 1 to 5 55 Remove the 3 off plastic snap action rivets retaining the top cap to the shroud and lift off the cap 56 Remove all the shroud retaining screws as shown in the photograph 57 Unscrew and remove the 2 off knoblets from the limit switch collets FIXINGS TO TOP CROSSHEAD FIXINGS TO BASE ...

Page 16: ... 5dV 1dV 2 5dV Service and Repair Manual Number 022 780 Issue Number 02 Page 16 of 32 58 Lift the shroud until it comes clear of the columns crossheads Refitting of the Shroud is the reverse of the above procedure ...
Page 17: ...ve the shroud as per Section 12 60 Remove M8 x 20 socket cap head screws retaining top crosshead to columns 61 Undo the 2 grub screws holding the drive coupling to the bottom of the ballscrew 62 Pull the top crosshead upwards and this should help remove the drive coupling as it is forced against the bottom brace Remove the drive coupling ...

Page 18: ...ng 65 Set the vertical position of the coupling such that it is fully inserted into the lower portion of the coupling and retighten the grub screws Use Loctite 243 on the grubscrews NOTE The ball screw must pass through the bottom bearing plate before the 12mm drive coupling with M4 x 10 skt grub screw can be fitted In this case loosen the coupling grub screws first then lift the ballscrew upwards...

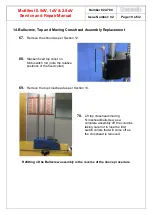
Page 19: ...8 Slacken fixed top collet on Microswitch rod note the relative positions of the fixed collet 69 Remove the top crosshead as per Section 13 70 Lift top crosshead moving 5crosshead ballscrew as a complete assembly off the columns taking care not to lose the limit switch collets that will come off as the crosshead is removed Refitting of the Ballscrew assembly is the reverse of the above procedure ...

Page 20: ...the base plate as per 4 Instructions 1 to 5 72 Locate the limit switch as identified in the photograph 73 Partially remove the rear panel as per Section 7 and lay clear of the limit switch 74 Remove knoblets from the two adjustable limit switch collets 75 Remove the shroud as per Section 12 76 Slacken grub screws retaining top and bottom fixed collets note the relative positions of all four collet...

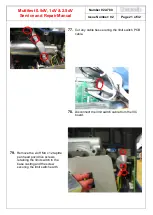
Page 21: ... Page 21 of 32 77 Cut any cable ties securing the limit switch PCB cable 78 Disconnect the limit switch cable from the VIC board 79 Remove the 2 off M4 x 12 taptite pan head pozi drive screws retaining the limit switch to the base casting and the screw securing the limit switch earth ...

Page 22: ... from the test stand Refitting of the Limit Switch is the reverse of the above procedure 81 Adjust top and bottom short locking collars to Factory set limits as listed in the table below Tighten in position using Loctite 243 on the screwthreads 0 5 kN Stands 1 kN Stands 2 5 kN Stands Top Collar 50mm 50mm 50mm Bottom Collar 60mm 60mm 60mm ...

Page 23: ...k that all the looms are connected and in the right positions 83 Connect a D V M to the orange and yellow wires of the transformer to check for correct voltage 24 28V AC 2 Over travelled is displayed on screen i Check that the limit switch rod moves freely If the rod moves freely up and down do you hear a click in both directions of the micro switches ii If the limit switch rod doesn t move freely...

Page 24: ... gauge i Check that the gauge loom is securely connected to the back of the stand ii Check that the DV rear panel RJ11 6 way loom is connected properly to PL3 on the VIC board iii Using a D V M check the continuity of the RJ11 loom iv Check that the RJ11 loom is wired correctly v If all of the above are ok then replace the VIC PCB NOTE The above checks are assuming that the gauge and connector loo...

Page 25: ...ectly fitted to the motor and the VIC board v If all of the above are ok then replace the motor 10 Stand resets itself Switches on and off i Check output from the mains inlet filter is constant ii Check output from transformer is correct 24 28V AC iii Check DV 20 way front panel loom 353 232 is correctly wired between the front panel and DISPLAY PL2 on the VIC board iv Check continuity of looms us...

Page 26: ...detected that the motor is over temperature Over travelled Emergency stop Faulty Emergency Stop Loom The emergency stop has two parts a hardware stop circuit and software stop circuit The hardware stop circuit and overtravel circuit both use the same signal to trigger a relay to stop the stand So if the hardware wire of the Emergency stop loom is damaged faulty it will activate the same relay The ...

Page 27: ...Multitest 0 5dV 1dV 2 5dV Service and Repair Manual Number 022 780 Issue Number 02 Page 27 of 32 Dimensions dV Stand Multitest dV Multitest 0 5 dV Multitest 2 5 dV Multitest 1 dV ...

Page 28: ...t 0 5dV 1dV 2 5dV Service and Repair Manual Number 022 780 Issue Number 02 Page 28 of 32 18 Dimensions Anvil plate 408 253 F98 ANVIL PLATE Further information 5 16 UNC 420 172 M6 x 20 420 054 10 32 UNF 420 055 ...

Page 29: ... Tx for Communication with Gauge 16 Digital Output 3 17 Digital Output 4 18 Digital Output 5 19 Digital Output 6 7 Ground 21 VCC 5V 9 Digital Input 1 10 Digital Input 2 23 Event Input 11 Digital Input 3 24 Digital Input 6 12 Digital Input 4 25 Ground 13 Digital Input 5 The pin out for the 6 way RJ11 connector on the back of the MultiTest dV is 1 Ground 2 S2 3 Tx 4 Rx 5 S1 6 5V The pin out for the ...

Page 30: ...568 MT 0 5 Mk2 COLUMN 1 Dependant on stand variant 18 406 567 MT 1 0 Mk2 COLUMN 1 Dependant on stand variant 19 406 421 MT 2 5 Mk2 COLUMN 1 Dependant on stand variant 20 406 570 MT 0 5 Mk2 LIMIT SWITCH ROD 1 Dependant on stand variant 21 406 569 MT 1 0 Mk2 LIMIT SWITCH ROD 1 Dependant on stand variant 22 406 422 MT 2 5 Mk2 LIMIT SWITCH ROD 1 Dependant on stand variant 23 300 148 V01 COMMON LIMIT S...

Page 31: ...NG X HEAD 1 408 310 MULTITEST TOP X HEAD 1 411 002 DU BUSH 1212 2 411 003 DU BUSH 2030 3 411 118 THRUST WASHER KOYO AS1226 5 411 119 THRUST BEARING KOYO AXK1226 A 2 413 037 ADJUSTABLE HANDLE LEVER M8 1 415 022 DISC SPRING 180002 2 420 039 WASHER M3 0 5 ZINC 2 420 053 SCREW GRUB SKT M4x10 1 420 063 SKT GRUB SCREW M4x4MM 2 420 236 M12x1 NUT LOCKING PITCH 1 420 246 WASHER FLAT M12 1 5mm THK 1 420 297...

Page 32: ...Green Pulsing All Ready to test Green Stationary Half Entering Meu selection Amber Stationary Half Ready to jog Amber Stationary All Test complete Amber Rotates clockwise Half Turning dial wheel clockwise crosshead moving up Amber Rotates anti clockwise Half Turning dial wheel anti clockwise crosshead moving down Amber Rotates clockwise Half Jogging down Amber Rotates anti clockwise Half Jogging u...

Reviews: