


9
(
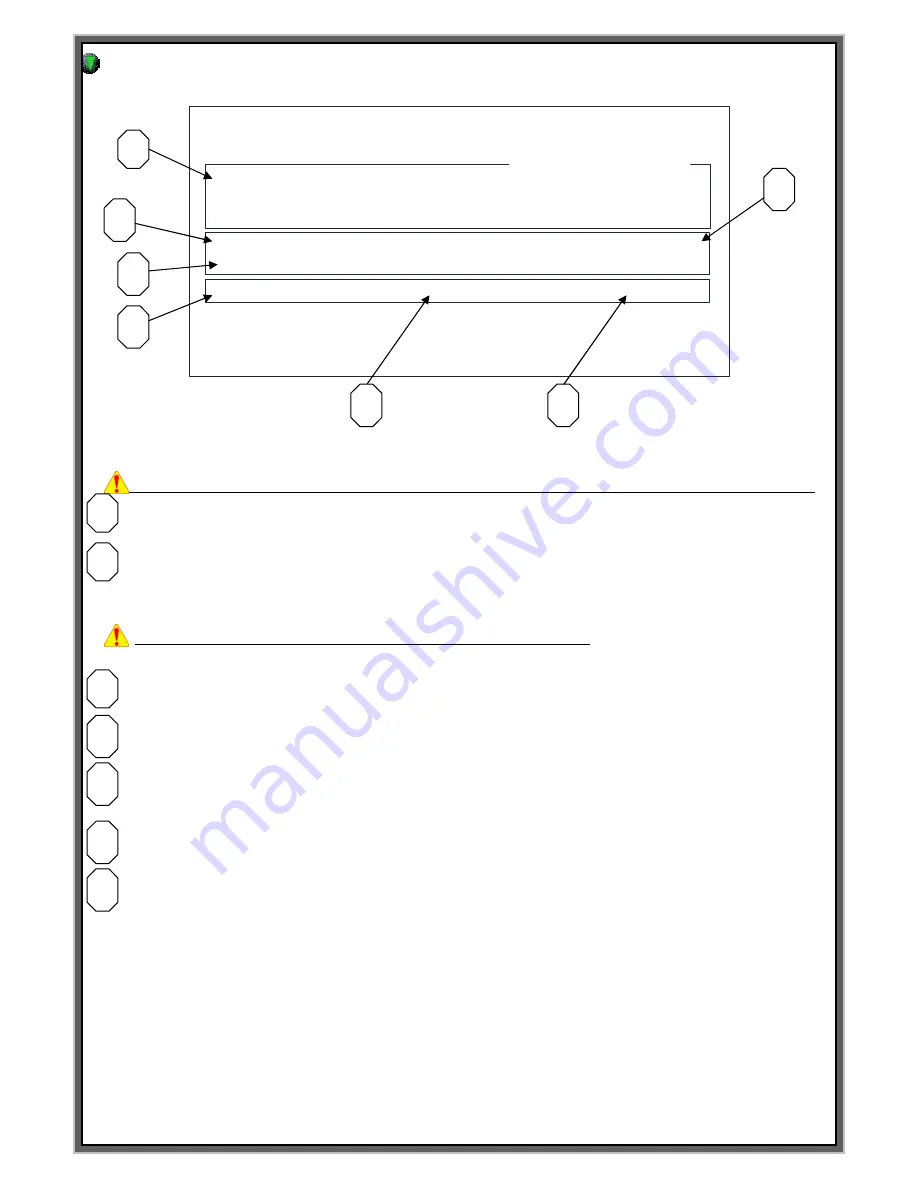
F1)Screen : M_MENU (Manual marking)
F1 : M_MENU F2 : A_MARK F3 : EDIT F4 : FILE
F5 : SETUP F6 : TEST F7 : LOAD F8 : COMM
BLK NO. [ 000 ]
LN X : 0300 Y : 0300 A : 000
FNT : STD1 CH:030 PX:030 PAUSE : N
MARK_UP_TO[ 00000000 ] UNIT_NO[00001713]
Blk Nos. [000] [001] [002] [003] [004]
15:15:22 0.00 STATUS [ ]
[MANUAL MARK MODE]
BLK_COPY : CTRL_C BLK_MOVE : UP/DOWN
CURSOR_MOVE : ENTER SELECT : SPACE_BAR
F9 : SIMULATION F10 : MARK F11 : HOME
F1 screen is the mode of simple manual marking. In case of manual marking, it can be done only
this screen. (But it can be done on the F8 mode when it is the marking using RS-232 Communication.)
IF you give the signal to the I/O on the F1, malfunctioned can be happened.(External control Malfunction)
BLK NO[000] : Block no. of the marking data
MARK UP TO: This function allows you to set a number of how many pieces of your product to be marked.
If you set the number like [00000100] to MARK_UP_TO,
when marked quantity reached this number, the system will be stopped automatically.
**Caution
–
This valve must be
“
0000000
”
on automation mode.**
UNIT NO : Indicate the work quantity until now.
Blk Nos. : Marking in order. Can change the marking order after you moves the cursor to Blk Nos.
15:15:22 : Indicate the present time.
0.00 : The Cycle time of previous marking. (Unit : sec)
STATUS : Indicate the status of marking machine
[ BLOCK ] : In case of marking using PLC START
[ MARKING ] : In case of marking by common START
[ END RUN ] : In case marking is done.
[ EMER STOP ] : When it gets the signal
“
Emergency stop
”
of PLC and error of the working
[ LIMIT ERROR ] : Limit error
[ UNIT END ] : When the specified marking quantity is done.
CUSOR_MOVE : ENTER : Moving the cursor and storage the data is the
“
Enter
”
on the keyboard.
SELECT :SPACE_BAR : Can change the mode of marking by Space_Bar on the keyboard
F9:SIMULATION : Simulation F10 :MARK : Marking F11:HOME: Return to home position
1
2
3
4
5
6
7
1
2
3
4
5
6
7
Summary of Contents for MCU-100N
Page 8: ...8 F1 MANUAL MARK MODE...
Page 10: ...10 F2 AUTO MARK MODE...
Page 35: ...35 F4 DATA MODE...
Page 39: ...39 F5 SETUP MODE...
Page 47: ...47 F6 TEST MODE...
Page 49: ...49 F7 FILE LODE MODE...
Page 52: ...52 F8 COMMUNICATION MODE...
Page 59: ...59 How to Create PLT file by standard AUTO CAD 2006...
Page 73: ...73...
Page 79: ...79...
Page 80: ...80...
Page 94: ...94 How to Modify the data of block and modify the time of the controller...


