background image

5

ENGLISH

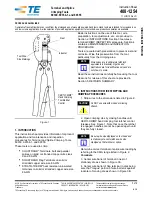
Explanation of general view

SPECIFICATIONS

• Due to our continuing programme of research and development, the specifications herein are subject to change without 

notice.

• Note: Specifications may differ from country to country.
* Net weight determined according to EPTA procedure (include side handle)

Intended use

ENE044-1

The tool is intended for hammer drilling in brick, concrete 
and stone as well as for chiselling work. 

Power supply

ENF002-1

The tool should be connected only to a power supply of 
the same voltage as indicated on the nameplate, and can 
only be operated on single-phase AC supply. They are 
double-insulated in accordance with European Standard 
and can, therefore, also be used from sockets without 
earth wire. 

SPECIFIC SAFETY RULES

GEB007-2

DO NOT let comfort or familiarity with product (gained 
from repeated use) replace strict adherence to rotary 
hammer safety rules. If you use this tool unsafely or 
incorrectly, you can suffer serious personal injury. 

1.

Wear ear protectors.

 Exposure to noise can cause 

hearing loss. 

2.

Use auxiliary handles supplied with the tool.

 Loss 

of control can cause personal injury. 

3.

Hold power tools by insulated gripping surfaces 
when performing an operation where the cutting 
tool may contact hidden wiring or its own cord.


Contact with a “live” wire will make exposed metal 
parts of the tool “live” and shock the operator. 

4.

Wear a hard hat (safety helmet), safety glasses 
and/or face shield. Ordinary eye or sun glasses 
are NOT safety glasses. It is also highly 

recommended that you wear a dust mask and 
thickly padded gloves. 

5.

Be sure the bit is secured in place before 
operation. 

6.

Under normal operation, the tool is designed to 
produce vibration. The screws can come loose 
easily, causing a breakdown or accident. 
Check tightness of screws carefully before 
operation. 

7.

In cold weather or when the tool has not been 
used for a long time, let the tool warm up for a 
while by operating it under no load. This will 
loosen up the lubrication. Without proper warm-
up, hammering operation is difficult. 

8.

Always be sure you have a firm footing. 
Be sure no one is below when using the tool in 
high locations. 

9.

Hold the tool firmly with both hands. 

10.

Keep hands away from moving parts. 

11.

Do not leave the tool running. Operate the tool 
only when hand-held. 

12.

Do not point the tool at any one in the area when 
operating. The bit could fly out and injure 
someone seriously. 

13.

Do not touch the bit or parts close to the bit 
immediately after operation; they may be 
extremely hot and could burn your skin. 

14.

Some material contains chemicals which may be 
toxic. Take caution to prevent dust inhalation and 
skin contact. Follow material supplier safety data. 

1.

Switch trigger

2.

Lamp

3.

Adjusting dial

4.

Lock button

5.

Pointer

6.

Change lever

7.

Power-ON indicator lamp (green)

8.

Service indicator lamp (red)

9.

Side grip

10. Bit shank
11. Bit grease
12. Bit
13. Chuck cover
14. Depth gauge

15. Clamp screw
16. Blow-out bulb
17. Screws
18. Connector
19. Crank cap cover

Model

HR3540C

HR3541FC

Capacities

Concrete

Tungsten-carbide tipped bit

35 mm

Core bit

90 mm

Steel

13 mm

Wood

32 mm

No load speed (min

-1

)

315 - 630

Blows per minute

1,650 - 3,300

Overall length

439 mm

*Net weight

5.2 kg

5.6 kg

Safety class

/II

Summary of Contents for HR3541FC

Page 1: ...nuel d instructions D Kombi Hammer Betriebsanleitung I Martello combinato Istruzioni per l uso NL Combinatiehamer Gebruiksaanwijzing E Martillo combinado Manual de instrucciones P Martelo combinado Ma...

Page 2: ...2 1 2 3 4 5 6 7 8 1 2 3 4 5 6 4 6 5 5 6 4 7 8 9...

Page 3: ...3 9 10 11 12 13 14 15 16 11 10 12 13 12 13 6 4 5 14 15 16...

Page 4: ...4 17 18 19 20 21 22 23 24 17 17 18 19 17 17 18...

Page 5: ...ecommended that you wear a dust mask and thickly padded gloves 5 Be sure the bit is secured in place before operation 6 Under normal operation the tool is designed to produce vibration The screws can...

Page 6: ...tate the change lever so that the pointer points to the symbol Use a tungsten carbide tipped bit Rotation only Fig 5 For drilling in wood or metal materials etc depress the lock button and rotate the...

Page 7: ...ore pressure when the hole becomes clogged with chips or particles Instead run the tool at an idle then remove the bit partially from the hole By repeating this several times the hole will be cleaned...

Page 8: ...enuine hammer grease optional accessory Filling with more than the specified amount of grease approx 30 g can cause faulty hammering action or tool failure Fill only with the specified amount of greas...

Page 9: ...level LpA 91 dB A Sound power level LWA 102 dB A Uncertainty K 3 dB A Wear ear protection Vibration ENG215 1 The vibration total value tri axial vector sum determined according to EN60745 2 6 Work mod...

Page 10: ...opre cordon d alimentation Le contact avec un fil sous tension mettra les parties m talliques expos es de l outil sous tension causant ainsi un choc lectrique chez l utilisateur 4 Portez une coiffure...

Page 11: ...a lampe Prenez garde de rayer la lentille de la lampe sinon sa capacit d clairage sera affect e Changement de vitesse Fig 3 Il est possible d ajuster les r volutions et les frappes par minute en tourn...

Page 12: ...us assurer qu il demeure fermement en place Pour retirer le foret tirez le couvercle du mandrin compl tement vers le bas puis tirez sur le foret Fig 11 Angle du foret lors du burinage de l caillage ou...

Page 13: ...ation ou chaque jour Cependant il est recommand de remplacer r guli rement la graisse pour une plus longue dur e de vie de l outil Faites tournez l outil pendant quelques minutes pour le r chauffer Me...

Page 14: ...NG301 1 Mode de fonctionnement per age du m tal Emission de vibrations ah D 2 5 m s2 Incertitude K 1 5 m s2 Pour le mod le HR3541FC ENG102 1 Pour les pays europ ens uniquement Bruit Les niveaux de bru...

Page 15: ...n kann Der Kontakt mit einem Strom f hrenden Kabel leitet diesen an die metallenen Teile des Werkzeugs weiter und verursacht einen Stromschlag beim Bediener 4 Tragen Sie einen Sicherheitshelm Sicherhe...

Page 16: ...Lampenlinse mit einem trockenen Tuch ab Achten Sie darauf die Lampenlinse nicht zu zerkratzen da dies die Beleuchtungsst rke mindern kann nderung der Drehzahl Abb 3 Die Umdrehungen und Schl ge pro Min...

Page 17: ...t ein Drehen Sie den Bohrmei el und dr cken Sie ihn hinein bis er einrastet berpr fen Sie nach der Montage stets ob der Mei el einwandfrei sitzt indem Sie versuchen ihn herausziehen Ziehen Sie die Wer...

Page 18: ...ngegen die Betriebsart Schlagbohren eingestellt kann die Diamantbohrkrone gegebenenfalls besch digt werden WARTUNG ACHTUNG Schalten Sie das Werkzeug stets aus und ziehen Sie den Stecker bevor Sie Pr f...

Page 19: ...me dreier Achsen nach EN60745 2 6 Arbeitsmodus Mei elfunktion Schwingungsbelastung ah CHeq 12 5 m s2 Abweichung K 1 5 m s2 ENG303 1 Arbeitsmodus Schlagbohren in Beton 20 mm Durchmesser und 165 mm Tief...

Page 20: ...che esposte dell utensile si trovino anch esse sotto tensione provocando scosse elettriche all operatore 4 Indossare un elmetto casco di sicurezza occhiali di sicurezza e o visiere protettrici I comun...

Page 21: ...e I segni sulla ghiera vanno da 1 velocit minima a 5 velocit massima Fare riferimento alla tabella seguente per quanto riguarda la relazione fra la posizione della ghiera e il numero di giri e di colp...

Page 22: ...no al simbolo Ruotare la punta fino all angolo desiderato Rilasciare il pulsante di blocco e ruotare la leva per la modifica della modalit operativa fino al simbolo Quindi verificare che la punta rima...

Page 23: ...i e rimuovere l impugnatura Nota le viti superiori sono diverse dalle altre Fig 18 Sconnettere il connettore tirandolo Fig 19 Allentare le due viti sul coperchio della manovella e rimuoverla Fig 20 Al...

Page 24: ...HR3541FC ENG102 1 Solo per i paesi europei Rumorosit Il tipico livello di rumore ponderato A determinato in conformit con la norma EN60745 2 6 Livello di pressione sonora LpA 91 dB A Livello di poten...

Page 25: ...en waar het gereedschap met verborgen bedrading of zijn eigen snoer in aanraking kan komen Door contact met onder spanning staande draden zullen de niet ge soleerde metalen delen van het gereedschap o...

Page 26: ...ingeknepen houdt De lamp gaat 10 tot 20 seconden nadat u de aan uit schakelaar hebt losgelaten uit OPMERKING Gebruik een doek om het vuil van de lens van de lamp te vegen Wees voorzichtig de lens van...

Page 27: ...et aanbrengen altijd of het boortje stevig in het gereedschap is bevestigd door te proberen het eruit te trekken Om de boor te verwijderen trekt u de boorkopmof helemaal omlaag en dan trekt u de boor...

Page 28: ...t nodig dit gereedschap iedere uur of iedere dag te smeren omdat het is uitgerust met een gesloten smeersysteem Wij adviseren u echter het vet regelmatig te verversen voor een langere levensduuur van...

Page 29: ...on 20 mm diameter en 165 mm diepte Trillingsemissie ah HD 18 0 m s2 Onzekerheid K 1 5 m s2 ENG301 1 Gebruikstoepassing boren in metaal Trillingsemissie ah D 2 5 m s2 Onzekerheid K 1 5 m s2 Voor model...

Page 30: ...una operaci n en que la herramienta de corte pueda entrar en contacto con cables ocultos o con su propio cable Si entra en contacto con un cable con corriente las piezas met licas expuestas se cargar...

Page 31: ...de luz Tire del interruptor disparador para encender la luz La luz permanece encendida mientras se acciona el interruptor disparador La luz se apaga entre 10 y 20 segundos despu s de soltar el dispara...

Page 32: ...la cubierta del mandril un par de veces hacia abajo Vuelva a introducir la broca G rela y emp jela hasta que se enclave Despu s de la instalaci n aseg rese siempre de que la broca est bien sujeta en...

Page 33: ...diamante utilizando el giro con percusi n la broca de punta de diamante puede resultar da ada MANTENIMIENTO PRECAUCI N Aseg rese siempre de que la herramienta est apagada y desenchufada antes de inten...

Page 34: ...o de trabajo funci n de cincelado Emisi n de vibraciones ah CHeq 12 5 m s2 Incertidumbre K 1 5 m s2 ENG303 1 Modo de trabajo perforaci n con percusi n en hormig n 20 mm de di metro y 165 mm de profund...

Page 35: ...ies isoladas desses acess rios O contacto com um fio el ctrico ligado corrente pode electrificar as pe as de metal da ferramenta e causar um choque 4 Use um capacete de seguran a culos de protec o e o...

Page 36: ...nima a 5 velocidade m xima Consulte a tabela em baixo para a verificar a rela o entre a defini o dos n meros no man pulo de regula o e as rota es sopros por minuto PRECAU O Se a ferramenta fica em fun...

Page 37: ...pulo de mudan a at apontar para o s mbolo Certifique se de que a broca est bem encaixada girando a ligeiramente Medidor de profundidade Fig 13 O medidor de profundidade conveniente para perfurar bura...

Page 38: ...or puxando o Fig 19 Solte os dois parafusos na cobertura da tampa da manivela e retire a cobertura da tampa da manivela Fig 20 Alinhe o man pulo de mudan a com o s mbolo solte os cincos parafusos e re...

Page 39: ...A t picos foram determinados segundo a EN60745 2 6 N vel de press o sonora LpA 91 dB A N vel de pot ncia sonora LWA 102 dB A Imprecis o K 3 dB A Use protec o para os ouvidos Vibra o ENG215 1 O valor...

Page 40: ...erhedshjelm beskyttelsesbriller og eller ansigtsmaske Almindelige briller eller solbriller er IKKE beskyttelsesbriller Det anbefales desuden kraftigt at b re st vmaske og kraftigt polstrede handsker 5...

Page 41: ...eller 1 da hastighedsjusteringen ellers kan g i stykker Valg af funktionstilstand Rotation med slag Fig 4 Ved boring i beton murv rk osv skal l seknappen trykkes ned og skiftearmen skal drejes s pilen...

Page 42: ...at det glider v k fra hullet Anvend ikke mere tryk n r hullet bliver tilstoppet med sp ner eller partikler Lad i stedet v rkt jet k re i tomgang og tag bitten delvist ud af hullet N r De gentager den...

Page 43: ...m tilbeh r Hvis der p fyldes mere end den angivne m ngde sm remiddel cirka 30 g kan det medf re forkert hammerfunktion eller at v rkt jet slet ikke fungerer P fyld kun den angivne m ngde sm remiddel F...

Page 44: ...91 dB A Lydkraftniveau LWA 102 dB A Usikkerhed K 3 dB A B r h rev rn Vibration ENG215 1 Den samlede vibrationsv rdi treaksiel vektorsum bestemt i overensstemmelse med EN60745 2 6 Arbejdstilstand mejsl...

Page 45: ...45 EPTA ENE044 1 ENF002 1 GEB007 2 1 2 3 4 5 6 7 1 2 3 4 5 6 7 8 9 10 11 12 13 14 15 16 17 18 19 HR3540C HR3541FC 35 mm 90 mm 13 mm 32 mm min 1 315 630 1 650 3 300 439 mm 5 2kg 5 6 kg II...

Page 46: ...46 8 9 10 11 12 13 14 1 OFF HR3541FC 2 10 20 3 1 5 5 1 5 1 4 5 6 5 630 3 300 4 590 3 100 3 480 2 500 2 370 1 900 1 315 1 650...

Page 47: ...47 7 ON ON OFF 8 8 9 10 11 12 24 13 14...

Page 48: ...48 15 16 17 Makita 18 19 20 21 22 23 30 Makita 30...

Page 49: ...ENG215 1 EN60745 2 6 ah CHeq 12 5 m s2 1 5 m s2 ENG303 1 20 mm 165 mm ah HD 18 0 m s2 1 5 m s2 ENG301 1 ah D 2 5 m s2 1 5 m s2 HR3541FC ENG102 1 EN60745 2 6 LpA 91 dB A LWA 102 dB A 3 dB A ENG215 1 E...

Page 50: ...3540C HR3541FC EN60745 EN55014 EN61000 2004 108 98 37 CE 2007 Tomoyasu Kato Makita Corporation 3 11 8 Sumiyoshi cho Anjo Aichi JAPAN Makita International Europe Ltd Michigan Drive Tongwell Milton Keyn...

Page 51: ...51...

Page 52: ...Makita Corporation Anjo Aichi Japan 884815A998...

Reviews: