background image

Magna-Matic Corporation - W4599 County Road IW - Waldo WI  53093 USA - Phone: (920) 564-2366 - FAX: (920) 564-2368 - Toll Free USA & Canada 

1-800-328-1110

http://

www.magna-matic.com

 - email: [email protected] © Copyright 2023 All rights reserved

Quick Setup Guide

WARNING

WHEN USING ELECTRIC TOOLS, BASIC SAFETY 

PRECAUTIONS SHOULD ALWAYS BE FOLLOWED 

TO REDUCE THE RISK OF FIRE, ELECTRIC 

SHOCK, AND PERSONAL INJURY.

CAUTION

TURN OFF AND UNPLUG

BEFORE SERVICING

Page 1

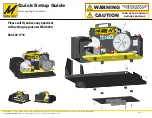
For all MAG-8200 Series Lawn Mower Blade Sharpeners 

Unpack the machine and check components: 

Box Contents: Sharpener, Grit Guard, Spanner Wrench, and Arbor Wrench

Assemble the grit guard.

1.  Use ten self-tapping screws.

2.  Assemble the grit guard sides to the top of the grit guard.

3.  The grit guard sides are identical and the holes will only line up in one orientation. (top 

vs bottom)

4.  Then attach the bottom of the grit guard.

Assemble the grit guard to the MAG-8200

5.  Remove the front cover (black cover with model decal on it) to expose the grinding 

wheel as shown in images 

6.  Use two self tapping screws to connect the bottom of the grit guard to the black base of 

the sharpener. The bottom of the grit guard is under the base of the sharpener, the put 

the screws in from under the machine, see image to right.

7.  Use two button head screws with nylon nuts to connect the top of the grit guard to the 

red body.

8.  Connect the crank handle to the end of the threaded adjustment rod with the set screw 

in the crank handle base.

Purchase grinding wheels and other parts  

and accessories at: 

www.magna-matic.com 

If you have any problems or  

questions please call:

800-328-1110

For full instruction manual:

www.magna-matic-direct.com/instruction-manuals/

Be sure the MAG-8200 power cord is unplugged.  Using 

a 5/16” socket wrench remove the (3) screws of the 

front steel guard.  Locate your spanner wrench and 

arbor wrench (both supplied by Magna-Matic.)  The 

arbor wrench fits into a square notch in the arbor behind 

the grinding wheel, and the spanner wrench fits into the 

two holes in the arbor nut. See diagrams below.

Always inspect grinding wheels for possible damage 

- never mount a cracked grinding wheel.  

DO NOT 

OVER-TIGHTEN ARBOR NUT - ONLY LIGHT 

PRESSURE TO TIGHTEN.

  The motor will tighten 

the arbor nut every time the sharpener is turned on.

For optimum performance use only grinding wheels 

specified by Magna-Matic.  All NORTON® brand grind

-

ing wheels sold by Magna-Matic are speed tested for 

5500 RPM

NOTE: ARBOR HAS LEFT-HANDED THREADS.

MAG-8200 OEM WHEEL = 9000-35

Summary of Contents for MAG-8200 Series

Page 1: ...it guard is under the base of the sharpener the put the screws in from under the machine see image to right 7 Use two button head screws with nylon nuts to connect the top of the grit guard to the red body 8 Connect the crank handle to the end of the threaded adjustment rod with the set screw in the crank handle base Purchase grinding wheels and other parts and accessories at www magna matic com I...

Page 2: ...gna matic com Copyright 2023 All rights reserved Quick Setup Guide WARNING WHEN USING ELECTRIC TOOLS BASIC SAFETY PRECAUTIONS SHOULD ALWAYS BE FOLLOWED TO REDUCE THE RISK OF FIRE ELECTRIC SHOCK AND PERSONAL INJURY CAUTION TURN OFF AND UNPLUG BEFORE SERVICING Page 2 Water Cooling Kit Assembly Please call if you have any questions with setting up your new MAG 8200 800 328 1110 ...

Page 3: ...nd water tray then put the nut on and tighten STEP 1 STEP 2 Shorter Rubber Feet are closer to 4 dia drain port to create pitch so liquid runs to drain port In these images we have removed the stand column to make the detail easier to see The stand table top must be connected to the column before adding the water tray ...

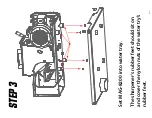
Page 4: ...Page 4 STEP 3 Set MAG 8200 into water tray The sharpener s rubber feet should sit on and cover the nylon nuts of the water try s rubber feet ...

Page 5: ...Page 5 Caulk each corner of the water tray and install corner angles and left and right splash guards STEP 4 ...

Page 6: ... Use 10 self tapping screws to connect water tray to grit guard and rear of MAG 8200 by motor STEP 5 2 Screws connect the rear of MAG 8200 to rear of water tray and use the loop to retain the clear vinyl hose ...

Page 7: ...uard sides to grit guard 2 Screws connect base of grit guard to base of water tray Use 10 self tapping screws to connect water tray to grit guard and splash guards STEP 6 Note The water cooling kit does not require a grit guard bottom ...

Page 8: ...he hose barb behind the sharpeners electric motor secure with loop connector 2 The power cord for the pump plugs into the outlet on the electric panel of the sharpener This outlet is switched by the blue switch 3 There is a red valve on the front of the sharpener to regulate how much coolant is delivered to the wheel 4 Always turn off the grinding wheel when adjusting coolant nozzle 5 Make sure to...

Page 9: ...8200 Series and MAG 10400 Stand Differences Changes IMPORTANT STAND NOTE The MAG 8200 Series mounts in the same oriention as the MAG 8000 So when you follow your MAG 10400 Stand instructions on page 14 The yellow base of the MAG 8200 is not threaded so the mounting to the stand is with a through bolt 1 4 The 10400 04 balancer arm base is a little longer now for the new MAG 8200 series IMPORTANT DU...

Page 10: ... Reference Point When the grinding wheel is lowered to the worktable almost cutting the work table corner you will produce a 30 degree angle on the lawn mower blade As the grinding wheel wears and reduces in diameter continue to lower the grinding wheel to almost touch the work table 1 32 space to maintain a consistent 30 degree edge angle on a blade As the wheel wears into an angled shape it will...

Reviews: