7 English
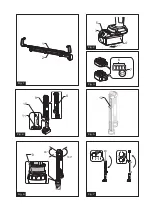
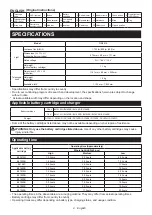
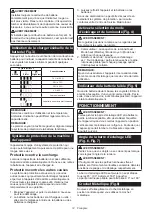
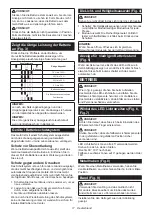
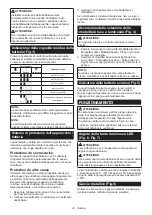
Indicating the remaining battery
capacity (Fig. 3)
Press the check button on the battery cartridge to
indicate the remaining battery capacity. The indicator
lamps light up for a few seconds.
Indicator lamps
Remaining capacity
Lighted
Off
Blinking
75% to 100%
50% to 75%
25% to 50%
0% to 25%
Charge the battery.
The battery may have malfunctioned.
NOTE:
Depending on the conditions of use and the ambient
temperature, the indication may differ slightly from the
actual capacity.
NOTE:
The first (far left) indicator lamp will blink when the
battery protection system works.
Appliance / battery protection system
The appliance is equipped with the protection system,
which automatically cuts off the output power for long
service life.
Overdischarge protection
When the battery capacity is not enough, the appliance
stops automatically. In this case, remove the battery
from the appliance and charge the battery.
Protections against other causes
Protection system is also designed for other causes that
could damage the appliance and allows the appliance to
stop automatically. Take all the following steps to clear
the causes, when the appliance has been brought to a
temporary halt or stop in operation.
1. Turn the appliance off, and then turn it on again to
restart.
2. Charge the battery(ies) or replace it/them with
recharged battery(ies).
3. Let the appliance and battery(ies) cool down.
If no improvement can be found by restoring protection
system, then contact your local Makita Service Center.
Turning on the light and brightness
mode selection (Fig. 4)
CAUTION:
Do not look in the light or see the source of light
directly.
1. Switch: Brightness sequence is: High mode(On) /
Medium mode / Low mode / Off for each press.
2. Mode selector: Light up sequence is: Whole Light /
Fixed light part / Foldable light part for each press
when the switch is on.
NOTE:
When you switch on the appliance, it will be turned on
the same light mode as the last time you use.
Low battery indicator (Fig. 5)
When the battery becomes low, the LED lights go out
except one LED light as illustrated. Then approximately
five to ten minutes later, the appliance automatically
turns off.
OPERATION
CAUTION:
Rotate the LED light bar and fold down the foldable
light part to stabilise the balance of the appliance when
you put the appliance in upright position as shown
in fig.4. Otherwise, the appliance may fall over and
personal injury occur.
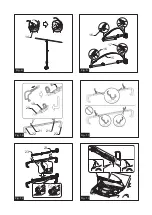
LED light bar angle (Fig. 6, Fig. 7)
CAUTION:
Take care not to trap finger(s) when adjusting the
angle of the light.
CAUTION:
Make sure the fixed and foldable light part to be locked
together firmly in folding and unfolding positions
respectively.
The LED light bar can be rotated in seven stages for
every 45˚. (90˚ to the right and 180˚ to the left)
The foldable light part can be bent to 0˚ or 180˚.
Metal hook (Fig. 8)
Raise and slide the metal hook to center position when
using the metal hook.
Strap (Fig. 9)
CAUTION:
Do not use the ring and strap hole for any purpose
other than installing the strap. Otherwise personal
injury may occur.
Install the strap on the appliance as illustrated.
Summary of Contents for DML818
Page 2: ...12 1 2 3 4 5 6 7 8 9 11 10 180 90 13 Fig 1 Fig 4 Fig 6 Fig 7 Fig 5 Fig 2 Fig 3...
Page 3: ...21 22 21 22 19 20 18 14 15 16 16 17 23 23 Fig 10 Fig 12 Fig 13 Fig 11 Fig 8 Fig 9...
Page 45: ...45 Ni MH Li ion UV IR 1 2 3 4 5 6 7 8 9 10 11 12 13 14...
Page 46: ...46 130 C 265 F 15 1 2 3 50 C 122 F Makita Makita Makita Makita 16 10 C 40 C 50 F 104 F Fig 2...
Page 48: ...48 Fig 9 Fig 10 Fig 11 Fig 12 Fig 13 LED Makita Makita Makita Makita Makita...
Page 80: ...80 Ni MH Li ion 1 2 3 4 5 6 7 8 9 10 11 12 13 14 130 C 265 F...
Page 81: ...81 15 1 2 3 50 C 122 F c Makita Makita Makita 16 10 40 C 50 104 F Fig 2...
Page 83: ...83 Fig 10 Fig 11 Fig 12 Fig 13 Makita Makita Makita Makita Makita...
Page 105: ...105 Ni MH Li ion 1 2 3 4 5 6 7 8 9 10 11 12 13 14 130 C 265 F...
Page 106: ...106 15 1 2 3 50 C 122 F Makita Makita Makita Makita Makita 16 10 C 40 C 50 F 104 F Fig 2...
Page 108: ...108 Fig 9 Fig 10 Fig 11 Fig 12 Fig 13 Makita Makita Makita Makita Makita...
Page 125: ...125 Ni MH Li ion UV IR 1 2 3 4 5 6 7 8 9 10 11 12 13 14 130 C 265 F...
Page 126: ...126 15 1 2 3 50 C 122 F Makita Makita Makita Makita Makita 16 10 C 40 C 50 F 104 F Fig 2...
Page 128: ...128 Fig 8 Fig 9 Fig 10 Fig 11 Fig 12 Fig 13 Makita Makita Makita Makita Makita...
Page 135: ...135 Ni MH Li ion UV IR 1 2 3 4 5 6 7 8 9 10 11 12 13 14 130 C 265 F...
Page 136: ...136 15 1 2 3 50 C 122 F Makita Makita Makita Makita Makita 16 10 C 40 C 50 F 104 F Fig 2...
Page 138: ...138 Fig 9 Fig 10 Fig 11 Fig 12 Fig 13 LED Makita Makita Makita Makita Makita...
Page 140: ...140 Ni MH Li ion 1 2 3 4 5 6 7 8 9 10 11 12 13 14 130 C 265 F...
Page 141: ...141 15 1 2 3 50 C 122 F 16 10 C 40 C 50 F 104 F Fig 2...
Page 143: ...143 Fig 10 Fig 11 Fig 12 Fig 13 LED...
Page 150: ...150 Ni MH Li ion UV IR 1 2 3 4 5 6 7 8 9 10 11 12 13 14 130 C 265 F...
Page 151: ...151 15 1 2 3 50 C 122 F Makita Makita Makita Makita Makita 16 10 C 40 C 50 F 104 F Fig 2...


