background image

INSTALLING THE Z AXIS PG. 5

LAST UPDATE 06.11.19

TERMS OF USE

This work is licensed under the 

CREATIVE COMMONS 

Attribution-NonCommercial-NoDerivatives 

4.0 International License

To view a copy of this license

visit http://creativecommons.org/licenses/by-nc-nd/4.0/ 

or send a letter to 

Creative Commons

PO Box 1866

Mountain View, CA 94042

YOU ARE FREE TO:

Share

 — copy and redistribute the material in any medium or format

The licensor cannot revoke these freedoms as long as you follow the license terms.

UNDER THE FOLLOWING TERMS:

Attribution

 — You must give appropriate credit, provide a link to the license, and 

indicate if changes were made. You may do so in any reasonable manner, but not in 

any way that suggests the licensor endorses you or your use.

NonCommercial 

— You may not use the material for commercial purposes.

NoDerivatives 

— If you remix, transform, or build upon the material, you may not 

distribute the modified material.

No additional restrictions

 — You may not apply legal terms or technological measures 

that legally restrict others from doing anything the license permits.

NOTICES:

You do not have to comply with the license for elements of the material in the public 

domain or where your use is permitted by an applicable exception or limitation.

No warranties are given. The license may not give you all of the permissions necessary 

for your intended use. For example, other rights such as publicity, privacy, or moral 

rights may limit how you use the material.

Summary of Contents for MASLOW CNC

Page 1: ...THE MAKERMADE LEARNING LIBRARY TABLE OF CONTENTS 1 0 What s in Your Kit 1 1 Building the Frame 1 2 Adding the Electronics 1 3 Building the Temporary Sled 1 4 Installing the Z Axis 1 5 Calibrating Your...

Page 2: ...ALIKE 4 0 INTERNATIONAL LICENSE AC POWER CABLE X Y Motor Mounts 2 RING BRACKET X Y MOTORS ARDUINO MOTOR SHIELD DC POWER SUPPLY USB CABLE USB FLASH DRIVE Z AXIS MOTOR CABLE CHAINS 2 RING BRACKET MOUNTS...

Page 3: ...ultiple uses Attaches carriages to ring Cords hardware for attaching to frame Fastens motor to mounts Fastens L brackets to ring and to sled Holds bricks in place on sled Attaches Arduino to frame Att...

Page 4: ...m kit Note Lumber dimensions are not critical if 2x4s are not available in your area the local equivalent will work When cutting try to keep the ends as square as possible but small errors in the leng...

Page 5: ...BUILDING THE DEFAULT FRAME PG 2 LAST UPDATE 05 22 19 STEP 1 BUY MATERIALS 2X4 or equivalent lumber 6 10 10 10 10 10 10 8 PLYWOOD PRO TIP Label the parts as you cut them you ll be glad you did...

Page 6: ...equivalent lumber 120 TOP BEAM 88 REAR CROSSMEMBER 34 VERTICAL 34 VERTICAL 30 KICKER 30 KICKER 28 DIAGONAL 28 DIAGONAL 82 FRONT CROSSMEMBER LOWER 82 FRONT CROSSMEMBER UPPER 79 FRONT LEG 79 FRONT LEG...

Page 7: ...rough top of kickers into front legs Screw through top of kickers into spacers Flip each assembly over for next step STEP 3 4C POSITION BACK LEGS Rotate back legs out to end of kickers Screw bottom of...

Page 8: ...lower front crossmember on kickers Screw from top of crossmember into each kicker see Figure 1 Screw from side of each front leg into crossmember see Figure 2 STEP 5C ATTACH UPPER FRONT CROSSMEMBER R...

Page 9: ...upper crossmember Screw diagonals in place on each end Placement of diagonals need not be exact STEP 9 ATTACH SIDE BEAMS Beams were placed on cut list to have one factory end this end should face out...

Page 10: ...STEP 10 ATTACH TOP BEAM Center top beam across front Screw through top beam into 7 beams on each side STEP 11 STAND UP FRAME ATTACH PLYWOOD Rest plywood on kickers Attach with screws through front of...

Page 11: ...with Heat Shield Part 4 DC Power Supply Part 9 USB Cable Part 10 Flash Drive optional Part 11 X and Y Motor Cables Part 12 X and Y Motor Mounts Part 13 X and Y Motors Hardware Bag 5 Hardware Bag 6 Be...

Page 12: ...CONNECT THE POWER SUPPLY PART 1 AC Power Cable PART 3 DC Power Supply Plug DC power supply into shield Arduino also has a power supply port plugging power supply into it will not damage it but will n...

Page 13: ...meout or permissions errors try adding username to dialout group then logging out and back in When upload finishes close Arduino IDE STEP 8 INSTALL GROUND CONTROL In your browser navigate to https git...

Page 14: ...eam with wood screws STEP 13 ATTACH MOTORS TO MOUNTS BAG 5 8 small screws 8 lock washers PART 13 X Y Motors Place one motor in each bracket Slide lock washers over screws Fasten screws through front o...

Page 15: ...s setup guide USB CABLE POWER CABLE BACK OF FRAME ARDUINO MOTOR SHIELD STEP 15 ATTACH THE ARDUINO BAG 6 screws standoffs PART 2 Arduino Gently remove shield from Arduino Position Arduino in center of...

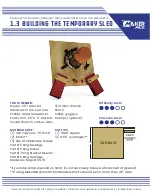
Page 16: ...ine Screws Part 5 Ring Bearings Part 6 Ring Mount Part 7 Ring Bracket Mounts Part 8 Ring Carriage Hardware Bags 3 6 7 8 If you have scrap plywood on hand it s not neccesary to buy a whole sheet of ply...

Page 17: ...m of baseplate Set router and baseplate aside SLED BASE BRICK HOLDERS 1X5 5 18 18 1 5 DIAMETER NOTE These steps are for the Rigid router other routers may differ CAP BOLT BEHIND CAP STEP 2 CUT CENTER...

Page 18: ...H CARRIAGES TO RING BAG 7 4 shoulder bolts 4 nuts 8 washers allen wrench PART 2 Ring Bearings PART 5 Carriage mounts Place one carriage on either side of ring Insert shoulder bolt up through bottom of...

Page 19: ...ith nuts STEP 10 ATTACH RING TO SLED BAG 8 18 small screws Place ring on sled centered around router Each L bracket has six small holes insert a small screw through each hole Fasten with Phillips head...

Page 20: ...made You may do so in any reasonable manner but not in any way that suggests the licensor endorses you or your use NonCommercial You may not use the material for commercial purposes NoDerivatives If...

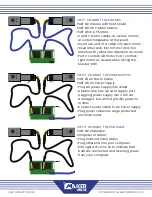
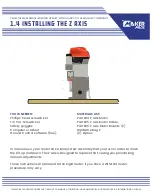
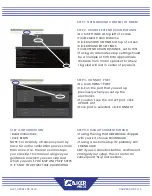
Page 21: ...manual use your router has a knob screw assembly that you turn in order to move the bit up and down The Z axis is designed to replace that saving you painstaking manual adjustments These instructions...

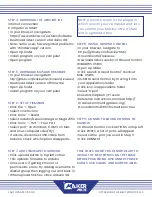
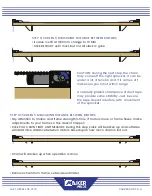
Page 22: ...back to front as shown with lengthwise slots lined up Insert bolts through slots in both brackets Hold bolts steady with allen wrench Twist nuts over end of bolts to secure Leave loose for later adju...

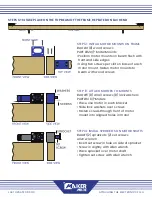
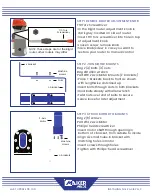
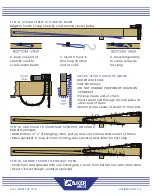
Page 23: ...rough small holes in bottom of L bracket screw into wood of sled STEP 6 ATTACH MOTOR CABLE Bag 2 ziptie Part 15 Z Axis Motor Cable Insert one end of motor cable into end of Z Axis motor Insert other e...

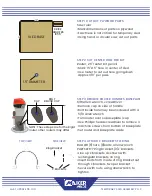
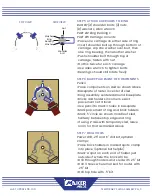
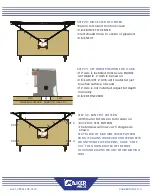
Page 24: ...router It should indicate the distance per rotation ie how far down the bit goes each time the handle is fully rotated STEP 8 TIGHTEN SHAFT COUPLER Bag 8 allen wrench Computer or tablet Ground Contro...

Page 25: ...made You may do so in any reasonable manner but not in any way that suggests the licensor endorses you or your use NonCommercial You may not use the material for commercial purposes NoDerivatives If y...

Page 26: ...SE Calibration is the step that sets your machine up so it will cut designs accurately Calibration is of paramount importance and is probably the most difficult and sometimes frustrating part of ownin...

Page 27: ...If you don t see the correct port click UPDATE LIST Once port is selected click CONNECT STEP 1 OPEN GROUND CONTROL TO BEGIN STEP 4 INTRODUCTION Read instructions Click BEGIN NOTE For a variety of reas...

Page 28: ...ing is fine just get it close Click SET ZERO Don t use AUTOMATIC button SKIP if there have been no location lost errors in previous procedures or errors with chains skipping or tangling STEP 8 DISTANC...

Page 29: ...all piece of duct tape may provide some stability Just be sure the tape doesn t interfere with movement of the sprocket STEP 10 SCREEN 5 MEASURING DISTANCE BETWEEN MOTORS Pay attention to motors and f...

Page 30: ...relax for a minute DON T SKIP STEP 14 SCREEN 9 SET SPROCKETS VERTICAL Same procedure as Step 4 This time it may work to hit AUTOMATIC If it doesn t work don t panic Re adjust sprockets with buttons as...

Page 31: ...ulleys BAG 4 wood screws Use center beam mark from Step 17 Mark 1 to the left 1 to the right Insert a screw through center of each pulley Screw into marked spots STEP 20 PREPARE STRETCHY CORDS BAG 2 s...

Page 32: ...d center pulley 3 Insert S hook in free loop on other end of cord 4 Hook temporarily to same screw as first loop 2 Loop one end of stretchy cord to screw under beam STEP 24 CONNECT CHAIN TO STRETCHY C...

Page 33: ...gh the carriage mounts A step ladder is also helpful here THIS IS A GOOD TIME TO MAKE SURE THAT YOU VE LOADED A WORKING PIECE OF PLYWOOD ONTO YOU FRAME IF YOU DON T WANT THE TEST CUTS TO BE MADE INTO...

Page 34: ...il router bit just touches surface of wood If Z Axis is not installed adjust bit depth manually Click DEFINE ZERO SLED SLED WORKING SURFACE SURFACE TO BE CUT STEP 30 RUN TEST PATTERN With router bit a...

Page 35: ...tructions for measuring Measuring distance and entering distance between cuts helps software dial in machine settings STEP 32 REVIEW MEASUREMENTS Same as STEP 7 if they look wonky go back and redo ste...

Page 36: ...You may do so in any reasonable manner but not in any way that suggests the licensor endorses you or your use NonCommercial You may not use the material for commercial purposes NoDerivatives If you re...

Page 37: ...6 Allen Wrench Pencil Safety goggles Clamps optional CUT LIST 1 18x18 circle 2 1x5 5 rectangles If using MakerMade metal brick holders or pre made sled these pieces aren t needed MATERIALS LIST 1 4x8...

Page 38: ...EXPORT SELECTED TOOLPATHS Save to your desktop as nc file STEP 2 LOAD PLYWOOD ONTO MASLOW Hang sled on bolt in center of top beam to keep it out of the way Load plywood onto frame Remove sled from bo...

Page 39: ...bolts holding bricks router and ring kit to temporary sled Transfer everything to final sled referencing instructions in Temporary Sled section if needed Sled will slide across the work area more smo...

Page 40: ...ade You may do so in any reasonable manner but not in any way that suggests the licensor endorses you or your use NonCommercial You may not use the material for commercial purposes NoDerivatives If yo...

Reviews: