background image

14

INITIAL SETUP, INSTALLATION, AND ASSEMBLY: 

12. TURNTABLE CONNECTIONS:

When connecting the turntable, the cables should rest on the platform you placed your turntable on, and not pull the turntable back or 

sideways. 

It is essential to make sure the cables don’t mess with the turntable level setup in the beginning when all of the connections are made. 

To ensure that the cables are not modifying the turntable level, you can check the motor suspension by pushing down the turntable body 

next to the motor, and the turntable body should move up and down freely.

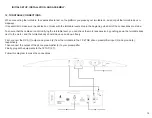
First, connect the RCA (1) output and ground (2) from the turntable to the FZ 47 DB phono preamplifier input (3) and ground (4), 

respectively. 

Then connect the output of the phono preamplifier (5) to your preamplifier. 

Finally, plug both equipments to the 127 AC (6,7).

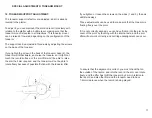
Follow this diagram to make the connections:

Summary of Contents for TT10

Page 1: ...TT 10Turntable User Manual...

Page 2: ...SETUP FACTORY ASSEMBLED 7 INSTALLING THE CARTRIDGE 8 ADJUSTING THE VTA VERTICAL TRACKING ANGLE 9 CARTRIDGE ALIGNMENT 10 CARTRIDGE DOWNFORCE WEIGHT 11 CARTRIDGE AZIMUTH 12 DRIVE BELT AND ANTISKATE PLA...

Page 3: ...cts of any kind into the unit through openings as they could touch dangerous voltage points and short out parts possibly resulting in a fire or electric shock Avoid spilling liquid of any kind on the...

Page 4: ...e unit ask the service technician to perform safety checks to ensure the unit is in proper operating condition Power Cord The removable power cord provided with your player has been specifically desig...

Page 5: ...s dropped too hard when placing it the ball bearing can break 2 2 Insert the spindle into the hole carefully allowing the air to flow outside of the bearing structure The bearing has been pre lubricat...

Page 6: ...TONEARM SETUP AND CALIBRATION ASSEMBLY REQUIRED Please read the following steps carefully The tonearm is factory leveled but the eccentric tonearm counterweight and cartridge needs to be installed A c...

Page 7: ...modify the factory settings A correct tonearm and cartridge calibration will ensure the best audio quality and will extend the life of the stylus tip and your records so please take time and care to s...

Page 8: ...nclude a color code use the following diagram Figure 5 4A 1 4 The scale should measure between 1 and 2 grams of downforce weight this will allow to adjust the tonearm and cartridge alignment If the do...

Page 9: ...In the Margules arm the arm s body should be lining against the protractor s VTA wall As a confirmation the centerpiece of the protractor should be pointing the pivot of the arm These lines should be...

Page 10: ...the cartridge so that the cantilever is aligned with the line of the protractor this will ensure the tangential adjustment Once you have achieved that carefully tighten the screws of the cartridge Do...

Page 11: ...wing the scale to tare 7 2 Using the tonearm lifter move the tonearm until the stylus tip rests on the black dot in the center of the measuring area and lower the tonearm to allow the scale to measure...

Page 12: ...downforce You can also use a small mirror to quickly check if the needle tip is perpendicular to the record The T3 tonearm is unipivot After the azimuth has been adjusted tap down on both sides of the...

Page 13: ...r axis are for 33 RPM and the lower grooves are for 45 RPM 13 sssss sssss 11 ANTI SKATE WEIGHT PLACEMENT Place the loop of the weight filament in the hook of the anti skating device on the tonearm bas...

Page 14: ...connections are made To ensure that the cables are not modifying the turntable level you can check the motor suspension by pushing down the turntable body next to the motor and the turntable body sho...

Page 15: ...ll start and will continue spinning the platter at the correct speed Select the desired RPM by lowering or raising the turntable drive band from the motor axis The top grooves on the pulley are for 33...

Page 16: ...Verify all connections have been properly made including the ground cable from the turntable to the FZ 47 DB phono stage or your phono stage Also make sure that the cartridge type is compatible with...

Page 17: ...or the arm lifter won t be able to raise the arm the 2mm required and the tonearm will not be able to rotate freely because of possible friction with the tonearm lifter If you tighten or loosen the sc...

Reviews: