50
Saving Your Current Position as a Waypoint
Saving your current position as a waypoint is very easy and can
be done regardless of whether a GIS job is open or not.
From any navigation screen, just hold down the LOG button
for 2 to 3 seconds until the Mark screen is displayed. This
screen provides the description of the waypoint you are about
to save.
You can accept all the defaults by simply pressing ENTER
(
Save
field already highlighted).
You can also edit the
Icon
,
Name
and
Message
fields using the
arrow keys to access these fields. Obviously you should keep
the
Location
and
Elevation
fields unchanged as they contain
the coordinates of your current location.
Waypoints recorded using the receiver's Mark feature are not
exportable by MobileMapper Office. If you wish to record way-
points in the field and export them to GIS formats, you should
use MobileMapper Office's Feature Library Editor to create a
"Waypoint" feature type. You can then log a "waypoint" as a
point feature while recording a job file.
Creating a Waypoint With the Map Cursor
This is another way of creating a waypoint whose coordinates
will be based on the location of the cursor on the Map screen.
Press NAV until the Map screen is displayed. Press any arrow
key to make the cursor visible on the map. Move the cursor to
the desired location on the map using any arrow keys. Hold
down the LOG button for 2 to 3 seconds until the Mark screen
is displayed.
You can accept all the defaults by simply pressing ENTER
(
Save
field already highlighted).
You can also edit the
Icon
,
Name
and
Message
fields using the
arrow keys to access these fields. Obviously you should keep
the
Location
and
Elevation
fields unchanged as they contain
the coordinates of the cursor location.
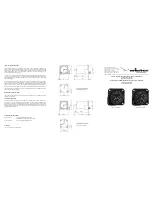
Mark screen
The Mark option from
the Menu list provides
a function similar to
the LOG button when
held down for 2 to 3
seconds.