42
43
time is too long, a warning will be displayed.
By clicking on "
delete
" you can remove the
recording time activated in the upper list. Be
careful, no warning appears!
If you want to correct the times, you can enter
the time setting anew by activating the buttons
"
change start
" or "
Change end
".
The button for "
Input
" in this menu allows you to
comfortably select the source for your system.
For example, you could have different sources
for different recordings.
After setting the time and having clicked on
"
Ok
", your system can be switched off. It will
start the recording at the time you have set.
Please make sure that your system is not
without power after setting the time.
Please choose the correct video input (menu
"
Video settings
") and connect a player, e.g. a TV
or receiver. Thus you can record TV scenes for
instance.
(11)
Should your system feature the "
Hard-drive
backup
" button select it. This brings up a selec-
tion menu, where you can choose to do a "
Back-
up
" (Copying the video found on the system
drive to the backup drive) or a "
Restore
" (Sen-
ding the data saved on the backup disk to the
system disk).
After chosing one of these options the process
begins.
You can cancel it at anytime.
Note:
The function "
Backup
" allows you to save
your video material regularly to avoid a possib-
le loss of data (e.g. if the system hard drive is
damaged during transport).
The function "
Restore
" allows you to copy the
video material saved on the backup drive to a
system hard drive. For further information
please see
Chapter 8 "HD Backup-System"
.
(12)
This
information field
displays the OS versi-
on and the device serial number.
(13)
Clicking on the
menu symbol
returns you
to the
Main menu
. Clicking the right trackball
button does the same.
(14)
You can now see the "
HDV-Recording
"
button, giving you the choice between "
Only
HDV
" and "
DV + HDV
". This button is only of
importance if you need to load HDV footage into
your project. If you select the "
Only HDV
" option,
the record screen merely requires a one-pass
load. Afterwards, the HDV material is converted
(rendered) into DV automatically.
If you select "
DV + HDV
", the record screen will
allow for two load passes.
Your footage is first loaded as HDV footage, then
in DV quality. More information about this can
be found in chapter 5.4, item
(2)
.
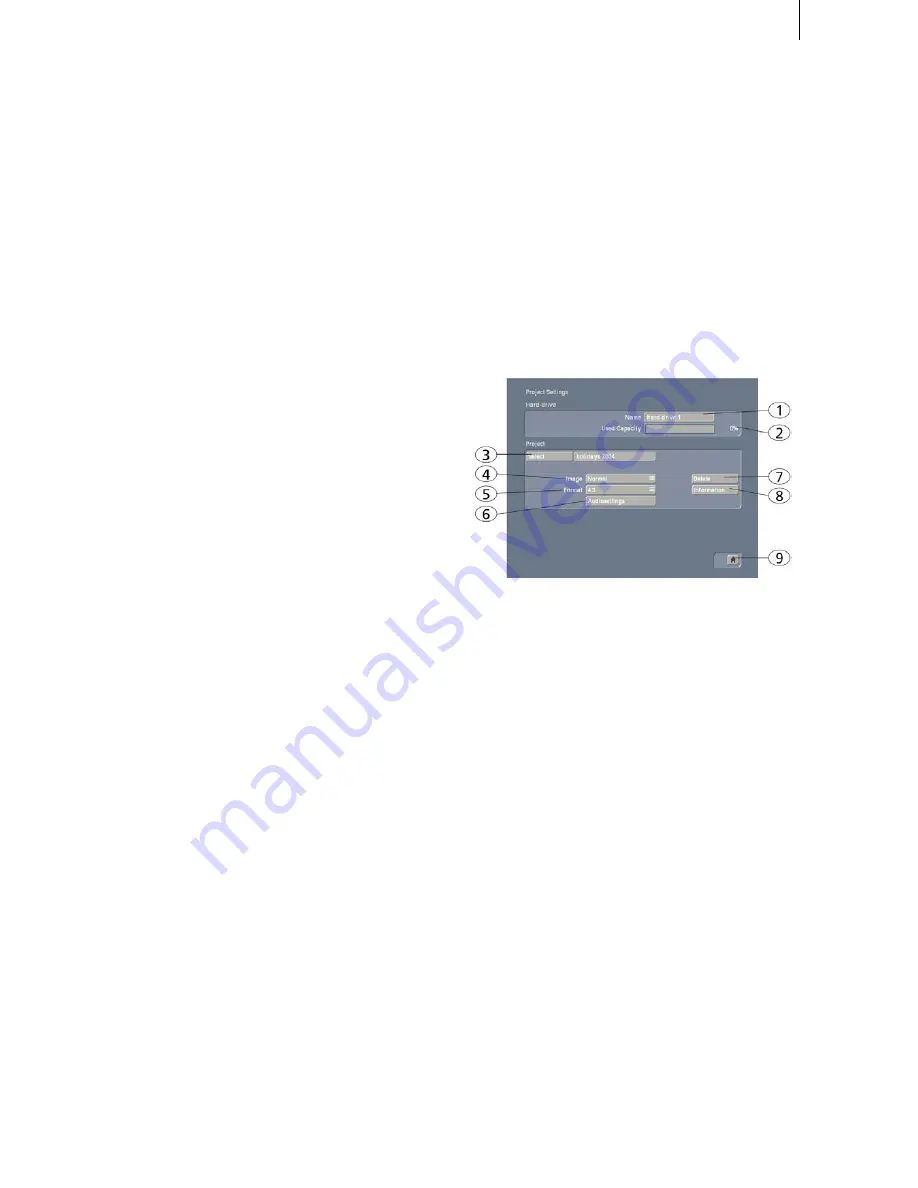
5.2 Project settings
In this menu you make the settings for your cur-
rent or next project. This affects, for example,
the project name, image size, and audio quality.
(1)
On the upper edge (the "Hard-drive" section)
you see the "
Name
" button. Clicking on the gray
name-field brings up the keyboard with which
you can enter the desired name for the hard dri-
ve. You can also see which hard drive is current-
ly in the system. This is otherwise not possible
because the label on the hard drive is not visible
when the hard drive has been inserted into the
machine.
(2)
The display, "
Used Capacity
" gives informa-
tion on the space used on the hard drive (dark
blue), and on the total remaining time (light
blue). A display for individual projects is not
possible because this display refers to the entire
hard drive.
(3)
Clicking on the "
Select
" button brings up the
Select Project
menu, in which you can select
several different projects.
If some projects already contain scenes, the
corresponding projects are marked to the right
of the project name (with a little dot).
After you press "
OK
", the project you have selec-
ted is displayed next to the selection button (e.g.
"
P 1
"). If you want to rename the project, click
Summary of Contents for SMART EDIT 5
Page 1: ...User manual SMART EDIT 5 2nd edition ...
Page 100: ...274 06 06 ...


