


48
Chapter 6: Create a User Interface with Layout Tools
Set up your workspace
First, you’ll open the start file for the lesson and set up your workspace to use an optimal layout
for taking lessons.
1.
To open your start file, in Flash select File > Open and navigate to the file:
■
On Windows 2000 or XP, browse to
boot drive
\Documents and Settings\All Users\
Application Data\Macromedia\Flash MX 2004\
language
\Configuration\HelpPanel\
HowDoI\BasicFlash\start_files and double-click layout_tools_start.fla.
Note:
If the Application Data folder is hidden, you’ll need to change your Windows Explorer
settings to see the folder.
■
On Windows 98, browse to
boot drive
\Windows\Application Data\Macromedia\Flash MX
2004\
language
\Configuration\HelpPanel\ HowDoI\BasicFlash\start_files and double-click
layout_tools_start.fla.
■
On Macintosh, browse to
Macintosh HD
/Users/Shared/Application Support/Macromedia/
Flash MX 2004/
language
/Configuration/HelpPanel/HowDoI/BasicFlash/start_files and
double-click layout_tools_start.fla.
Note:
The BasicFlash\finished_files folder contains completed versions of lesson FLA files, for
your reference.
2.
Select File > Save As and save the document with a new name, in the same folder, to preserve
the original start file.
3.
Select Window > Panel Sets > Training Layout to modify your workspace for taking lessons.
4.
In the Stage View pop-up menu, in the upper right of the Timeline, select Show Frame to view
both the Stage and the work area.
5.
Click in the work area, away from objects on the Stage, so that no objects are selected.
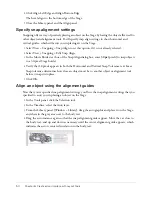
Use guides to align an object
You can use rulers and guides to precisely position or align objects in your document. You’ll add
guides to help you center the block of text.
1.
Select View > Rulers.
A horizontal and vertical ruler appear above and to the left of the Stage.
2.
Click anywhere in the horizontal ruler and drag down until you reach the 250-pixel
horizontal position.
3.
Click anywhere in the vertical ruler and drag left until you reach the 375-pixel vertical position.
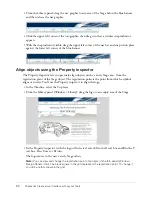
4.
In the Tools panel, click the Selection tool.
Summary of Contents for FLASH MX 2004-LEARNING FLASH
Page 1: ...Learning Flash...
Page 8: ...8 Contents...
Page 34: ...34 Chapter 3 Write Scripts with ActionScript...
Page 54: ...54 Chapter 6 Create a User Interface with Layout Tools...
Page 62: ...62 Chapter 7 Draw in Flash...
Page 68: ...68 Chapter 8 Create Symbols and Instances...
Page 76: ...76 Chapter 9 Add Animation and Navigation to Buttons...
Page 104: ...104 Chapter 13 Add Interactivity with ActionScript...
Page 112: ...112 Chapter 14 Create a Form with Conditional Logic and Send Data...
Page 122: ...122 Chapter 15 Work with Objects and Classes Using ActionScript 2 0...


