background image

Owner’

s Manual

15

Owner’s Manual

Rigging

WARNING: Installation should only be done  
by an experienced technician. Improper  
installation may result in damage to the  

equipment, injury or death. Make sure that the  
loudspeaker is installed in a stable and secure way  
in order to avoid any conditions that may be dangerous 
for persons or structures.

WARNING: The cabinet is suitable for rigging 
via its fly points. NEVER attempt to suspend  
an SRMv3 loudspeaker by its handle.

Rigging Design Practices

Rigging a loudspeaker requires determining:

1. The rigging methods and hardware that meet static, 

shock, dynamic, and any other load requirements for 
supporting the loudspeaker from structure.

2. The design factor and required WLL (Working Load 

Limit) for this support.

We strongly recommend the following rigging practices:

1. Documentation: Thoroughly document the design 

with detailed drawings and parts lists.

2. Analysis: Have a qualified professional, such as a 

licensed Professional Engineer, review and approve the 
design before its implementation.

3. Installation: Have a qualified professional rigger do 

the installation and inspection.

4. Safety: Use adequate safety precautions and  

back-up systems.

Rigging Hardware and Accessories

Rigging our loudspeakers will invariably require  

hardware not supplied by us. Various types of  
load-rated hardware are available from a variety  
of third-party sources. There are a number of such  
companies specializing in manufacturing hardware  
for, designing, and installing rigging systems. Each  
one of these tasks is a discipline in its own right.  
Because of the hazardous nature of rigging work  
and the potential liability, engage companies that  
specialize in these disciplines to do the work required. 

We do offer certain accessory rigging items and some 

of them may be used with a variety of products. While 
these accessories are intended to facilitate installation, 
the wide variety of possible installation conditions and 
array configurations do not permit us to determine their 
suitability or load rating for any particular application.

We are not in the business of providing complete  

rigging systems, either as designers, manufacturers,  
or installers. It is the responsibility of the installer to  
provide a properly engineered, load-certified rigging 
system for supporting the loudspeaker from structure.

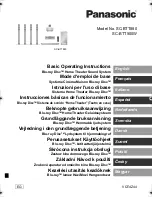
SRMv3 loudspeakers may be individually flown  
using a PA-A1 Eyebolt Kit, part number 
0031943. SRM350v3 cabinets are fitted  

with four M5 insert points on the top and bottom for 
installing an optional hanging bracket that allows the 
speaker to be flown. SRM350v3 Bracket Kit: PN 0016404

Rigging Notes

The SRMv3 loudspeaker’s integral mounting points  

are designed to support only the weight of their own 
loudspeaker with suitable, external hardware. This 
means that each SRMv3 loudspeaker must be supported 
independently of any other SRMv3 loudspeaker and any 
other loads. All rigging points must be used to hang an 
SRMv3 loudspeaker.

SRM350v3 Inserts

SRM450v3 Fly Points

ON

OFF

POWER

SIG/OL

SIG/OL

CH 1

MIX

U

MAX

OFF

LINE

MIC

U

MAX

OFF

LINE

MIC

PA

DJ

MON

SOLO

1

ON

HOLD TO

CLEAR

2

3

4

LIMIT

ON

LOGO

OFF

POWER CONSUMPTION 160W

R

L

GAIN

GAIN

SPEAKER

MODE

FEEDBACK

DESTROYER

MAIN

MP = Mounting Point

MP

MP

MP

Top

Rear

M5 inserts for mounting optional hanging bracket.

Top

Bottom

Summary of Contents for SRM450v3

Page 1: ...OWNER S MANUAL Powered Loudspeakers SRM350v3 and SRM450v3...

Page 2: ...de reasonable protection against harmful interference in a residential installation This equipment generates uses and can radiate radio frequency energy and if not installed and used in accordance wit...

Page 3: ...your investment when things get pushed a little too hard Monitor specific angle and voicing mode perfect for cutting through on stage Flyable for permanent install Proven highly durable portable desi...

Page 4: ...evel outputs from the mixing console or other signal source to the inputs on the rear panel of the SRM350v3 SRM450v3 loudspeakers 3 Make sure that the loudspeaker s gain knobs are set to or near line...

Page 5: ...songwriters touring the local coffee shops Bring your favorite axe and mic SRMv3 loudspeakers and cables and power cords In this example a dynamic microphone is connected to the channel 1 input of an...

Page 6: ...5 U 60 dB 30 20 10 10 O O 40 50 5 5 U 60 dB 30 20 10 10 O O 40 50 5 5 U 60 dB 30 20 10 10 O O 40 50 5 5 U 60 dB 30 20 10 10 O O 40 50 5 5 U 60 dB 30 20 10 10 O O 40 50 5 5 U 60 dB 30 20 10 10 O O 40...

Page 7: ...MIC U MAX OFF LINE MIC PA DJ MON SOLO 1 ON HOLD TO CLEAR 2 3 4 LIMIT ON LOGO OFF R L GAIN GAIN SPEAKER MODE FEEDBACK DESTROYER MAIN SIG OL SIG OL CH 1 MIX U MAX OFF LINE MIC U MAX OFF LINE MIC PA DJ...

Page 8: ...COUVERCLE ATTENT ION NE PAS OUVRIR RISQUE DE CHOC ELECTRIQU E POWER CONSUMPTION 200W POWER CONSUMPTION 200W POWER CONSUMPTION 200W POWER CONSUMPTION 200W SRM 550 SRM 650 VAR SRM 550 SRM 650 VAR SRM 5...

Page 9: ...ature 1 4 Wide Z inputs with combo jacks that may accept balanced unbalanced XLR and 1 4 connections The gain range of the Wide Z inputs may handle anything from an instrument or mic level to a line l...

Page 10: ...output of the amplifiers and you are getting the most out of your loudspeaker If connecting mixer outputs to loudspeaker inputs set the gain knob to 10 00 Line for optimal sound and performance SLEEV...

Page 11: ...destroy feedback and maximize gain prior to feedback This is a great tool for performers without a dedicated engineer The integrated and amazingly accurate Feedback Destroyer instantly employs up to f...

Page 12: ...try turning down the level control a notch or two on the mixing console or the back of the loudspeaker to avoid overheating the amplifier Be aware that direct sunlight and or hot stage lights may be t...

Page 13: ...ing the loudspeaker in places exposed to harsh weather conditions If you are setting them up outdoors make sure they are under cover if you expect rain SRMv3 loudspeakers are NOT designed to array hor...

Page 14: ...ighly directional and tend to be absorbed much easier than lower frequencies By providing direct line of sight from the loudspeakers to the audience you increase the overall brightness and intelligibi...

Page 15: ...in its own right Because of the hazardous nature of rigging work and the potential liability engage companies that specialize in these disciplines to do the work required We do offer certain accessory...

Page 16: ...Friday during normal business hours Pacific Time to explain the problem Tech Support will tell you where the nearest factory authorized service center is located in your area If you think the SRMv3 l...

Page 17: ...ing Sleeve the three connections available on a stereo 1 4 cable This allows for a direct connection to the channel 1 and 2 input jacks on SRM loudspeakers Be sure the cables are wired per AES Audio E...

Page 18: ...Rated Power 100 watts rms 200 watts peak Rated THD 1 Cooling Convection Design Class AB Input Output Channel 1 Mic Line 8 k balanced 1 4 TRS Wide Z 1 M unbalanced Channel 2 Mic Line 8 k balanced 1 4...

Page 19: ...co sauce or 1 8 teaspoon red hot sauce Directions Preheat oven to 350 F degrees In a mixing bowl using an electric mixer beat cream cheese and mayonnaise until smooth Stir in crabmeat minced onion lem...

Page 20: ...d SRM450v3 Powered Loudspeakers SRM350v3LoudspeakerDimensions SRM450v3LoudspeakerDimensions 20 8 in 527 mm 13 1 in 333 mm 20 8 in 527 mm 12 3 in 311 mm WEIGHT 23 lb 10 4kg 50 WEIGHT 37 lb 16 8kg 26 1...

Page 21: ...ses on mid range clarity where vocals often reside Soloist Speaker Mode This mode features a low frequency roll off to get rid of unwanted thumps and adds boost and sparkle to mid range and high frequ...

Page 22: ...TO CLR ON 1 2 3 SOLO MODE LIMIT PA DJ MON LED ON OFF MAIN FEEDBACK DESTROYER SPEAKER MODE USER CONTROLS FRONT LED XLR OFF 20 dB 40 dB GAIN CCW 12 00 CW TRS WIDE Z OFF 0 dB 20 dB RCA THRU XLR TRS COMBO...

Page 23: ...the noncompliance within the Warranty Period to the Company at www 720trees com or by calling LOUD technical support at 1 800 898 3211 toll free in the U S and Canada during normal business hours Paci...

Page 24: ...16220 Wood Red Road NE Woodinville WA 98072 USA Phone 425 487 4333 Toll free 800 898 3211 Fax 425 487 4337 www 720trees com...

Reviews: