Community CLOUD 4, Installation Manual
Looking for an Installation Manual for Community CLOUD 4? Look no further! Download the comprehensive manual for free from our website. It provides step-by-step instructions to ensure a hassle-free installation process. Get your hands on this essential manual today and unleash the full potential of Community CLOUD 4.
Share
Download


Reviews:
No comments
Related manuals for CLOUD 4

GO
Brand: Xblitz Pages: 40

1001
Brand: Dali Pages: 10
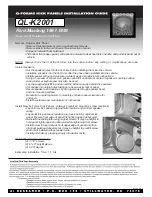
QL-K2001
Brand: Q-Logic Pages: 3

Pit Boss Sportsman 7 Series
Brand: Dansons Group Pages: 51

EXPAND 80T
Brand: EPOS Pages: 2

Radius R180
Brand: Monitor Audio Pages: 18

CR.5mk2
Brand: Snell Pages: 12

BeoSound 3
Brand: Bang & Olufsen Pages: 4

AQUARIUS 4 S109
Brand: JBL Pages: 22

S 803
Brand: JAMO Pages: 15

IB-SP202-BT
Brand: Icy Box Pages: 16

SPCW8
Brand: System Sensor Pages: 4

TS212W
Brand: Alto Professional Pages: 40

TS-W45
Brand: Aiwa Pages: 7

LumiPlay
Brand: Promate Pages: 28

Avanti A.10
Brand: Audio Pro Pages: 24

ST050
Brand: Fenton Pages: 16

P326.963
Brand: Waterproof Pages: 36


