background image


 9 


Chapter 4: Advanced Keyboard Functions 


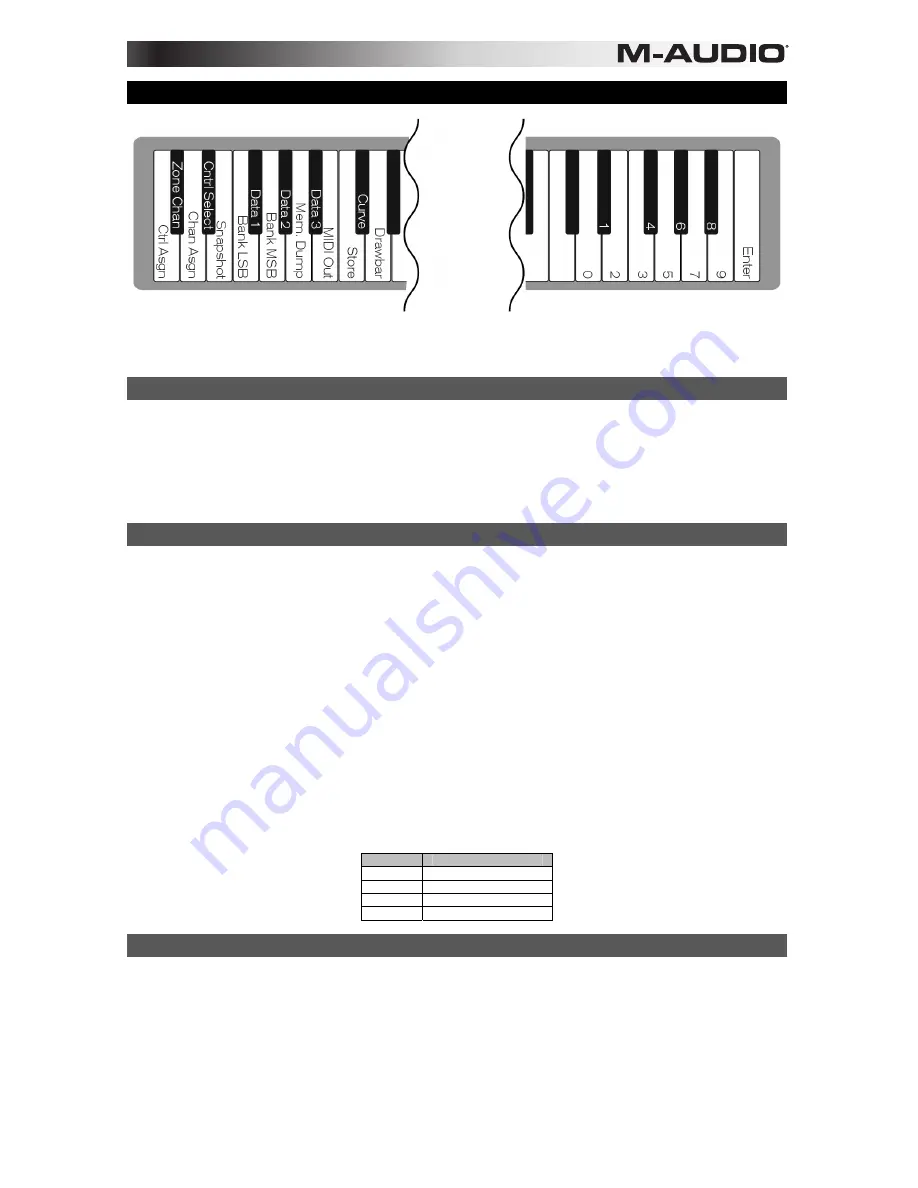
Axiom includes extended programming capabilities through secondary functions of the keys. The available parameters are listed along the 
top edge of the keyboard, and accessed by pressing the Edit button. The LCD screen shows the numerical value of the parameter being 
edited. 
 

Control Assign (Ctrl Assign), Data 1, Data 2, Data 3 

 
The Control Assign function (Ctrl Assign) assigns a MIDI continuous control number (MIDI CC), or other MIDI parameter to any assignable 
Axiom control. The Data 1, Data 2, and Data 3 keys define various related aspects of the parameter or function assigned to a control.  
 
For example, it is possible to configure a button to send MIDI note On/Off Data by assigning it to controller number 147. The Data 1 key is 
used to specify the pitch (note number) of the note played by the button. The Data 2 key is used to set the Note Off velocity (Velocity Off). 
The Data 3 key is used to set the Note On velocity (Velocity On), determining how loud the note will sound. 
 
For more details and step-by-step control assignment examples, refer to Chapter 5, "Advanced Programming Functions." 
 

Zone Channel (Zone Chan) 

 
The Zone Channel (ZONE CHAN) function specifies which MIDI Channel a Zone will use when transmitting MIDI data. Assigning each 
Zone to its own channel will allow you to play up to 4 different sound patches on a connected synthesizer or virtual instrument. This setting 
is saved as part of a user patch when stored to a Memory Location. For instructions on how to save a user patch, see the "Store" section. 
 
Assigning an Axiom control to a Zone MIDI Channel (z1– z4) as described in the following section ("Channel Assign (Chan Assign)"), 
causes that control to transmit MIDI data on the same MIDI Channel as the corresponding Zone. 
 
For more information about Keyboard Zones and their related functions and parameters, see Chapter 6, "Keyboard Zones." 
 

To set the MIDI Channel for a Keyboard Zone: 

1.


Press the Zone button followed by one of the Zone selection buttons. See Chapter 6, "Keyboard Zones." 

2.


Press the Edit button. 

3.


Press the Zone CHAN key. The LCD screen will display the current function ("CHAN"), the active Zone number (for example "z1") 
and the current Zone Channel number. 

4.


Enter the new MIDI Channel number using the number keys or Patch buttons (+/–). 

5.


Press the Enter key. 

6.


Repeat steps 1 – 5 to assign set the MIDI channel for the remaining Zones. 

 
After setting the Zone channel and exiting Edit mode, activate all desired Zones by simultaneously pressing their respective Zone buttons. 
 

Default Zone Channels 


Zone 

MIDI Channel 

1

0 (Global Channel)

2

1

3

2

4

3


Channel Assign (Chan Assign) 

 
The Channel Assign function (CHAN ASGN) assigns the active Axiom control to a specific MIDI channel. 
 

To assign a knob, fader, button or pedal jack to a MIDI channel: 

1.


Select the active control as described in the next section, "Control Select (Ctrl Select)". 

2.


Press the Edit button. 

3.


Press the Channel Assign key. The LCD screen will display the current parameter ("CHAN), the currently selected control (for 
example "E1"), and the current MIDI channel (for example "1"). 

4.


Enter the new MIDI channel number using the number keys. 

5.


Press the Enter key. 

Summary of Contents for Axiom AIR 25

Page 1: ...User Guide English...

Page 2: ......

Page 3: ...t on a computer using the included USB cable and set the power switch to the On position The 5 pin MIDI connectors transmits MIDI data to and from Axiom when controlling external hardware synthesizers...

Page 4: ...ndows XP proceed to the next step 6 For Windows XP only do the following After Windows XP identifies the keyboard and asks if you want to search the Internet for a driver select No not this time and c...

Page 5: ...s the pitch The upper and lower pitch bend limit is determined by settings on your hardware or software synthesizer not by the Pitch Bend wheel on Axiom This wheel is spring mounted and returns to the...

Page 6: ...button is illuminated the group is enabled for the operation For example when storing a Patch the group is enabled by default Pressing the button disables and excludes the controls from the newly sto...

Page 7: ...buttons will illuminate and the LCD screen will show the current Program change and active Zone number A direct Program change can then be sent by entering the desired program number using the numeri...

Page 8: ...assigned MIDI CC When pressure is applied to the Strip the LCD screen will display the assigned message type CH AT the active keyboard Zone for example z1 and the value sent for example 0 A unique MI...

Page 9: ...ocation For instructions on how to save a user patch see the Store section Assigning an Axiom control to a Zone MIDI Channel z1 z4 as described in the following section Channel Assign Chan Assign caus...

Page 10: ...sitional value of each control is saved within the patch as the Null values In other words if you use Axiom controls to set up a virtual instrument or synth and save the settings to a patch pressing s...

Page 11: ...ry locations Storing new assignment settings permanently overwrites the contents of the selected memory location To Restore the factory presets hold down the Patch Up and Down buttons during power up...

Page 12: ...ads will generate a fixed velocity value of either 32 64 100 or 127 on a scale of 0 127 depending on how hard or soft they are struck To select a Trigger Pad Velocity Curve 1 Press the Edit button 2 P...

Page 13: ...ntrol for example F10 and the current MIDI CC assignment for example 146 4 Type 10 using the number keys This assigns MIDI CC number 10 Pan to the button 5 Press the Enter key 6 Press the Edit button...

Page 14: ...n to switch between the approximate ten o clock and two o clock positions when pressing and releasing the button Assigning MMC Control to Buttons The transport functions of some hardware recording dev...

Page 15: ...ess the Enter key It is also possible to configure a pad or button to send a note on message when it is pressed and a note off message when it is pressed a second time To do this follow the configurat...

Page 16: ...value 13 Press the Enter key 14 Press the Edit button 15 Press the Data 3 key 16 Enter 127 using the number keys This specifies the maximum value 17 Press the Enter key To configure a button to decre...

Page 17: ...ey The LCD screen will read MAX and display the currently selected control for example F1 and the current value for example 127 8 Enter 0 using the number keys This configures the control to reach its...

Page 18: ...by your device 9 Press the Enter key 10 Press the Edit button 11 Press the Data 2 key The LCD screen will read LSb and display the currently selected control for example E1 and the current value for e...

Page 19: ...Press the highest note to be included in the Zone The LCD screen will display the note value 5 Repeat steps 1 5 to set the range of notes for all remaining Zones Simultaneously holding down multiple...

Page 20: ...iately 5 Repeat steps 1 4 to assign new program numbers for the remaining Zones After configuring the program numbers and exiting Edit mode activate all desired Zones by simultaneously pressing their...

Page 21: ...el pressure Assignable Controls 8 encoders 360 9 faders 40 mm Axiom 49 Axiom 61 1 fader 40 mm Axiom 25 9 fader buttons Axiom 49 Axiom 61 6 transport buttons 8 assignable trigger pads Pitch bend wheel...

Page 22: ......

Page 23: ......

Page 24: ...m audio com Manual Version 1 0...

Reviews: