5
Chapter 3: Controls and Connectors
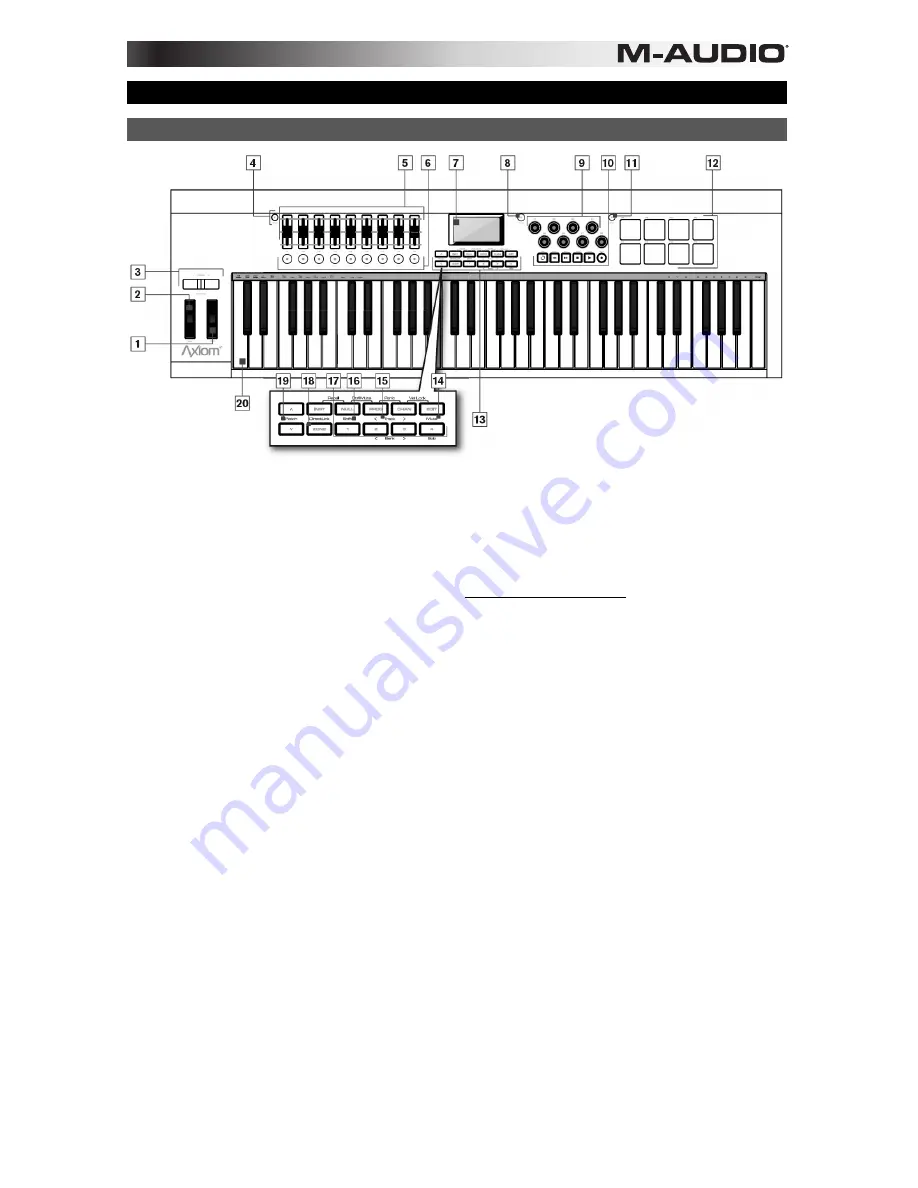
Top Panel
Using DirectLink
Once installed and configured, DirectLink is activated by launching a qualified DAW application on the host computer. This automatically
maps Axiom controls to functions in your recording software and offers the following modes of operation:
•
Mixer Mode:
This is the default mode which maps Axiom Faders, Encoder knobs, and Fader buttons to their corresponding DAW
mixer functions.
•
Instrument Mode:
Pressing the Instrument Mode button (See "Function Buttons") switches DirectLink to Instrument Mode, and
assigns Axiom controls to virtual instrument parameters within a selected DAW track.
Because DirectLink configuration and operation varies slightly in different DAW applications, please refer to the DirectLink documentation
for your qualified DAW for further details and installation instructions at
www.m-audio.com/hypercontrol
.
Where applicable, this section provides an overview of these controls using DirectLink, as well as their default MIDI assignments.
1.
Modulation Wheel –
This wheel changes the intensity of certain effects during performance. By default, most synthesizers assign
this wheel to control vibrato (change in intonation) or tremolo (change in volume). Rolling it upward increases the modulation effect,
while rolling downward reduces the effect.
When this control is moved the LCD screen will display the assigned MIDI CC number ("cc 1"), the active keyboard Zone (for
example "z1"), and the values sent. If the Control Mute function is active (See "Additional Functions") the LCD will display the same
information, with the addition of "MUTE." This signifies that MIDI data will not be transmitted.
The Modulation Wheel can be assigned to MIDI messages other than Modulation data (see Chapter 5, "Advanced Programming
Functions"), and different assignments can be made for each of the 4 keyboard Zones. This means the type of messages sent is
determined by the active Zones. See Chapter 6, "Keyboard Zones"for further details.
2.
Pitch Bend Wheel –
This wheel raises and lowers pitch during performance. Rolling the Pitch Bend wheel upward raises the pitch.
Rolling it downward lowers the pitch. The upper and lower pitch bend limit is determined by settings on your hardware or software
synthesizer, not by the Pitch Bend wheel on Axiom. This wheel is spring-mounted and returns to the center position when released.
When this control is moved the LCD screen will display the assigned message type (such as "P.bENd"), the active keyboard Zone
(for example "z1"), and values sent. If the Control Mute function is active (See "Additional Functions") the LCD will display the same
information, with the addition of "MUTE." This signifies that MIDI data will not be transmitted.
This wheel can be assigned to MIDI messages other than Pitch Bend data, and different assignments can be made for each of the
4 keyboard Zone. This means the type of messages sent is determined by the active Zones. See Chapter 6, "Keyboard Zones"for
further details.
3.
Octave/Transpose Buttons –
These buttons shift the keyboard up or down in one octave increments to extend the range of
playable notes. The Right button (+) shifts upward (for example, note F3 becomes F4), while the Left button (–) shifts downward (for
example, note F3 becomes F2).
The Transpose function is activated by pressing the Left (–)and Right (+) buttons simultaneously. In this mode, pressing the Right
button shifts the keyboard upward by one half-step (semi-tone). For example, note F3 becomes F#3. Pressing the Left button shifts
the keyboard downward by one half-step (F3 becomes E3).
Global and Zone Shift Functions:
As described in Chapter 6, "Keyboard Zones," keyboard Zones can have individual Octave
and/or Transpose settings. The Global and Zone Octave/Transpose settings work in combination to shift the pitch of the entire
keyboard while preserving relative pitch offsets between Zones. The Zone Octave and Transpose functions are useful when
different Octave or Transpose shift settings are needed across multiple Zones.
4.
Group F Button (Axiom 49 & 61 only)
•
DirectLink Operation:
When this button is pressed, all nine Axiom Faders, and Fader buttons (F1–18) are released from
their DirectLink assignments, and mapped according to the active Patch. A new Axiom Patch can be selected at any time by
using the "Recall" function (see "Additional Functions"). Pressing the Group F button again, returns all controls to their
DirectLink assignments. The button also illuminates confirming the group is in DirectLink mode.
Summary of Contents for Axiom AIR 25
Page 1: ...User Guide English...
Page 2: ......
Page 22: ......
Page 23: ......
Page 24: ...m audio com Manual Version 1 0...