pg. 5
Activation & Setup
For the first time, you need to activate the Indoor Station & Outdoor Station.
There are two ways to activate the station. (See video link in Page 1)
1.
Activate it through the Indoor Station Setup Wizard.
2.
Use Windows PC to activate it. (Require NVMSv3 software)
However, the difference is the first method is for the simple intercom environment.
If you have more than 3 stations, I recommend using a PC to do the setup will be easy.
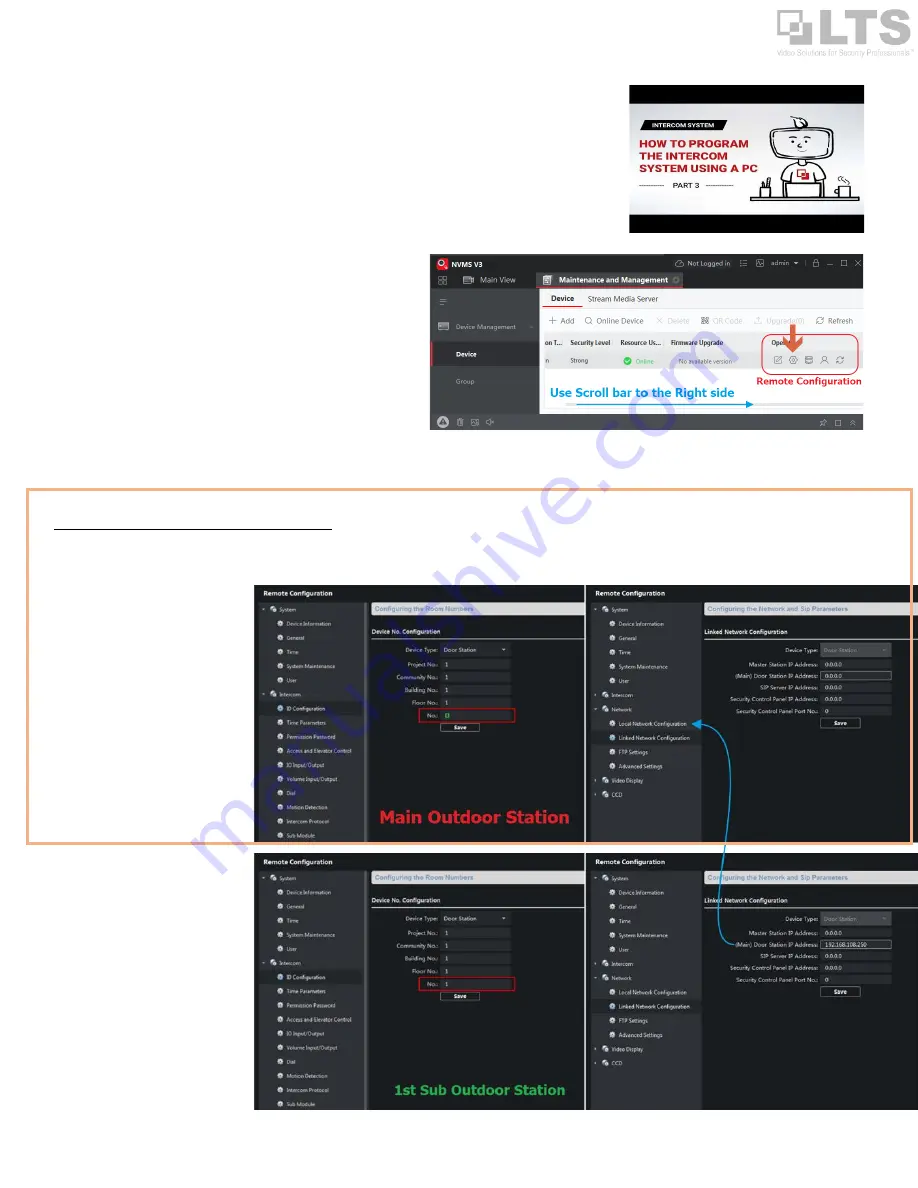
NVMSv3 (NVMS 7000 v3)
You can use the Online Device button on top to perform the device
activation and modify the network IP address to match your network
region.
After the intercom device is
Online
.
You need to use the
Remote
Configuration
button to perform the adjustment.
Define the No#
(for Outdoor Station)
and Room No#
(for Indoor Station)
.
Important:
Each ID must be unique. Otherwise, you will get a
“Calling Fail” error.
If you only have 1 outdoor station, just focus on the orange box section.
The Main Outdoor station number is always set to “0”
. Remember: this is the only Zero in the system.
If you have a more outdoor station, then keep reading under. Otherwise, please skip to the next page. (Define Name Tag button)
For Multiple Outdoor Station:
Set ID:
Set each sub outdoor station ID.
In an example, the
Main outdoor station
is always marked
as “0”
, Extend Sub
Outdoor Station is marked
as “1,2,3,4…
up to 8”
Go to the
Remote Configuration
>
Network
>
ID Configuration
. (Picture on
right)
After change Device No, it will ask you
to reboot the device.
Link IP to the Master:
If this device is the sub-station, you
need to point each device IP to the
Master Station IP address.
Go to the
Remote Configuration
>
Network
>
Linked Network
Configuration
. (Picture on right)
For all other outdoor Stations Linked
Network Configuration, you need a
point to the Master Outdoor station
IP
address
.


