background image

LRP electronic GmbH

Hanfwiesenstraße 15
73614 Schorndorf
Deutschland

HA00097 © LRP electronic GmbH 2017

BEST-NR. 220716

GRAVIT SMART VISION FPV

APP-CONTROLLED  

WIFI QUADROCOPTER

ENGLISH

Dear customer,
Thank you very much for choosing a LRP-product. The Gravit Smart Vision FPV is a 

high-quality quadrocopter with built-in HD-camera and video transmission to your 

smartphone. In addition, it can be fully controlled by your smartphone, there is no 

need for a separate transmitter anymore. Please read this documentation before 

flying your Gravit in order to get the maximum fun out of it.

1. BEFORE FLYING - CHARGE FLIGHT-BATTERY

Before you can fly your Gravit, you should always make sure that the battery is 

fully charged. To charge the battery, remove the battery from the Gravit by pres-

sing together the lock-mechanism on the upper and lower side of the battery‘ rear 

end, then pull the battery backwards out of the Gravit‘s chassis. The battery has a 

Micro-USB-port. Please use the provided USB-cable (or any other suitable cable) to 

connect the Micro-USB-plug to the battery‘s connector (see picture). Then insert the 

other end of the USB-cable into a suitable 5V power-supply. This can either be a USB 

2.0 or 3.0 port of a PC or Laptop, or any separate 5V power-supply with at least 500 

mA (most USB-power-supplies for smartphones should work, for example).

When the battery is being charged, a SOLID GREEN LED is showing up just next to 

the Micro-USB-port of the battery. As soon as the battery is fully charged, the LED 

goes out and the battery should be disconnected.
Now you can insert the battery again into the Gravit‘s chassis. Please make sure that 

the Lipo is completely inserted into the chassis and is held in place firmly.

IMPORTANT: 

You can also charge the flight battery of your Gravit Smart Vision whi-

le the LiPo battery is inside the quadrocopter by connecting the copter to a Micro-

USB-cable.  However, we DO NOT RECOMMEND to do this, as the Gravit will be ON 

during the charging process and the whole copter will therefore heat up strongly. 

ALWAYS charge the battery of your Gravit OUTISDE of the copter!

2. BEFORE FLYING - DOWNLOAD AND INSTALL THE APP

PLEASE NOTE:

 The LRP GRAVIT VISION FPV app and its author are not associated 

with LRP electronic GmbH in anyway and LRP is not responsible for the content, 

functions, availability and pricing of the software. The software is the author’s intel-

lectual property and may be used according to the legal terms which apply for the 

application and the app-store offering it. 
Now you have to download and install the app „LRP Gravit Smart Vision FPV“ from 

either Google‘s Play Store or Apple‘s iTunes marketplace. 

IMPORTANT:

 Make sure to download the correct app with the exact name as shown 

above. There are other similar LRP apps. Those apps are for other quadrocopters 

and do NOT work with the Gravit Smart Vision FPV!
Turn on your smartphone‘s WiFi.

3. BEFORE FLYING - CONNECTING YOUR GRAVIT TO THE SMARTPHONE

After you have turned on the WiFi on your smartphone, set the Gravit on a flat and 

even surface and turn it on by pressing the button on the left side of the chassis. 
Next, enter your smartphone‘s WiFi-settings and connect to the AP of your Gravit, 

named „GravitSmartVisionFPV“. 
In case your smartphone should give out a warning saying that there is no internet 

connecting established, please confirm to use this WiFi-connection nevertheless.
The connection is established within a few seconds.
Now start the downloaded app. On the start screen that will show up, tap the „Start 

Button“. 
You should now see a live video image from your Gravits drone on the smartphone 

screen. You will also see a lot of buttons and controls. They will be explained below 

and in more detail in the download version of this manual, which you can grab from 

www.lrp.cc

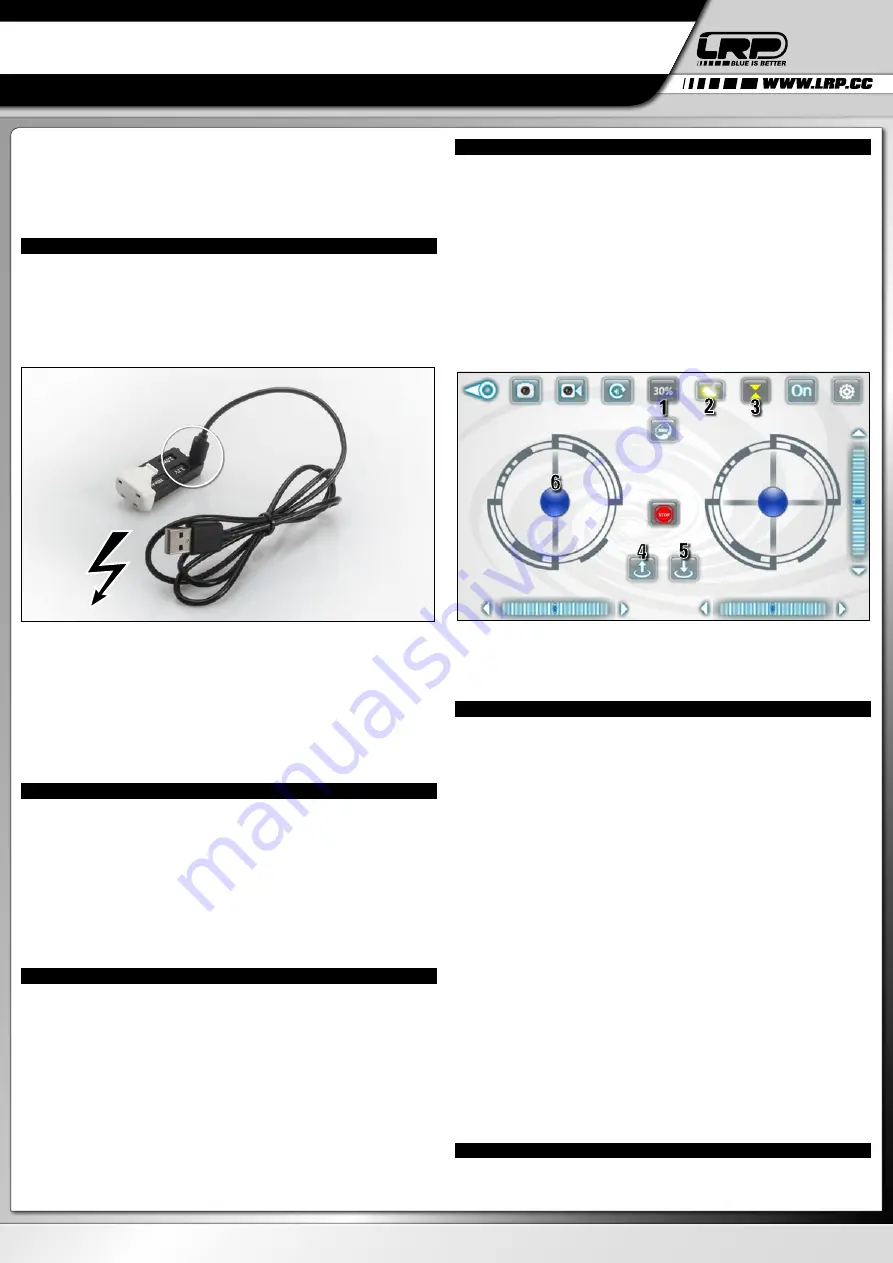
4. STARTING THE GRAVIT SMART VISION FPV

To start and fly your Gravit, please do the following:

1.

 Make sure that your Gravit is sitting level on an even surface, like the floor or a 

desk. Also make sure that you are either outdoors or in a room with enough space.

2.

 Enable the altitude hold function (see picture, 3) by pressing the altitude hold 

button. It is highlighted yellow when enabled and 3 additional buttons will appear 

on the screen between the two control sticks.

3.

 Enable gyro control by pressing the gyro-icon (see picture, 2). It will also high-

light yellow when enabled and the RIGHT control stick will move when you tilt your 

smartphone, please check.

4.

 Make sure the power level is set to 30% (see picture, 1). If it isn‘t, tap the icon until 

it is at 30%. You can later increase it, but for a first flight, 30% is recommended.

5.

 Press the Auto-start button (see picture, 4) to start the motors. If you don‘t start 

within a few seconds (see point 6.), the motors will go out again. In this case, press 

Auto-start again.

6.

 While the motors are turning, move the LEFT control stick (see picture, 6) upwards.

IMPORTANT: 

Make sure to hold your smartphone level! If you don‘t, your Gravit will fly 

towards the direction your smartphone is tilted right after the start! The Smart Vision 

will „jump“ upwards, be careful. Let go off the throttle stick again and the Smart Vision 

will hold its altitude, go into a hover and wait for your further instructions.

5. FLYING THE GRAVIT SMART VISION FPV – BASIC FUNCTIONS

To control your Gravit in the air, please do the following:

Of course you can combine those individual commands for more complex move-
ments. For example: If you tilt your smartphone forwards and to the left side at the 
same time, the Gravit will fly to the front left.
Now you can carefully and slowly test the control of your Gravit Smart Vision FPV. 
You will see that it is very easy and intuitive to control.
You will quickly gain experience and you will be able to control the Smart Vision 
better and with greater confidence and skill.
To land your Gravit, make sure you are flying over a smooth surface, suitable for lan-
ding. Then press the Auto-Land-button (see picture). The Gravit will slowly decline, 
land and turn off the motors automatically.

PLEASE NOTE:

 If at any time your Gravit should crash and as a result of the crash 

start to blink and remain unresponsive to any control input from the smartphone, 
please set the Smart Vision on flat surface and move the LEFT control stick down-
wards. The blinking should stop and the Gravit should be ready to fly again.

6. FLYING THE GRAVIT SMART VISION FPV - ADVANCED FUNCTIONS

Now that you know the basics about flying your Gravit Smart Vision, it is time to look 

at the app and all more advanced features in detail.
If you start up the app, you will see the start-screen, which looks like shown in the 

USER GUIDE

To gain or loose altitude ->

Move the LEFT control stick up or down

To rotate around your own axis ->

Move the LEFT control stick left or right

To fly towards the left or right side ->

Tilt your smartphone to the left or right. 
The further you tilt your smartphone, 
the faster the Gravit will fly sidewards

To fly forwards or backwards ->

Tilt your smartphone forwards or 
backwards. The further you tilt your 
smartphone, the faster the Gravit will fly 
forwards/backwards.

Summary of Contents for GRAVIT SMART VISION FPV

Page 1: ...p Auf dem Start Bildschirm der auftaucht drücken Sie bitte auf den Start Knopf Sie sollten jetzt ein Live Bild von Ihrer Gravit auf dem Smartphone sehen Des Weiteren werden Sie jede Menge Knüpfe und Steuerungen sehen 4 DIE GRAVIT SMART VISION FPV STARTEN Um Ihre Gravit zu starten und zu fliegen machen Sie bitte folgendes 1 Stellen Sie sicher dass Ihre Gravit auf einer ebenen Fläche steht wie auf e...

Page 2: ...n Knopf drücken wird er gelb hervorgehoben und der Flip Mode ist aktiv Im Flip Mode kann Ihre Gravit Flips in alle vier Richtungen machen Um dies zu tun neigen Sie Ihr Smartphone einfach in die Richtung in welche die Gravit einen Flip machen soll Achten Sie dabei darauf Ihr Smartphone um mindestens 80 in die entsprechende Richtung zu neigen und neigen Sie es nicht zu schnell oder ruckartig Sobald ...

Page 3: ...n Um die Gravit zu drehen bewegen Sie den Steuerknüppel nach rechts oder links Um an Höhe zu gewinnen be wegen Sie ihn nach oben um an Höhe zu verlieren bewegen Sie ihn nach unten BITTE BEACHTEN SIE Sollten Sie das Feature Altitude Hold button 7 NICHT aktiviert haben wird die Gravit ihre Höhe NICHT automatisch halten Sie müssen die gewünschte Flughöhe dann selber halten indem Sie den Steuerknüppel...

Page 4: ...as Produkt in jedem Fall repariert werden soll Sollte kein Gewährleistungs oder Garantieanspruch beste hen erfolgt die Produktüberprüfung und ggf Reparatur in jedem Falle kostenpflichtig gemäß unserer Preisliste Ein Gewährleistungs oder Garantieanspruch kann nur aner kannt werden sofern eine Kopie des Kaufbelegs beigefügt ist Auf Ihre ausdrückliche Anforderung erstellen wir einen kostenpflichtigen...

Page 5: ...Now start the downloaded app On the start screen that will show up tap the Start Button You should now see a live video image from your Gravits drone on the smartphone screen You will also see a lot of buttons and controls They will be explained below and in more detail in the download version of this manual which you can grab from www lrp cc 4 STARTING THE GRAVIT SMART VISION FPV To start and fly...

Page 6: ...he 360 Flip button should be greyed out deactivated again To do another flip simply press the button and tilt your smartphone again If you have pressed the button but then decide to rather NOT do a flip at the moment simply press the button again to uncheck the flipping function again 6 Gyro control When this option is checked highlighted the Gravit can be controlled by the gyro of your smartphone...

Page 7: ...altitude automatically You have to keep the Gravit at the desired fleight height by issuing stick commands yourself moving the stick up and down accordingly 7 FLYING THE GRAVIT WITHOUT ALTITUDE HOLD Normally we recommend flying the Gravit only with Altitude Hold enabled The reason for this is that it is very precise easy intuitive and convenient to fly when this feature is turned ON PLEASE NOTE It...

Page 8: ...urchase including date of purchase needs to be included Otherwise no warranty can be granted For quick repair and return service add your address and detailed descrip tion of the malfunction If LRP no longer manufactures a returned defective product and we are unable to service it we shall provide you with a product that has at least the same value from one of the successor series The specificatio...

Page 9: ...ment indiquant qu il n y a pas de connexion Internet confirmez que vous utiliserez néanmoins cette connexion WiFi La connexion est établie en quelques secondes Maintenant lancez l application téléchargée Sur l écran de démarrage qui apparaît appuyez sur le bouton Démarrer Vous devriez maintenant voir une image vidéo en direct de votre drone Gravit sur l écran du smartphone Vous voyez aussi beaucou...

Page 10: ... de 30 60 ou 100 Plus le niveau est élevé plus votre Gravit sera puissant et manœuvrable Vous pouvez modifier le niveau de puissance en appuyant plusieurs fois sur le bouton Le niveau de puissance tournera entre les réglages 30 60 100 Laissez le régla ge à 30 si vous êtes débutant 5 360 Flip Si vous appuyez sur ce bouton il sera mis en évidence en jaune et le mode Flip sera activé En mode Flip vot...

Page 11: ...r les moteurs du Gravit Si vous voulez démarrer le Gravit et le faire voler appuyez sur le bouton pour démarrer les moteurs Actionner la manette des gaz 18 vers le haut dans les secondes qui suivent Pour plus de détails voir le chapitre Démarrer le Gravit Smart Vision FPV 18 La manette de commande gauche sert à faire tourner le Gravit sur son axe lacet et à augmenter ou diminuer l altitude Pour fa...

Page 12: ...ez d abord contrôler tous les autres composants de votre modèle et consulter le guide de dépannage de votre produit si disponible afin d exclure les autres sources de dérangement et erreurs de commande Si le produit est exempt de défaut lors de l inspection par notre S A V nous devons vous facturer les frais de travail occasionnés selon notre liste de prix Lors de l envoi du produit le client doit...

Page 13: ...ravit en su smartphone Además se mostrarán un gran número de botones y control es Los cuales se explican detalladamente en la versión descargable de este manual disponible en www lrp cc 4 PRIMEROS PASOS CON EL GRAVIT SMART VISION FPV Para arrancar y volar su Gravit realice los siguientes pasos 1 Asegúrese de que su Gravit descansa sobre una superficie plana como el suelo o una mesa Busque una zona...

Page 14: ...looping 360º quedará de nuevo en color gris desactivado Para hacer otro looping active nuevamente la función Si ha presionado el botón y NO desea realizar un looping pulse de nuevo el botón para desactivar y desmarcar la función 6 Gyro control Cuando esta opción esté destacada marcada podrá controlar el Gravit por el giróscopo de su smartphone Esto significa que el Gravit volará en la dirección ha...

Page 15: ...la función Altitud Hold botón 7 debe estar desmarcado desacti vado el Gravit NO mantendrá automáticamente su altitud Usted deberá de mantener la altura deseada mediante la emisión de ordenes a través del stick moviéndolo hacia arriba y abajo según la necesidad 7 VOLAR EL GRAVIT SMART VISION FPV SIN ALTITUDE HOLD Normalmente recomendamos volar el Gravit con la función Altitud hold habilitada Ya que...

Page 16: ...a los costes de trabajo según la lista de precios Con el envío del producto el cliente debe comunicar a LRP si el producto debe ser reparado en cualquier caso En caso de no existir derecho de garantía el producto sería comprobado y en caso necesario reparado con cargo de los costes según nuestra lista de precios El derecho de garantía sólo se reconocerá si se adjunta una fotocopia del ticket de co...

Page 17: ...entro pochi secondi Ora avvia l app scaricata Nella schermata di avvio che verrà visualizzata tocca il pulsante Start Ora sullo schermo dello smartphone dovresti vedere l immagine video in diretta dal drone Gravit Vedrai anche molti pulsanti e controlli Questi saranno illustrati in seguito e più in dettaglio nella versione scaricabile di questo manuale che è disponibile su www lrp cc 4 COME INIZIA...

Page 18: ... 30 5 360 Flip Se premuto questo tasto verrà evidenziato in giallo e attiverà la mo dalità Flip La modalità Flip consente al tuo Gravit di eseguire flip in tutte le direzioni Per farlo basta inclinare lo smartphone nella direzione in Gravit deve eseguire il flip Accertarsi di ruotare lo smartphone di almeno 80 nella direzione corrispondente e di non inclinarlo troppo velocemente o a scatti Una vol...

Page 19: ...leratore 18 verso l alto Per ulteriori dettagli consultare il capitolo Avviamento di Gravit Smart Vision FPV 18 Lo stick sinistro serve a far ruotare Gravit attorno al proprio asse imbardata a prendere e a perdere quota Per far ruotare Gravit spostare lo stick a destra o sinistra Per prendere quota muoverlo verso l alto per perdere quota invece muoverlo verso il basso NOTA Se non hai attivato la f...

Page 20: ...lo in assistenza per la riparazione Se i prodotti spediti per la riparazione dovessero funzionare correttamente dovremo addebitarvi una commissi one per il servizio come da nostro listino Spedendoci questo prodotto il cliente è tenuto ad avvisare LRP se il prodotto deve essere riparato in qualunque caso Se il prodotto non fosse coperto da garanzia o la garanzia non fosse applicabile per l ispezion...

Page 21: ...e all erta riguardo altri oggetti volanti aerei elicotteri palloni ecc cercando di evitarli e di atterrare se necessario Bitte beachten Sie dass Sie länderabhängig ggf einen speziellen Versi cherungsschutz ZUSÄTZLICH zu Ihrer regulären Haftpflichtversicherung benötigen Informieren Sie sich diesbezüglich bei Ihrem Versicherungs geber Please note that you might need a special insurance IN ADDTITION ...

Page 22: ...perty please be responsible when operating all re mote controlled models If you are not familiar with RC vehicles we recommend that you ask someone familiar with RC vehicles for advice Avoid running in rain or wet conditions The electronic and mechanical components could be damaged If your model got wet please dry it up directly and clean it Do not drive your car during a thunder storm Mortal dang...

Page 23: ... μπαταριών ή καινούργιες και παλιές μαζί Συνδέετε σχολαστικά όλα τα εξαρτήματα του εξοπλισμού Εάν οι συνδέσεις αποσυνδεθούν λόγω κραδασμών μπορεί να χάσετε τον έλεγχο του μοντέλου Ο κατασκευαστής δε φέρει ευθύνη για ζημιές που προκαλούνται λόγω παράβλεψης των υποδείξεων ασφαλείας και των προειδοποιήσεων Χρησιμοποιείτε μόνο γνήσια ανταλλακτικά Magyar Nem játék Nem alkalmas 14 évnél fiatalabb gyerme...

Page 24: ...o para crianças com menos de 14 anos Mantenha o produto fora do alcance de crianças pequenas Preste muita atenção às seguintes indicações visto poderem destruir o produ to e anular a garantia A não observância destas indi cações pode causar danos materiais e pessoais assim como ferimentos graves Mantenha o produto sob vigilância sempre que este estiver ligado a funcionar ou ligado a uma fonte de c...

Page 25: ...батерии литий полимерните батерии Батериите не трябва да влизат в досег с огън вода или други течности Процесът на зареждане да се извършва само в сухи помещения Не трябва да се използват повредени акумулаторни клетки Ако се установи промяна на формата видими изменения или подобни отклонения клетките не трябва да бъдат използвани За зареждане на никел метал хидридни или никел кадмиеви батерии да с...

Reviews: