background image

40

Whenever you locate a Map Place, the Waypoint Information screen appears
(with name, position, etc.) and the 

G

T

O

 command is automatically high-

lighted in the command box. To navigate to that Map Place, press 

ENT

 and

iFINDER begins displaying navigation information to that location.

Navigate to a Waypoint

You can select any waypoint visible on the Map Page with the cursor,
then use the Navigate to Cursor command. However, you can avoid
scrolling the map to pick your waypoint if you use the Find commands:

1. Press 

FIND

|

ENT

. To look up the nearest waypoint, press 

ENT

, or to

look by name (and scroll through the entire waypoint list), press 

|

ENT

.

For this example, look by name.

2. If your waypoint list is a long one, you can spell out the waypoint name
in the 

F

IND 

B

N

AME

 box to search for it. (Press 

 or 

 to change the first

character, then press 

 to move the cursor to the next character and re-

peat until the name is correct, then press 

ENT

 to jump to the list below.)

3. If the list is short, you can jump directly to the 

F

IND 

I

L

IST

 box by

pressing 

ENT

. Use 

 or 

 to select the waypoint name, press 

ENT

 and the

waypoint information screen appears with the 

G

T

O

 command selected.

4. To begin navigating to the waypoint, press 

ENT

.

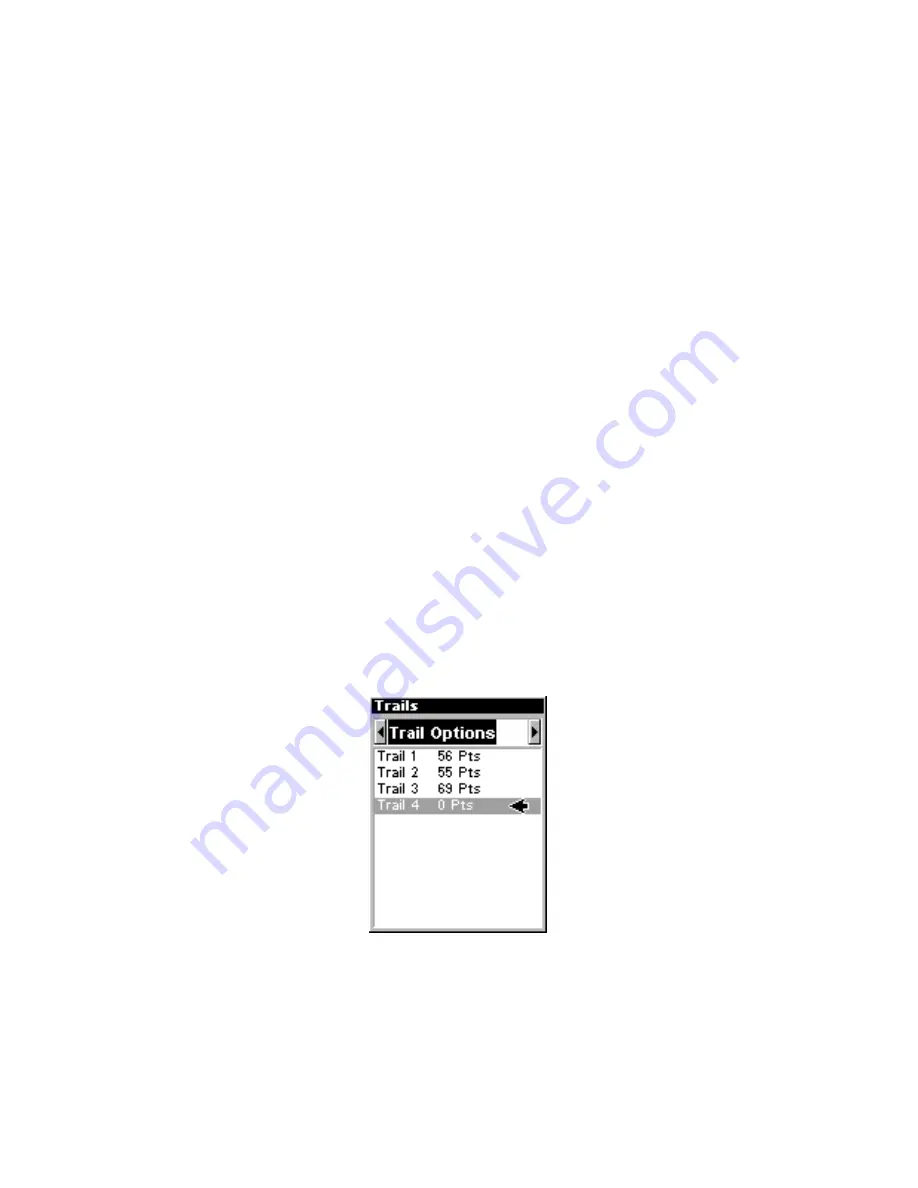
Navigate a Trail

1. Press 

MENU

|

MENU

|

 to 

M

T

RAILS

|

ENT

 and a screen similar to the

one below appears.

Trails Menu, Advanced Mode.

2. Press 

 then use 

 or 

 to select a trail to navigate.

3. With the trail name highlighted, press 

ENT

|

 to 

N

AVIGATE

|

ENT

.

4. Wait while iFINDER creates a route from the trail. When the prog-
ress message disappears, the unit displays a trail information screen,
with the 

N

AVIGATE

 command highlighted in the top command box.

Summary of Contents for iFINDER GO

Page 1: ...Pub 988 0148 731 www lowrance com iFINDER Go Handheld Mapping GPS Receiver Advanced Users Guide ...

Page 2: ...nergizer and e2 are registered trademarks of Energizer Holdings Inc eXitSource Database copyright 2001 2005 Zenrin Co Ltd Exit Authority and eXitSource are trademarks of Zenrin Co Ltd Lowrance Electronics may find it necessary to change or end our policies regulations and special offers at any time We reserve the right to do so without notice All features and specifications subject to change witho...

Page 3: ...e 18 iFINDER Easy Mode Quick Reference 20 Find Your Current Position 21 Moving Around the Map Zoom Cursor Arrow Keys 21 Selecting Any Map Item with the Cursor 21 Searching 22 Set Home Waypoint 23 Navigate Back Home 24 Set Man Overboard MOB Waypoint 24 Navigate Back to MOB Waypoint 25 Navigate to Cursor Position on Map 25 Navigate to a Map Place 26 Creating and Saving a Trail 27 Displaying a Saved ...

Page 4: ...cel Navigation 39 Navigate a Route 39 Navigate to Cursor Position on Map 39 Navigate to an Icon 39 Navigate to Map Place 39 Navigate to a Waypoint 40 Navigate a Trail 40 Backtrack a Trail 41 Routes 41 Create and Save a Route 41 Delete a Route 43 Searching 43 Find Any Item Selected by Map Cursor 44 Find Interstate Highway Exits 44 Find Map Places 46 Find Streets or Intersections 47 Find Waypoints 4...

Page 5: ...rch 56 Com Port Configuration 57 Coordinate System Selection 57 Map Fix 59 Customize Page Displays 60 Customize Position or Navigation Page 60 Customize Map Page 60 GPS Simulator 61 Simulating Trail or Route Navigation 61 Map Auto Zoom 62 Map Data 62 Earth Map Detail 63 Pop up Map Info 63 Fill Land Gray 63 Map Overlays Range Rings Lat Long Grid 63 Map Detail Category Selection 64 Map Orientation 6...

Page 6: ...ons Therefore the prudent navigator will not only take advantage of all available navigation tools when traveling to a way point but will also visually check to make sure a clear safe path to the waypoint is always available WARNING When a GPS unit is used in a vehicle the vehicle operator is solely re sponsible for operating the vehicle in a safe manner Vehicle operators must maintain full survei...

Page 7: ...oming up next If it s a concept you re already familiar with we ll show you how and where to skip ahead for the next important topic We ve also made it easy to look up any tips you may need from time to time Here s how The manual is organized into six sections This first section is an intro duction to Lowrance GPS It tells you the basics you need to know be fore you can make the unit look around a...

Page 8: ...mer service information Now if you re into the fine details glance over the next segment on specifications to see just how much GPS power you hold in your hand It s important to us and our power users but if you don t care how many waypoints iFINDER can store or how long the batteries last skip ahead to important information on how iFINDER works on page 3 Capabilities and Specifications iFINDER Go...

Page 9: ...on points 1 000 waypoints 1 000 event marker icons Routes 100 up to 100 waypoints per route Plot Trails 100 savable up to 9 999 points per trail Zoom range 40 map zoom ranges 0 02 to 4 000 miles How iFINDER Works You ll navigate faster and easier if you understand how iFINDER scans the sky to tell you where you are on the earth and where you re go ing But if you already have a working understandin...

Page 10: ... and routes This lets you look back the way you came Think of this data storage like the hard drive memory in a computer or a tape in a cassette tape recorder You can save several different GPS data files erase em and record new ones over and over and over again Introduction to GPS and WAAS Well now you know the basics of how iFINDER does its work You might be ready to jump ahead to Section 2 Inst...

Page 11: ...called a 2D fix It takes four satellites to determine both position and elevation your height above sea level also called altitude This is called a 3D fix Remember the unit must have a clear view of the satellites in order to receive their signals Unlike radio or television signals GPS works at very high frequencies These signals can be easily blocked by trees buildings an automobile roof even you...

Page 12: ...Aircraft and vessels on open water can get consistently good WAAS reception but terrain foliage or even large man made struc tures frequently block the WAAS signal from ground receivers You ll find that using your GPS receiver is both easy and amazingly accurate It s easily the most accurate method of electronic navigation available to the general public today Remember however that this receiver i...

Page 13: ...ndicate that you are to select this command or option from a menu or take an action of some kind with the menu item Text that you may need to enter or file names you need to select are shown in italic type such as trail name Instructions Menu Sequences Most functions you perform with iFINDER are described as a sequence of key strokes and selecting menu commands We ve written them in a condensed ma...

Page 14: ...8 Notes ...

Page 15: ...rk If you re looking for an extended life battery the Duracell ULTRA bat tery has performed well in our tests You can also use rechargeable AA alkaline batteries such as those made by RAYOVAC or rechargeable AA nickel metal hydride NiMH batteries We do not recommend nickel cadmium NiCd rechargeable batteries because you will get poor battery life from them Rechargeable alkaline batteries will not ...

Page 16: ...r Align the two tabs in the bot tom of the cover with two small sockets in the base of the unit Then fold the cover into place and make sure the latch clicks closed Replace battery compartment cover Align tabs with slots then snap cover in place Cigarette Lighter Power Adapter To use external DC power Plug the power cable s cigarette lighter adapter into a cigarette lighter receptacle Next slide t...

Page 17: ...radle can swivel on a ball for easy viewing in any type of vehicle R A M mounting system Other Accessories Other iFINDER accessories include a belt holster with a see through cover as well as other cable connections If these accessories are not available from your dealer see the accessory ordering information on the inside back cover of this manual ...

Page 18: ...12 See through belt holster for the iFINDER Go ...

Page 19: ... 20 Keypad iFINDER keypad 1 PWR LIGHT Power Light The PWR key turns the unit on and off and activates the backlight Turn off the unit by pressing and hold ing the PWR key for 3 seconds 2 PAGES Pressing this key switches the unit between the three dif ferent page screens in Easy Mode Satellite Navigation and Map Each page represents one of the unit s major operation modes 3 MENU Press this key to s...

Page 20: ...the unit by pressing and holding the PWR key for 3 seconds Main Menu Easy Mode has a single Main Menu which contains some function com mands and some setup option commands The tutorial lessons in this sec tion will deal only with functions the basic commands that make iFINDER do something iFINDER will work fine for these lessons right out of the box with the factory default settings But if you wan...

Page 21: ...nt the three major op erating modes They are the Satellite Status Page the Navigation Page and the Map Page They are accessed by pressing the PAGES key Pressing PAGES repeatedly scrolls among the three screens in an end less circular loop Satellite Status Page This Page shown in the following images provides detailed informa tion on the status of iFINDER s satellite lock on and position acquisi ti...

Page 22: ...te one channel per visible satellite The taller the bar on the graph the better the unit is receiving the signals from the satellite The Estimated Position Error horizontal position error shown in the upper right corner of the screen is the expected error from a benchmark location In other words if the EPE shows 50 feet then the position shown by the unit is estimated to be within 50 feet of the a...

Page 23: ...is the distance you are off course to the side of the desired course line The course line is an imaginary line drawn from your position when you started navigating to the destination waypoint It s shown on the steering screen as a vertical dotted line Lines on either side of the present position show the current cross track error range The default for the cross track error range is 0 20 mile For e...

Page 24: ...ing options in Advanced Mode See the topic Map Orientation in Sec 5 If you re navigating to a waypoint the map also shows your starting location present position course line and destination NOTE When our text says navigating to a waypoint we really mean navigation to any selected item whether it is a waypoint you made a map feature or a map place such as a city or town Using the map is as simple a...

Page 25: ...ns the same maps plus high detail USA lake river and coastal shoreline data The low detail world map contains some large cities and most country political boundaries The medium detail U S map contains all incorpo rated cities shaded metropolitan areas county boundaries some major city streets Interstate U S and state highways lakes and streams and more than 60 000 navigation aids and 10 000 wrecks...

Page 26: ... closer to see greater detail press ZIN zoom in key Zoom out to see more area less detail press ZOUT zoom out key Scroll map north south east or west using arrow keys To stop scrolling and return to current position on map press EXIT key 6 Set Home waypoint at your current position so you can navigate back here press ENT ENT 7 Zoom scroll map to find a nearby object or location Use arrow keys to c...

Page 27: ...in a smaller geographic area 2 Press the ZOUT key zoom out to move farther away and see less map detail but a larger geographic area When you are walking or riding in a vehicle the map will automatically move as you move This keeps your current location roughly centered on the screen You can manually pan or scroll the map northward southward east ward or westward by using the arrow keys which laun...

Page 28: ...of searches refer to Sec 4 Advanced Mode Operation After iFINDER has acquired a position 1 Press FIND to MAP PLACES ENT to WATER ENT Find Map Places Menu left category menu with water selected cen ter and Find By Nearest menu right 2 A window will pop up giving you the option of choosing a body of wa ter by name or viewing a list of the locations nearest you For this ex ample we ll search by neare...

Page 29: ... latitude and longitude distance and bearing Map screen showing Finding Waypoint the result of a Water search 6 To clear the search and return to the last page displayed press EXIT EXIT EXIT Before you completely exited out of the Search menus you could have gone looking for another place Set Home Waypoint A waypoint is simply an electronic address based on the latitude and longitude of a position...

Page 30: ...ENT to YES ENT iFINDER stops showing navigation information Set Man Overboard MOB Waypoint One of boating s most terrifying events is having a friend or family member fall overboard This situation can be deadly on any body of wa ter fresh or salt It s particularly dangerous at night or if you re out of sight of land Of course the first thing to do is remain calm and try all standard safety measure...

Page 31: ...al waypoint other than Home in Easy Mode When you set the MOB point just cancel navigation and then use MOB like a regular waypoint Remember you can set 1 000 waypoints in Advanced Mode To cancel navigation to MOB press MENU to CANCEL NAVIGATION ENT to YES ENT iFINDER stops showing navigation information Navigate to Cursor Position on Map The Go To Cursor command navigates to the current cursor po...

Page 32: ...le zoom figure at left clearly shows the dotted course line connecting your current position to your destination The 60 mile zoom center shows both current position and destination on screen The Navigation Page right will also show navigation information To stop navigating to the cursor use the Cancel Navigation command press MENU to CANCEL NAVIGATION ENT to YES ENT iFINDER stops showing navigatio...

Page 33: ...l by placing a dot trail point on the screen every time you change directions The method used for creating a trail and the trail update rate can both be adjusted in Advanced Mode See Sec 5 for Trail Options In Easy Mode this unit automatically creates a plot trail when turned on and this trail is automatically saved in memory when the unit is turned off iFINDER continues recording the same trail u...

Page 34: ...r current position arrow traces along the trail you have just made Navigate a Back Trail 1 Press MENU to NAVIGATE TRAIL ENT 2 Now begin moving and follow your iFINDER NOTE If you are already located at or near the beginning of your back trail the arrival alarm will go off as soon as you hit Enter Just press EXIT to clear the alarm and proceed On the map your original trail is visible as a flashing...

Page 35: ...nt 3 and must turn south to follow the trail Arrival alarm goes off and bearing arrow swings around to say turn right south toward the next waypoint trail point 4 iFINDER now shows navigation information to point 4 which is 0 95 miles away 3 When you reach your destination be sure to cancel your navigation press MENU to CANCEL NAVIGATION ENT iFINDER asks if you re sure press ENT Clearing or Erasin...

Page 36: ... asks if you re sure press ENT 2 Return to the page by pressing EXIT Switch to Advanced Mode To leave Easy Mode and switch to Advanced Mode 1 Press MENU to ADVANCED MODE ENT 2 Unit asks Are you sure you want to enter Advanced Mode 3 press ENT and the unit switches to Advanced Mode Switch Back to Easy Mode from Advanced Mode To leave Advanced Mode and switch back to Easy Mode 1 Press MENU MENU to E...

Page 37: ...ou to select or adjust a feature from a list 4 ARROW KEYS These keys are used to navigate through the menus make menu selections move the map cursor and enter data 5 ENT SAVE Enter Save This key allows you to save data ac cept values or execute menu commands 6 EXIT The Exit key lets you return to the previous screen clear data or erase a menu 7 FIND The Find key launches the iFINDER search menus 8...

Page 38: ...ee Sec 5 System Setup and GPS Setup Options 1 To get to the main menu from any page press MENU MENU To clear the menu screen and return to the page display press EXIT Main Menu Advanced Mode Pages Advanced Mode has four Page displays that represent the four major operating modes They are the Satellite Status Page the Position Page the Navigation Page and the Map Page They are accessed by pressing ...

Page 39: ...s PAGE repeatedly until the page you want appears 2 To get to Satellite Status Menu press MENU Satellite Status Page left Satellite Status Menu right Status Menu The Satellite Status Menu allows you to set your own GPS options such as power saving track smoothing and whether you want the GPS en gine to stop searching a power saving function for use indoors Position Page This page provides detailed...

Page 40: ...ng to a waypoint Your position is shown by an arrow in the center of the screen Your trail history or path you ve taken is depicted by the line extending from the arrow The large arrow pointing down at the top of the compass rose indicates the current track direction of travel you are taking NOTE Refer to Sec 3 Easy Mode Operation for further explanation and more illustrations of the Navigation Pa...

Page 41: ...able map zoom ranges from 0 02 miles to 4 000 miles NOTE Refer to Sec 3 Easy Mode Operation for further explanation and more illustrations of the Map Page 1 To get to Map Page Map page is the default when iFINDER is turned on To switch from another page to the Map Page press PAGE repeatedly until the page you want appears 2 To get to Map Page Menu press MENU Map Page left Map Menu right Map Menu T...

Page 42: ...ing your current position to the cursor s location The distance along that line will appear in the lower left hand corner of the screen 3 Press EXIT to return to regular operation The distance to Dallas from the starting point is 238 7 miles Find Distance From Point to Point You can also measure distance between two other points on the map 1 While on the Map page press MENU to FIND DISTANCE ENT 2 ...

Page 43: ...EXIT until the cursor goes away and the map snaps back to center on your position Icons Icons are graphic symbols used to mark some location personal point of interest or event They can be placed on the map screen saved and re called later for navigation purposes These are sometimes referred to as event marker icons iFINDER has 42 different symbols you can pick from when creating an icon Icons are...

Page 44: ...e all the icons at one time you can delete all icons represented by a particular symbol or you can use the cursor to delete a selected icon from the map 1 Press MENU to DELETE MY ICONS ENT 2 Press to DELETE ALL ICONS DELETE BY SYMBOL or DELETE FROM MAP and press ENT Delete icons menu Navigate Navigation is one of the most powerful reasons for owning an iFINDER With the navigation options available...

Page 45: ...N ENT to YES ENT Navigate a Route 1 From the NAVIGATION PAGE press MENU ENT or from the MAP PAGE press MENU MENU to ROUTE PLANNING ENT 2 Press to select route name ENT ENT 3 Upon arrival at your destination cancel navigation press MENU MENU to CANCEL NAVIGATION ENT to YES ENT Navigate to Cursor Position on Map 1 Use arrow keys to center cursor cross hair over the map object or location 2 To naviga...

Page 46: ...out the waypoint name in the FIND BY NAME box to search for it Press or to change the first character then press to move the cursor to the next character and re peat until the name is correct then press ENT to jump to the list below 3 If the list is short you can jump directly to the FIND IN LIST box by pressing ENT Use or to select the waypoint name press ENT and the waypoint information screen a...

Page 47: ...NT Backtrack a Trail See the tip paragraph in the previous entry Navigate a Trail Routes A route is a series of waypoints linked together in an ordered sequence that s used to mark a course of travel You can visualize a route as a string of beads The beads represent waypoints and the string repre sents the course of travel connecting waypoint to waypoint The course from one waypoint to the next is...

Page 48: ... Street and 145th E Ave to start our route to a public hunting area next to a river 1 2 3 Route creation sequence from left Fig 1 Set route waypoint 1 at 11th St 145th Ave Fig 2 and 3 Zoom in move cursor north to set point 2 at intersection with interstate I 44 In figures 2 and 3 notice the rubber band line extending from the previously set waypoint to the cursor This line will become the course f...

Page 49: ...AVIGATE With the command box active just press to highlight a different command then press ENT 10 If you are finished with the route for now you can return to the last page displayed by pressing EXIT EXIT EXIT Delete a Route 1 From the NAVIGATION PAGE press MENU ENT or from the MAP PAGE press MENU MENU to ROUTE PLANNING ENT 2 Press to the route list press or to select route name ENT 3 Press to DEL...

Page 50: ... page press EXIT A highway exit selected by the cursor left The Find Menu center Waypoint Information screen right NOTE Since the Go To command is highlighted you can navigate to the selected waypoint by pressing ENT while in the Waypoint Informa tion screen Find Interstate Highway Exits 1 Press FIND to HIGHWAY EXITS ENT which calls up the Find Exit Menu 2 First select a highway name by pressing E...

Page 51: ...n exit Press to switch to the Exit List then press or until you highlight the exit you want then press ENT Selected exit 4 In the Exit Information screen you have two choices A Press ENT to navigate or go to the exit B Press ENT to find the exit on the map Go To option left Find On Map option right ...

Page 52: ...ategory menu 3 Search by nearest location At the Find By menu press ENT The Find by Nearest menu will show a calculating screen then a list of nearest Map Places will appear Press or to select the place you want and press ENT to call up the Waypoint Information screen Find by nearest option left Calculating screen center places list right 4 Search by name of location At the Find By menu press ENT ...

Page 53: ...right Find Streets or Intersections You can use the iFINDER to find any of the streets displayed on the map Find a Street 1 Press FIND to STREETS ENT and the Find Streets menu appears 2 You must first fill in a street name in the First Street dialog box Press ENT to display the Find By Name menu There are two options A You can spell out the street in the top selection box Press or to change the fi...

Page 54: ... EXIT Find an Intersection You must enter one street in the First Street dialog box and enter the next street in the Second Street dialog box 1 Press FIND to STREETS ENT and the Find Streets menu appears 2 You must first fill in a screet name in the First Street dialog box Press ENT to display the Find By Name menu There are two options A You can spell out the street in the top selection box Press...

Page 55: ... can specify a city and or Zip Code later on to narrow the search if the resulting list is too long Find intersection left Intersection list right 6 To search for the intersection of the two streets press to FIND INTERSECTION ENT A message appears asking you to wait while the unit finds the intersection When the Intersections Found list appears press or to select the intersection you are searching...

Page 56: ...with the cursor highlighting the found waypoint To clear these menus and return to the previous page press EXIT repeatedly 5 If you re looking by name there are two options A You can spell out the name in the top selection box Press or to change the first letter then press to move the cursor to the next letter and repeat until the name is correct then press ENT ENT B Jump down to the lower se lect...

Page 57: ...particularly handy when you are trying to retrace your trip and go back the way you came Easy Mode only allows you to work with one trail But Advanced Mode lets you save up to 10 trails in iFINDER s memory For various trail options see the Trail Options entry in Sec 5 Create and Save a Trail iFINDER is set at the factory to automatically create and record a trail while the unit is turned on It wil...

Page 58: ...ator To get to the Calculator menu press MENU MENU to UTILITIES ENT to TRIP CALCULATOR ENT Trip Down Timer To get to the Down Timer menu press MENU MENU to UTILI TIES ENT to DOWN TIMER ENT Trip Up Timer To get to the Up Timer menu press MENU MENU to UTILITIES ENT to UP TIMER ENT Waypoints A waypoint is simply an electronic address based on the latitude and longitude of a position on the earth A wa...

Page 59: ...aused by atmospheric condi tions and other factors 1 Press ENT to AVERAGE POSITION ENT cursor jumps to highlight CREATE ENT 2 Wait while the unit takes points to average for the position The greater the number of points the greater the accuracy When the desired number of points accumulates press ENT to create and save the waypoint 3 The Edit Waypoint menu appears You can simply save the waypoint b...

Page 60: ...ymbol 1 Press FIND ENT to NAME ENT ENT to waypoint name ENT to EDIT SYMBOL ENT 2 Use arrow keys to select desired symbol and press ENT To return to the previous page press EXIT EXIT EXIT Waypoint Position To edit waypoint position 1 Press FIND ENT to NAME ENT ENT to waypoint name ENT to EDIT POSITION ENT 2 Latitude press ENT then press or to change the first character then press to the next charac...

Page 61: ...course line to the waypoint For example if the alarm is set to 0 1 mile then the alarm flashes a message if you drift 0 1 mile or more to the right or left of the line to the waypoint The anchor alarm is triggered when you drift outside of a preset radius Again using the 0 1 mile as an example if you re anchored and your boat moves more than 0 1 mile the alarm will flash a message You can only adj...

Page 62: ...ion but it s rarely required to determine a position It needs this data so that it can calculate which satellites should be in view It then searches for only those satellites When your GPS receiver is turned on for the first time it doesn t know what your position or elevation altitude is The unit begins searching for the satellites using data that it acquired the last time it was turned on This w...

Page 63: ... Menus for changing Com Port settings For connectors and wiring information for another device consult the factory phone numbers are in the back of this manual To set Com Port Configuration 1 Press MENU MENU to SYSTEM SETUP ENT 2 Press to COM PORT ENT Coordinate System Selection The Coordinate System Menu lets you select the coordinate system to use when displaying and entering position coordinate...

Page 64: ...untry This unit will pick the matching datum for you when you select the grid See the entry on Map Datum Selection for more information The military grid reference system MGRS uses two grid lettering schemes which are referred to as standard and alternate MGRS on this unit Your position and datum in use determines which one to use If you use standard and your position is off significantly then try...

Page 65: ...to work the latitude longitude lines must be parallel with the edge of the map USGS maps are parallel others may not be Also this works better with smaller scale maps The reference position can be anywhere on the map but the closer it is to your location the smaller the numbers will be that you ll have to deal with Once you ve decided on a reference position you can save it as a way point See the ...

Page 66: ... is viewable on each page Customize Position or Navigation Page Both of these Pages have data boxes in the bottom portion of the screen displaying digital data To customize these data boxes on either page press MENU to CUSTOMIZE ENT Use the arrows keys to select one of the data boxes the title bar of the currently selected box flashes and press ENT The Customize Windows list will appear with all o...

Page 67: ...ically reminding you that the simula tor is on To turn the simulator off repeat the above steps or turn the unit off While in simulator mode you can press EXIT to clear the steering and speed boxes from the screen while continuing the simulation This will allow you to use the map cursor during a simulation To turn steering and speed boxes back on again return to the GPS Simulator menu se lect the ...

Page 68: ...ivers force you to make It works in conjunction with the navigation features First start navigation to a waypoint See the waypoint section for more information on navigating to a waypoint Then with the auto zoom mode on the unit zooms out until the entire course shows from the present position to the destination waypoint As you travel toward the destination the unit automatically begins zooming in...

Page 69: ...s Range Rings Lat Long Grid The map screen can be customized with four range rings and or grids that divide the plotter into equal segments of latitude and longitude Range rings are handy for visually estimating distances on the map The ring diameters are based on the current zoom range For example at the 100 mile zoom the screen will show two rings with your current position in the center The lar...

Page 70: ...he mapping features are shown on the screen This includes waypoints trails icons cities highways etc You can selectively turn on or off any of these items customizing the map to your needs Map Detail Categories can be turned off and on only in Ad vanced Mode Switch from Easy to Advanced MENU to ADVANCED MODE ENT ENT To get to Map Categories 1 Press MENU to MAP CATEGORIES ENT 2 Press or to select a...

Page 71: ...keeps the map at the same orientation as the initial bearing to the waypoint When either the track up or course up mode is on an N shows on the map screen to help you see which direction is north To change map orientation from the MAP PAGE press MENU to MAP ORIENTATION ENT Press or to select an orientation option With the option highlighted press ENT to select it After the option is set press EXIT...

Page 72: ...e unit on NOTE Reset Options does not erase any waypoints routes icons or plot trails Advanced Mode s Reset Options command Require WAAS You can force iFINDER to require WAAS for reporting a valid position The default setting off uses WAAS automatically but doesn t require it to yield a position Here s how to turn it on and off in Advanced Mode 1 Press MENU MENU to GPS SETUP ENT to REQUIRE WAAS EN...

Page 73: ...N ENT In Advanced Mode you first press MENU MENU ENT Once in the Screen menu To adjust the display s contrast 1 The CONTRAST slider bar is already selected Press or to move the bar The left end of the scale is minimum contrast the right end is maximum contrast Contrast bar on the Screen Menu To adjust the display s brightness 1 Press to BRIGHTNESS Press or to move the bar The left end of the scale...

Page 74: ...ct mode EXIT Display Mode menu To adjust the display s back light delay options 1 Press to LIGHT DELAY ENT press or to select mode EXIT 2 To leave screen settings and return to the last page displayed press EXIT EXIT Light Delay menu Setting shown is Continuous which is ideal for night travel in a vehicle on external power ...

Page 75: ...vanced Mode but you access the SET LOCAL TIME command differently in each mode In Easy Mode you first press MENU to SET LOCAL TIME ENT In Advanced Mode you first press MENU MENU to SYSTEM SETUP ENT to SET LOCAL TIME ENT The Time Settings menu Once in the Time Settings menu To set Local Time Press ENT Press or to change the first charac ter then press to move the cursor to the next character Repeat...

Page 76: ...me to time Lowrance updates the operating system software in some of its products These software upgrades are usually offered to customers as free downloads from our web site www lowrance com These upgrades make the unit perform better or introduce a new fea ture or function You can find out what software version is running in your iFINDER by using the Software Info command The Software Info scree...

Page 77: ... in track up mode Track Smoothing option turned on Trail Options There are several options you can use with trails Some affect all trails other options can be applied to a particular trail You can change the way trails are updated you can display or hide trails make them flash on the screen or not flash create a new trail delete a trail etc These options are only available in Advanced Mode but opt...

Page 78: ...y the trail updates occur Trail Options menu WARNING If you uncheck the Update Trail option automatic trail creation and recording will be turned off in both Advanced and Easy modes and you must turn it back on to record trails The default setting is on Press or to UPDATE TRAILS With the option highlighted press ENT to check it turn on and uncheck it turn off Update Trail Criteria Auto Time Distan...

Page 79: ...range from 1 second to 9999 sec onds the default is 3 seconds You can update by distance with a range from 0 01 mile nm km to 9 99 mile nm km the default is 0 10 mile With Update Criteria selected press to either the rate or distance data entry boxes and press ENT Press or to change the first charac ter then press to the next character and repeat until the entry is correct Press EXIT EXIT to retur...

Page 80: ...NDER is recording new points for a particular trail On the Edit Trail menu press or to highlight the section you wish to change then press ENT Make your changes then press EXIT to erase this menu Units of Measure This menu shown below sets the speed and distance statute or nauti cal miles meters depth feet fathoms or meters temperature de grees Fahrenheit or Celsius and heading true or magnetic un...

Page 81: ...ge the heading then press ENT After the option is set press EXIT EXIT to re turn to the page display To set Time Format Press to TIME FORMAT ENT Press or to change the time format then press ENT After the option is set press EXIT EXIT to return to the page display To set Date Format Press to DATE FORMAT ENT Press or to change the date format then press ENT After the option is set press EXIT EXIT t...

Page 82: ...76 Notes ...

Page 83: ...onable pro tection against harmful interference in a residential installation This equipment generates uses and can radiate radio frequency energy and if not installed and used in accordance with the in structions may cause harmful interference to radio communica tions However there is no guarantee that interference will not occur in a particular installation If this equipment does cause harmful i...

Page 84: ...Display 60 Customize Map Data Shown 62 63 64 D Data Boxes Customize Display 60 Depth Range 3 17 18 19 20 21 28 35 62 63 64 73 E Easy Mode 1 2 7 13 14 15 19 20 23 25 27 30 31 33 34 35 39 41 43 51 53 66 67 69 70 71 74 Switch To 51 F File Transfer 3 Fill Land Gray Map Data option 63 G GPS Data File 4 I Icons 3 4 26 37 38 39 64 66 Creating 37 38 Deleting 38 Navigate 39 Information Displays Customize D...

Page 85: ... 64 Repeat Play List 43 62 69 Reset Options 66 Route 3 4 6 17 20 35 39 40 41 42 43 56 61 62 66 Create and Save 41 Delete 43 Navigate 39 S Satellite Search 56 Searching 14 20 21 22 23 24 25 27 31 36 37 39 40 43 44 45 46 47 48 49 50 51 By Cursor 44 Highway Exits 44 POIs 22 27 46 Streets 47 48 49 Waypoints 43 49 Set Local Time 15 69 Simulator 61 62 Software Version Information 70 Status Menu 33 Sun M...

Page 86: ...80 40 41 42 43 44 46 47 49 50 51 52 53 54 55 56 58 59 60 61 62 64 65 66 69 73 Delete 54 Edit 54 Navigate 39 40 Save 52 53 Search 43 49 Z Zooming 3 14 17 19 20 21 28 31 35 42 62 Auto Zoom 62 ...

Page 87: ...nexclusive nonassignable right to use these Databases for supplemental navigation reference purposes but only as long as you comply with the terms and conditions of this License Agreement We reserve the right to terminate this license if you violate any aspect of this License Agreement You are responsible for using official government charts and prudent navigation for safe travel 3 The Databases h...

Page 88: ...S BE LIABLE TO ANYONE FOR ANY SPECIAL CONSE QUENTIAL INCIDENTAL OR OTHER INDIRECT DAMAGE OF ANY KIND Some states do not allow the exclusion or limitation of incidental or consequen tial damages so the above limitations or exclusions may not apply to you This warranty does NOT apply in the following circumstances 1 when the product has been serviced or repaired by anyone other than us 2 when the pr...

Page 89: ...MENT OR REFUND AS JUST DESCRIBED IS THE EXCLUSIVE REMEDY AVAILABLE TO YOU AGAINST US FOR ANY DEFECT MALFUNCTION OR NON CONFORMITY CONCERNING THE PRODUCT OR FOR ANY LOSS OR DAMAGE RESULTING FROM ANY OTHER CAUSE WHATSOEVER WE WILL NOT UNDER ANY CIRCUMSTANCES BE LIABLE TO ANYONE FOR ANY SPECIAL CONSEQUENTIAL INCIDENTAL OR OTHER INDIRECT DAMAGE OF ANY KIND Some states do not allow the exclusion or lim...

Page 90: ...ange or end our ship ping policies regulations and special offers at any time We reserve the right to do so without notice in Canada If you re in Canada and you have technical return or repair questions please contact the Factory Customer Service Department Before any product can be returned you must call customer service to determine if a return is necessary Many times customer service can resolv...

Page 91: ...s necessary to send a product for repair or replacement you must first receive a return authorization number from Customer Service Products shipped without a return authorization will not be accepted When shipping we recommend you do the following 1 Please do not ship the knobs or mounting bracket with your unit 2 If you are sending a check for repair please place your check in an envelope and tap...

Page 92: ...Visit our web site Lowrance Pub 988 0148 731 Copyright 2005 All Rights Reserved Printed in USA 050305 Lowrance Electronics Inc ...

Reviews: