Lorex Vantage LH010 ECO BLACKBOX SERIES Instruction Manual Download Page 127

109

Mobile Apps: Accessing your DVR Using a Mobile Device

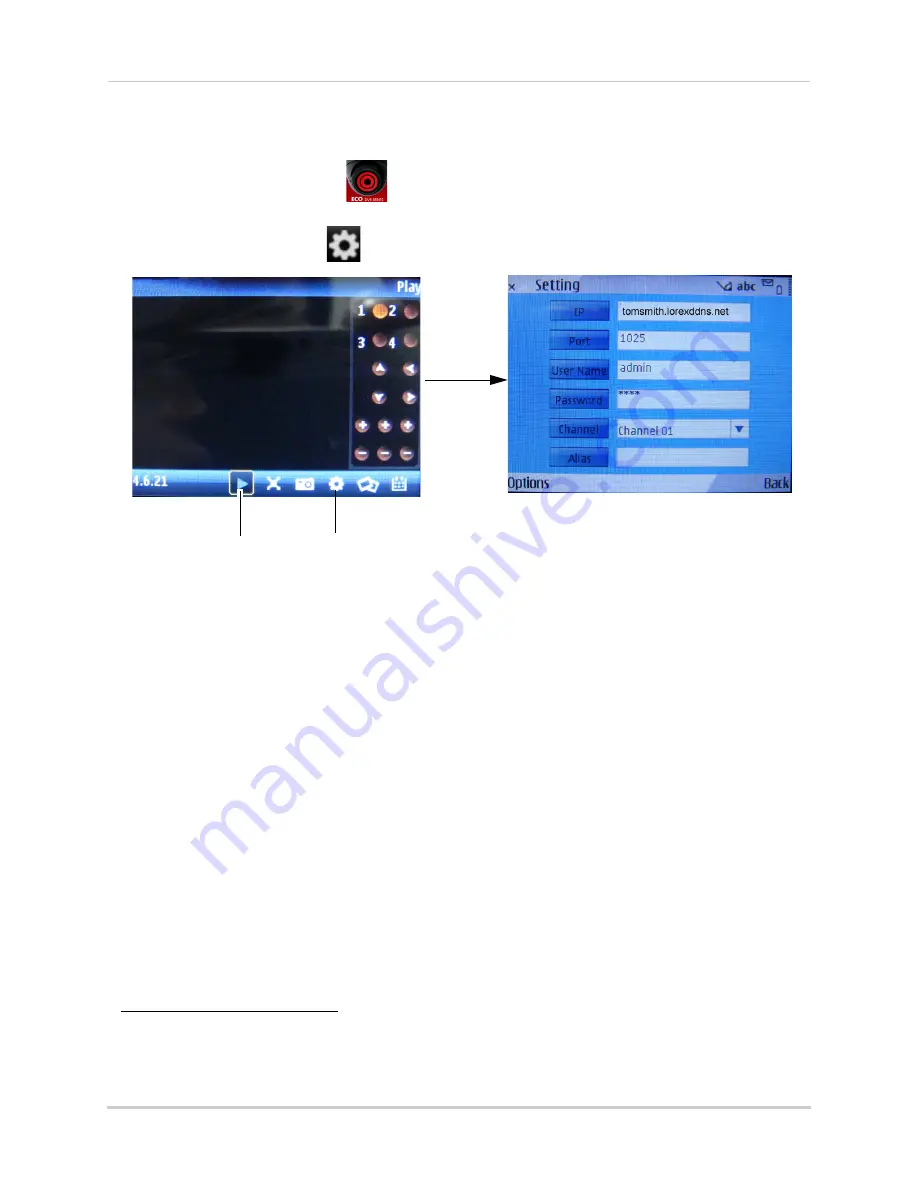
Step 2 of 2: Configuring and Connecting to Lorex Mobile ECO

1

Open the 

Lorex Mobile ECO

 (

) app on your phone.

2

Click the Settings button (

).

3

Configure the following:

• 

IP

: Enter the DDNS address of the DVR (i.e 

tomsmith.lorexddns.net

)

1

.

• 

Port

: Enter the DVR’s Mobile Port number (by default, port 

1025

).

• 

User Name

: Enter the DVR’s user name (by default: 

admin

)

• 

Password

: Enter the DVR password (by default: 

0000

)

• 

Alias

: Enter a DVR name of your choice

4

Save your settings. From the main viewing window, press the play button to connect to the 
DVR.

1. Some routers may prevent you from connecting to your DVR using a DDNS address on a local network. If you are 

unable to connect, try disabling WiFi on your mobile device and attempt to connect using the 3G or mobile 
network. If you need to use WiFi, use the DVR’s internal IP address to connect.

Settings

Play

Summary of Contents for Vantage LH010 ECO BLACKBOX SERIES

Page 1: ...VIDEO SURVEILLANCE RECORDER LH010 ECO BLACKBOX SERIES Copyright 2012 Lorex Technology Inc Instruction Manual English Version 3 0 THE ECONOMICAL SOLUTION TO PROTECT YOUR HOME OR BUSINESS RETAIL INDUSTR...

Page 2: ...EMOVE COVER NO USER SERVICABLE PARTS INSIDE REFER SERVICING TO QUALIFIED SERVICE PERSONNEL The lightning flash with arrowhead symbol within an equilateral triangle is intended to alert the user to the...

Page 3: ...vice for warranty matters 1 888 425 6739 1 888 42 LOREX Tech Support for technical installation issues 1 877 755 6739 1 877 75 LOREX Mexico 001 800 681 9263 001 800 514 6739 International 800 425 6739...

Page 4: ...rend les renseignements sur les produits guides d utilisation guides de d part rapide et FAQ www lorextechnology com support En ligne Hay 2 maneras f ciles de comunicarse con nosotros Norte Am rica At...

Page 5: ...logy com support If you require further installation assistance please visit www lorextechnology com installation or contact a professional installer Please note that once the components of this produ...

Page 6: ...de ce produit vous ne pouvez pas retourner celui ci directement au magasin sans son emballage original Favor de leer la gu a de instalaci n r pida y la gu a del usuario antes de instalar este product...

Page 7: ...f the obsolete outlet 5 Power Sources This product should be operated only from the type of power source indicated on the marking label If you are not sure of the type of power supplied toyourlocation...

Page 8: ...moving covers may expose you to dangerous voltage or other hazards Refer all servicing to qualified service personnel 2 ConditionsRequiringService Unplugthisproduct from the wall outlet and refer serv...

Page 9: ...ment does cause harmful interference to radio or television reception which can be determined by turning the equipment on and off the user is encouraged to try to correct the interference by one or mo...

Page 10: ...e product can survive fire or extreme conditions Use product in accordance with the instructions provided All trademarks belong to their respective owners No claim is made to the exclusive right to us...

Page 11: ...lerts with snap shot attachment Accurate Time Stamps with NTP Daylight Savings Time 1 Recording time may vary based on recording resolution quality lighting conditions and movement in the scene 2 HDMI...

Page 12: ...x...

Page 13: ...DVR 7 Step 6 Verify Camera Image 7 Step 7 Set the Time 8 Default System Password Port Numbers 8 Quick Access to System Information 8 Connecting Cameras 9 Installation Tips 9 Installing Cameras 9 Conn...

Page 14: ...guring Custom Channel Names 36 Changing the Position of the Channel Name 36 Adjusting Camera Color Settings 36 Enabling Covert Recording 36 Configuring the Time and Recording Time Display 37 Configuri...

Page 15: ...r Shutting Down the DVR 54 Configuring System Warnings 54 Saving Your System Configuration to a USB Flash Drive ECO Blackbox Series Only 55 Loading a System Configuration from a USB Flash Drive ECO Bl...

Page 16: ...ings 82 Configuring your System to Beep During Motion 83 Configuring Alarm Notifications 16 Channel ECO Blackbox Only 84 Configuring Hard Drive Recording Mode 85 Configuring PTZ Parameters 85 Configur...

Page 17: ...Step 2 of 2 Configuring and Connecting to Lorex Mobile ECO 107 Symbian OS 108 Step 1 of 2 Downloading the App 108 Step 2 of 2 Configuring and Connecting to Lorex Mobile ECO 109 Appendix A System Speci...

Page 18: ...xvi...

Page 19: ...LE REMOTE CONTROL may not be exactly as shown DVR DIGITAL VIDEO RECORDER HDMI CABLE BLACKBOX SERIES ONLY HARD DRIVE SIZE NUMBER OF CHANNELS AND CAMERA CONFIGURATION MAY VARY BY MODEL PLEASE REFER TO Y...

Page 20: ...se included or USB flash drive not included for data backup or firmware updates ECO Blackbox Series 4 Channel 8 Channel 1 Video Input Connect BNC cameras 2 Video Output Outputs the DVR interface to a...

Page 21: ...eras 2 Video Output Outputs the DVR interface to a BNC connection This allows you to see your mouse cursor and have full control of the system on a secondary monitor To switch the mouse and system int...

Page 22: ...i e for a TV connection 3 Audio Output Output for 1 RCA audio channel e g speakers 4 Audio Input Input for 2 RCA audio enabled cameras not included 5 HDMI Connect to an HDMI monitor or TV not included...

Page 23: ...e g speakers 4 Audio Input Input for 4 RCA audio enabled cameras not included 5 HDMI Connect to an HDMI monitor or TV not included to view the system interface 6 VGA Connect a VGA monitor not included...

Page 24: ...n the DVR Step 3 Connect the Ethernet Cable Connect an ethernet cable included to the LAN port on the rear panel of the DVR Connect the other end of the ethernet cable to a router on your network Push...

Page 25: ...itch to I to turn on the DVR At startup the system performs a basic system check and runs an initial loading sequence After a few moments the system loads a live display view Step 6 Verify Camera Imag...

Page 26: ...00 Client port Port 1025 Mobile port Remote connectivity LAN Internet to the DVR User Name admin Password none left blank Mobile connectivity e g iPhone to the DVR User Name admin Password 0000 Quick...

Page 27: ...eras 1 Mount the camera s to the desired mounting surface according to the instructions that came with the camera s Choose a firm mounting surface NOTE If you wish to mount cameras to drywall it is re...

Page 28: ...camera power adapter to a power outlet Connecting and Removing BNC Cables BNC Bayonet Nut Connector is a special connector that locks on to the system port and cannot be accidently removed To connect...

Page 29: ...lect a menu option During live viewing in Split screen View double click on a channel to view the selected channel in full screen double click the channel again to return to Split screen View 2 Right...

Page 30: ...to mute un mute audio during Live Viewing and Playback Mode 5 Playback Controls In Playback Mode press to fast forward increase fast forward speed In Playback Mode press to rewind increase rewind spee...

Page 31: ...menus ENTER In menus press to confirm selections In Live Viewing Mode press to access System Information 3 MENU ESC Press to open the system menu In menus press to go back exit menu MUTE In Live Viewi...

Page 32: ...A alarm recording 16 Channel ECO Blackbox only 3 Channel number Channel title Displays channel number or channel title To rename the channel number to a title see Configuring Custom Channel Names on...

Page 33: ...s digital zoom Must be in Full screen Mode Record Search Opens the DVR Search Menu This allows you to search for video recorded on the DVR Start Stop Recording Start or stop DVR recording on all chann...

Page 34: ...sing the mouse click on an option or field such as the User ID and Password fields if passwords are enabled The Virtual Keyboard opens Click Shift to switch between upper and lowercase letters Click t...

Page 35: ...ght click to open the Menu Bar and select the Zoom button A Zoom icon appears on the screen 3 Click and drag on the area of the screen you would like to enlarge The image zooms in on the selected area...

Page 36: ...ws 1 channel in full screen and 1 other channel PIP1X2 shows 1 channel in full screen and 2 other channels Picture in Picture Mode opens To change the full screen channel click anywhere in the main vi...

Page 37: ...al DST Click the Setup button next to DST to configure automatic Daylight Savings Time adjustments Optional NTP Click the Setup button next to NTP to synchronize your DVR s time and date with a Networ...

Page 38: ...button 2 Configure the following Daylight Saving Time Select Enable Time Offset Select the number of hours the system should move forward or backward when DST occurs Daylight Saving Time Mode Select...

Page 39: ...e To enable NTP 1 Right click to open the Menu Bar and click the Main Menu button 2 Click System Beside NTP click Setup 3 Configure the following Enable Select Enable Server Address Select ntp lorexdd...

Page 40: ...iously recorded data For more details see Configuring Hard Drive Settings on page 50 Event Recording The system also includes motion recording Recording Motion The system records when motion is detect...

Page 41: ...The Record Search tab opens 2 Configure the following CH Select the channel you wish to search Select All to search all channels Search Date Enter the month date and year you wish to search for video...

Page 42: ...h button Your search results appear in the calendar In the top portion of the calendar results are shown for each day in the month In the bottom portion results are shown for each hour in the selected...

Page 43: ...l buttons on the remote control Click the playback controls to play pause fast forward rewind and slow down playback Drag the slider to adjust the volume audio capable camera required not included Cli...

Page 44: ...ents in the Playback Bar ECO Blackbox Series Only The advanced playback controls show the time and type of video footage available Continuous recordings are shown in green and motion or alarm recordin...

Page 45: ...ge click The button will become colored Move your mouse to the time you where you would like the range to start and click Then move your mouse to the time you where you would like the range to end and...

Page 46: ...l is selected for Playback To create a backup video clip 1 Connect a USB flash drive not included to one of the USB ports on the DVR 2 Open Playback mode with only one channel selected For details see...

Page 47: ...connected to the DVR To back up video 1 Connect a USB flash drive to one of the USB ports on the DVR 2 Right click to open the Menu Bar and click the Record Search button 3 Click the Backup tab 4 Con...

Page 48: ...page 93 Converting Backed Up Video to AVI Files The DVR saves its backup files as proprietary video files To share these files you must convert them into AVI files Note that the AVI generator can als...

Page 49: ...sired file format 264 h 264 All File that you wish to search for Click Open 4 Click Start to convert and save the file in the default save folder Or click Save As to select a desired save folder then...

Page 50: ...sswords you must select a 6 digit ADMIN password By default the system password is disabled Enabling and Changing Passwords You can change the system password of the ADMIN and the USER from the Users...

Page 51: ...ers to log in to the system When adding different users you can assign what menus they have access to For example you may want your friend to monitor your system while you are away while not giving fu...

Page 52: ...ble or disable the system from prompting you for a user or admin password during log in Password Enter your desired password Confirm Re enter the password 8 Click Apply to save your settings Now you c...

Page 53: ...ra color settings camera title video output 2 Search Search for recorded video and log files on the system 3 Alarm Configure motion detection settings 4 System Configure system time and user accounts...

Page 54: ...nd corner D L Lower left hand corner U R Upper right hand corner D R Lower right hand corner OFF Disable Do not display the channel name 4 Optional Use the drop downs next to Copy to copy settings to...

Page 55: ...Click the drop down menu beside VGA Resolution and select the output resolution 3 Click Apply to save your settings 4 Right click repeatedly to exit all menus The DVR prompts you to restart Click OK...

Page 56: ...y zone allows you to block out portions of each channel with a black square To configure a privacy zone 1 Click the Privacy Zone tab 2 In the Channel drop down menu select the channel you wish to conf...

Page 57: ...ote control again to return the mouse and system interface to the VGA or HDMI monitor Your custom display will be saved on the secondary monitor To re arrange the split screen display 1 Select the Out...

Page 58: ...ging the file size changes the duration of backed up files For example if you select 15 minutes as your file size the system stores video files in 15 minute durations Configuring the Recording Schedul...

Page 59: ...each channel To change the recording quality recording resolution and video frame rate 1 Click the MainStream tab 2 Blackbox Series Only Under Mode select D1 or 960H 960H will enable larger wide scree...

Page 60: ...ourchanges reduce the Resolution Quality or FPS and try again Search The Search menu allows you to search for saved video on your system for playback and backup Searching for Video on the System 1 In...

Page 61: ...files 1 Perform a search 2 Insert a blank USB flash drive into one of the USB ports 3 Click on the desired date you wish to back up 4 Click the Backup button A list of files appears in the Log menu 5...

Page 62: ...lank USB flash drive to your system Select the BAK checkbox beside the desired file name Then click the Backup button Using the Log Search A log search allows you to search system event logs To perfor...

Page 63: ...in the DVR you must assign 192 168 2 89 in your router as a static IP as well Consult your router s user s manual for details 3 Click Apply to save your settings 4 Right click until you exit all menu...

Page 64: ...eam tab 2 Configure the following beside the desired channel Video Select Enabled or Disabled If you selectDisabled youwillnotbeabletoview the channel when connecting remotely to the system FPS Select...

Page 65: ...ter your SMTP Server Sender Email Enter the sender email address This can be any address of your choice Sender Password Enter your email server s password Receiver Email Enter the recipient s email ad...

Page 66: ...DDNS UserName Enter yourDDNSUser Name Password Enter your DDNS Device password 3 Click Apply to save your settings NOTE Please allow 10 15 minutes for the DDNS servers to update with your new DDNS add...

Page 67: ...when an external alarm device not included is triggered To configure the Alarm tab 1 From the Alarm menu click the Alarm tab 2 Configure the following Alarm In Select the channel you wish to configure...

Page 68: ...ding or linear recording 1 Select the HDD tab 2 Select the checkbox beside the hard drive you wish to configure 3 In the Overwrite drop down menu select Auto recommended or select the desired duration...

Page 69: ...Language drop down menu select your desired system language 2 Click Apply to save your settings 3 Right click until you exit the menu Follow the on screen instructions to restart your system Changing...

Page 70: ...able the Auto Reboot feature 1 Select the Maintain tab 2 Configure the following Auto Reboot Select Enable or Disable to activate or deactivate the Auto Reboot feature Reboot In the drop down menu sel...

Page 71: ...Follow the on screen instructions to update the firmware Do not remove the USB flash drive or power off the DVR during the firmware update Wait for the system to reboot Restoring to Factory Default S...

Page 72: ...low on storage To configure system warnings 1 Click the Events tab 2 Configure the following Event Type Select the event that triggers the system to send out a notification Choose from Disk No Space...

Page 73: ...of the USB ports 2 Right click to open the Menu Bar and click Main Menu 3 Click Advanced and select the Maintain tab 4 Click Save Settings Wait for the system to save your settings Loading a System C...

Page 74: ...connects to the system remotely there may be slow performance when accessing the system locally This is normal and not a malfunction Description Requirement CPU Pentium 4 or above Operating System Win...

Page 75: ...tep 1 of 3 Connect your DVR to the Local Area Network 1 Power off your DVR by disconnecting the power adapter 2 Connect an Ethernet cable included to the LAN port on the rear panel of the DVR Connect...

Page 76: ...ocal network on a PC or Mac To connect using the DVR s Local IP Address on a PC 1 Open Internet Explorer NOTE If you are connecting using Internet Explorer 9 you must use the 32 bit version From the S...

Page 77: ...If you are having difficulty logging into your system using Internet Explorer it is recommended to use the Client Software provided on the CD or as a free download from www lorextechnology com For in...

Page 78: ...own above 8 Enter the DVR username and password to log in to the system By default the username is admin and the password is left blank Accessing your DVR Remotely over the Internet Setting up remote...

Page 79: ...on your router to your DVR s IP address by following your router manufacturer s instructions For more information on port forwarding see the reference guides on www lorextechnology com NOTE If the abo...

Page 80: ...o create a new account fill in the required fields on the right and click Create Account 3 Click Warranties to register your product for warranty NOTE Warranty registration is required to register for...

Page 81: ...ion and click Create Address 6 Fill in the warranty registration form with your product and purchase details Check the sticker underneath your DVR for the Product Model Number and Serial Number Click...

Page 82: ...e This is used to identify this device in your list of activated DDNS accounts that appears anytime you visit the DDNS page MAC Address Enter the MAC address of your Lorex product Right click and then...

Page 83: ...nd click the Main Menu button 2 Click Network and select the DDNS tab 3 In the DDNS drop down menu select Enable Beside Server select LOREXDDNS default 4 Under Domain Name enter your Domain name URL R...

Page 84: ...ou have entered your DDNS address into Internet Explorer or Safari enter the DVR user name and password at the login screen and click Login NOTE To log in remotely the default user name is admin The p...

Page 85: ...desktop The DVR login screen appears 3 Configure the following IP Address Enter the DDNS address or local IP address of your DVR The DDNS address must include the URL Request you created when you reg...

Page 86: ...igation Tabs Allows you to access the following tabs Live Watch live video Playback View saved video footage Remote Setting Configure system and networking options Local setting Configure where local...

Page 87: ...Screen Main display screen for live viewing and playback You can also drag the screens to any desired position 7 PTZ Controls PTZ Pan Tilt Zoom control for connected PTZ cameras not included Changing...

Page 88: ...ght corner 2 Click the Security tab 3 De select Enable Protected Mode 4 Click Apply to save your settings 5 Refresh Internet Explorer Recording Video You can record video footage directly onto your lo...

Page 89: ...viewing video in its original aspect ratio To open the sub menu 1 Right click on a desired channel A sub menu opens 2 Click on one of the following Show Bit rate Displays video bit rate Original Propo...

Page 90: ...from your DVR as an avi file This does not affect the format of video files that are backed up locally on the DVR i e using a USB flash drive NOTE This feature is not available via Mac 1 Click the Lo...

Page 91: ...us and iris control of the camera Direction keys Click to pan and tilt the camera Speed Slider Increase or decrease the pan and tilt speed Preset Cruise Video Tab Use the Preset tab to configure camer...

Page 92: ...ed month year and date 3 Under the Type drop down menu select the desired recording type you wish to search for Continuous Alarm or All 4 Select the channels you wish to search Check Synchronous playb...

Page 93: ...ard button to advance the video by 1 frame Video Slider Drag the slider control the playback speed Download Content Allows you to download recorded videos to your computer hard drive To download video...

Page 94: ...r hide the record time on the remote display 3 Click Save to apply your settings Configuring Privacy Zone Settings You can blank out a certain portion of the channel with a black box To configure a pr...

Page 95: ...select 15 minutes then every file will contain 15 minutes of footage Pre record Select whether to enable or disable pre recording 3 Click Save to apply your settings Configuring the Recording Schedule...

Page 96: ...em Recording Quality 1 Click the Remote Setting tab and click Record MainStream 2 ECO Blackbox Series Only Under Resolution Mode select D1 or 960H It is recommended to select D1 unless you have 960H c...

Page 97: ...it the IP address Subnet Mask Gateway and DNS settings AutoPortForwarding SelectEnableorDisabletoenableordisabletheAutoPortForwarding feature 3 Click Save to apply your settings Configuring the System...

Page 98: ...op down menu select Default to use the default Lorex email server recommended or select Custom to use your own custom SMTP email server If you want to use Lorex s email server recommended 1 In the Sen...

Page 99: ...new email notification 2 Click Save to save your settings Changing the Mobile User Name and Password You can change the User Name and Password used to connect to the system with a mobile device To ch...

Page 100: ...User Name that was emailed to you after DDNS registration Password EnteryourDDNSDevicepasswordthatwasemailedtoyouafterDDNSregistration 3 Click Save to apply your settings Configuring Motion Detection...

Page 101: ...r the channel for motion 4 Click Save to apply your settings Configuring your System to Beep During Motion You can set your system to beep during motion This is useful to notify you if someone enters...

Page 102: ...ired latch time when an alarm triggers Show Message Select the checkbox so that the system displays a warning message during an alarm recording Send email Select the checkbox for the system to send ou...

Page 103: ...system should retain data For example if you select 30 days the hard drive will begin to overwrite itself after 30 days Note that hard drive size determines the duration of hard drive recording 3 Cli...

Page 104: ...configure the system time and date 1 Click the Remote Setting tab and click System General 2 Configure the system format and time System Time Enter the desired system time and date An on screen calen...

Page 105: ...ired user you wish to configure i e user1 User name Enter the desired user name Password Enter the desired user password Confirm Re enter the user password Active Select Enable or Disable to activate...

Page 106: ...age at www lorextechnology com To upgrade the system firmware 1 Download and extract the file to your computer s desktop 2 Click the Remote Setting tab and click Advanced Firmware upgrade 3 Beside Upg...

Page 107: ...notify you if there is a potential system problem To configure the system event settings 1 Click the Remote Setting tab and click Advanced Events 2 Configure the following Event Type Configure the ty...

Page 108: ...ability To configure Auto Maintain 1 Click the Remote Setting tab and click Advance Maintain 2 Click the Auto Reboot drop down menu and select Enable or Disable to activate or deactivate the auto rebo...

Page 109: ...equisites Back up video files from the DVR to your local hard drive Installing Lorex Player 11 1 Insert the software CD that comes included with the system 2 Click DVR Software Lorex Player PC Follow...

Page 110: ...ptures are stored To open the Advanced Config menu 1 Click the button 2 Click Select to change the snapshot save folder Then select the folder and click OK 3 Click OK to save changes Click here to ope...

Page 111: ...te to the product page for your DVR model and download Backup Player for MAC 3 Extract the file and double click the Lorex Mac Player installer pkg file Follow the on screen instructions to install th...

Page 112: ...ur Home folder dvr 3 Double click the video file in the playlist to begin playback Loading Multiple Video Files You can load an entire folder of video files To load multiple video files saved onto you...

Page 113: ...ote viewing to obtain your DDNS address and enable DDNS on your DVR Complete all the steps under Setting up your DVR for Remote Connectivity on page 56 The Mobile Port Number of your DVR The Mobile Po...

Page 114: ...iPad screen System requirements iOS version 4 0 and above For the latest device compatibility list visit www lorextechnology com Prerequisites An iTunes account requires valid credit card number NOTE...

Page 115: ...1025 User ID Enter the mobile access user ID of the DVR default admin Password Enter the DVR s mobile access password default 0000 MaxChannel EnterthenumberofchannelsoftheDVR 4 8 or 16 4 Touch the OK...

Page 116: ...o select another channel 2 Touch the name of your DVR Select the channel that you want to display in the selected space The selected channel appears in the quad screen display TIP Double tap the chann...

Page 117: ...on appears Touch the Delete button to remove the device Taking Snapshots You can take a picture of the selected channel The images save into your Photos directory To take snapshots Touch the camera bu...

Page 118: ...DVR on an Android smartphone or tablet NOTE The instructions below may differ depending on the model of your Android device System requirements Android v 1 5 and above For the latest device compatibi...

Page 119: ...ser Name Enter the mobile access ID default admin Password Enter the DVR password by default 0000 Max Channel Enter the number of total channels your DVR can support e g 4 8 or 16 4 Touch OK Touch the...

Page 120: ...the channel you would like to display in the space in Quad view Touch Touch the name of your DVR Then touch the channelyouwant to add Touch the arrow to change your DVR details or delete a DVR Play Se...

Page 121: ...oading or installing BlackBerry apps consult your BlackBerry s user s manual or www blackberry com for support 1 Go to www lorextechnology com and search for the model number of your DVR look at the l...

Page 122: ...e DDNS address of the DVR e g tomsmith lorexddns net 1 Port Enter the Mobile Port number of the DVR by default port 1025 No of CHs Select the number of channels of your DVR User ID Enter the mobile ac...

Page 123: ...e APN Access Point Name on your Blackberry Contact your service provider for your Blackberry s APN name NOTE The instructions below may differ based on the model of your Blackberry smartphone For supp...

Page 124: ...enu 2 Select Advanced Options TCP IP 3 Select the checkbox beside APN Settings to enable APN 4 Beside APN enter your APN You must obtain the APN from your local service provider 5 Exit to save your se...

Page 125: ...le s user s manual or www microsoft com windowsphone for support Step 2 of 2 Configuring and Connecting to Lorex Mobile ECO 1 Open the Lorex Mobile ECO app on your phone 2 Click the Setting button 3 C...

Page 126: ...tep 1 of 2 Downloading the App 1 Go to www lorextechnology com and search for the model number of your DVR look at the label underneath your DVR for the model number 2 Navigate to the product page for...

Page 127: ...5 User Name Enter the DVR s user name by default admin Password Enter the DVR password by default 0000 Alias Enter a DVR name of your choice 4 Save your settings From the main viewing window press the...

Page 128: ...pecifications ECO Blackbox Series As our products are subject to continuous improvement Lorex Technology Inc and its subsidiaries reserve the right to modify product design specifications and prices w...

Page 129: ...O Blackbox Series As our products are subject to continuous improvement Lorex Technology Inc and its subsidiaries reserve the right to modify product design specifications and prices without notice an...

Page 130: ...able to the side of the RS485 port on the rear panel 3 Connect the video cable to a BNC port Configuring PTZ Settings Before you can use the PTZ controls you must enter your camera s PTZ protocol deta...

Page 131: ...ress Use the Copy To drop down menu to copy the PTZ settings to multiple channels 4 Click Apply to save your settings Using the PTZ Menu Local DVR To control the PTZ camera locally on your DVR 1 Selec...

Page 132: ...ets as needed Press Save when you are finished to save all created presets Selecting PTZ Presets 1 In the No field select the number of the preset you would like to select 2 Click Go to to go to the p...

Page 133: ...e and system interface between VGA and BNC monitors ECO Blackbox Series Only the DVR can simultaneouslydisplaythesysteminterfaceon monitorsconnectedtothe HDMIandVGAports NOTE ECO Blackbox Series model...

Page 134: ...4 8 channel Blackbox Series Connect the BNC video cable from the camera to the BNC Video Input port marked 1 4 8 channel Blackbox Series and 16 channel Blackbox Series Connect the BNC video cable from...

Page 135: ...Click Record and select the MainStream tab 5 Ensure the Audio checkbox is checked next to the channel the audio enabled camera is connected to 6 Click Apply to save your changes Check Audio to enable...

Page 136: ...re available at www lorextechnology com Removing the Hard Drive To remove the hard drive 1 Remove the screws from the side panels 1x per panel and from the rear panel x3 of the cover 2 Gently slide th...

Page 137: ...of the way 2 Place the hard drive with the power and data connectors facing left if looking at the DVR from the front and then slide the hard drive to the right 3 Reconnect the power and data cables E...

Page 138: ...o open the Menu Bar and click the Main Menu button 2 Click Device 3 Click the checkbox under Select to choose the drive you wish to reformat 4 Click Format HDD Enter the system password 5 When the war...

Page 139: ...o another outlet Test the outlet with another device such as a lamp or phone charger 16 channel only Power switch is set to OFF position Confirm that the power switch is in the ON I position Remote co...

Page 140: ...ort on the rear panel There is no picture on selected channels camera picture is not being displayed Camera cables are loose or have become disconnected Check the camera video cable and connections Di...

Page 141: ...the instructions under Step 3 of 4 Enable DDNS on the DVR on page 65 DDNS address not entered correctly If connecting through client software enter the URL request from the confirmation email and then...

Page 142: ...R16 EXPAND AND CUSTOMIZE YOUR SYSTEM WITH A FULL RANGE OF CAMERAS ACCESSORIES Accessories www lorextechnology com Specialty Cameras Wireless Cameras Dome Cameras Digital Video Recorders Simulated Came...

Reviews: