background image

GB-24

Saf

et

W

ar

nings 


Produc
t O

ver

view

Connec

tions

M

ain
tenanc

e

Oper

ation

H

in

ts 

and 
Tips 
 

and 

Specifica

tion

Safety Warnings

•  Read all the instructions carefully before 

using the unit and keep them for future 

reference.

•  Retain the manual. If you pass the unit 

onto a third party make sure to include this 

manual.

•  Check that the voltage marked on the 

rating label matches your mains voltage.

Damage
•  Please inspect the unit for damage after 

unpacking.

•  Do not continue to operate the unit if you 

are in any doubt about it working normally, 

or if it is damaged in any way - switch off, 

withdraw the mains plug and consult your 

dealer.

Location of Unit
•  The unit must be placed on a flat stable 

surface and should not be subjected to 

vibrations.

•  Do not place the unit on sloped or unstable 

surfaces as the unit may fall off or tip over.

•  The mains socket must be located near the 

unit and should be easily accessible.

•  This unit is designed for indoor use only.
Temperature
•  Avoid extreme degrees of temperature, 

either hot or cold. Place the unit well away 

from heat sources such as radiators or gas/

electric fires.

•  Avoid exposure to direct sunlight and other 

sources of heat.

Naked Flames
•  Never place any type of candle or naked 

flame on the top of or near the unit.

Moisture
•  To reduce the risk of fire, electric shock or 

product damage, do not expose this unit 

to rain, moisture, dripping or splashing. No 

objects filled with liquids, such as vases, 

should be placed on the unit.

•  If you spill any liquid into the unit, it can 

cause serious damage. Switch it off at the 

mains immediately. Withdraw the mains 

plug and consult your dealer.

Ventilation
•  To prevent the risk of electric shock or 

fire hazard due to overheating, ensure 

that curtains and other materials do not 

obstruct the ventilation vents.

•  Do not install or place this unit in a 

bookcase, built-in cabinet or in another 

confined space. Ensure the unit is well 

ventilated.

Safety
•  Always disconnect the unit from the mains 

supply before connecting/disconnecting 

other devices or moving the unit.

•  Unplug the unit from the mains socket 

during a lightning storm.

Mains Cable
•  Make sure the unit or unit stand is not 

resting on top of the mains cable, as the 

weight of the unit may damage the mains 

cable and create a safety hazard.

•  If the mains cable is damaged it must be 

replaced by the manufacturer, its service 

agent, or similarly qualified persons in 

order to avoid a hazard.

Earphones
•  Listening to loud sounds for prolonged 

periods of time may permanently damage 

your hearing.

•  Before putting on earphones, turn the 

volume down then put the earphones on 

and slowly increase the volume until you 

reach a comfortable listening level.

Interference
•  Do not place the unit on or near appliances 

which may cause electromagnetic 

interference. If you do, it may adversely 

affect the operating performance of the 

unit, and cause a distorted picture or 

sound.

Standby 
•  The STANDBY/ON   button on the 

remote control does not switch off the unit 

completely. The unit will continue to draw 

electricity from the mains supply while in 

standby. In the interests of safety and to 

avoid unnecessary energy consumption, 

never leave the unit in standby while 

unattended for long periods of time, e.g. 

overnight, while on holiday or while out of 

the house. Switch it off and disconnect the 

mains adapter from the mains socket.

Logik LCDCRDB10_IB_100811_Zell.indd   24

11/08/2010   5:06 PM

Summary of Contents for LCDCRDB10

Page 1: ...CD Radio Clock with DAB Instruction Manual LCDCRDB10 ...

Page 2: ... 10 Powering ON OFF 10 Selecting Modes 10 Adjusting the Volume 10 Mute Function Remote Control Only 10 Setting the Time 10 Alarm Clock and the Wake up Mode Settings 10 Activating the Alarm Function and Selecting the Wake up Mode 11 Snooze Function 11 Sleep Function 12 System Reset 12 Display Backlight 12 DAB Operation 13 DAB Auto Scan 13 Secondary Services 14 Manual Tuning 14 Storing Stations 14 R...

Page 3: ...Modes 17 Compatible Disc Types 18 Playing a CD 18 Selecting a Different Track 18 Finding a Passage within a Track 18 Programming Track Numbers 19 Repeat Program Play 19 Erasing a Program 19 Reviewing the Program 19 Random Mode Remote Control Only 19 Repeat Mode 20 Maintenance 21 Hints and Tips 22 Specifications 23 Safety Warnings 24 ...

Page 4: ...gratulations on the purchase of your new Logik CD Radio Clock with DAB We recommend that you spend some time reading this instruction manual in order that you fully understand all the operational features it offers You will also find some hints and tips to help you resolve any issues Read all the safety instructions carefully before use and keep this instruction manual for future reference MENU ST...

Page 5: ... SLEEP BACKLIGHT STANDBY ON SKIP SELECT PROGRAM REPEAT 11 10 9 12 13 5 4 6 7 8 1 14 2 15 3 16 1 SKIP SELECT Button 2 SELECT Button 3 SKIP SELECT Button 4 IR Sensor 5 CD DAB FM Button 6 LCD Display Window 7 DISPLAY INFO Button 8 STANDBY LED Indicator 1 Speakers 9 STANDBY ON Button 10 JOG MODE Button 11 SLEEP Button 12 BACKLIGHT Button 13 VOL SKIP SELECT Control 14 PROGRAM Button 15 MENU Button 16 R...

Page 6: ...nections Maintenance Operation Hints and Tips and Specification SNOOZE ALARM 1 ALARM 2 OPEN CLOSE Top View Rear View AC 1 CD Door 2 OPEN CLOSE Button 3 ALARM 1 Button 1 Mains Cable 4 ALARM 2 Button 5 SNOOZE Button 2 DAB FM Aerial 2 2 5 4 1 1 3 ...

Page 7: ...T Button 17 VOLUME Button 18 PRESET Button 19 VOLUME Button STANDBY MUTE CD DAB FM DISPLAY INFO SLEEP SNOOZE PROGRAM SELECT MENU REPEAT SKIP SELECT RANDOM ALARM 2 ALARM 1 PRESET VOLUME 3 6 7 10 13 16 18 1 2 5 9 12 15 17 19 4 8 11 14 2 Place the cover into the compartment press down lightly and push it inside until it snaps on Battery Installation for the Remote Control 1 Press down of the compartm...

Page 8: ...e personal injury or damage to property Only use the battery type indicated in this manual When the battery is exhausted the remote control will not function Replace the battery at the same time with new ones Do not install new batteries with used ones and do not mix different types of batteries Do not dispose of used batteries as domestic waste Dispose of them in accordance with local regulations...

Page 9: ...nit to the mains socket To the Mains Socket Using Earphones Connect earphones Ø3 5mm stereo mini plug to the earphone socket Adjust the volume control to obtain the desired volume level When the earphones are connected the speakers will automatically mute When earphones are connected the alarm will sound through the earphones instead of the speakers Unplug the earphones when using the alarm functi...

Page 10: ...UTE will disappear from the display Setting the Time When you first turn on your radio it will automatically set the time by searching out the DAB signal It will continue to search for the clock whilst in DAB mode until it has managed to set the time If after 10 minutes the clock has not automatically set itself try repositioning the radio to get a better reception If the radio cannot find a DAB f...

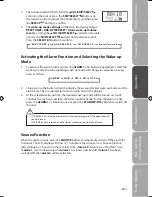
Page 11: ...e on every press as follows BEEP DAB FM CD OFF 2 Stop pressing the button when the display shows your desired wake up mode and the alarm is set The associated alarm on icon will show in the display 3 At the selected wake up time the desired wake up mode will be turned on It will continue for one hour and then shut down automatically To stop the alarm sooner press the ALARM 1 or 2 button once or pr...

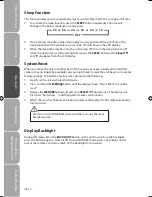
Page 12: ...t When you move the unit to another part of the country your pre tuned and stored DAB stations may no longer be available and you might need to reset the unit back to its original factory settings To perform a factory reset please do the following 1 Switch on the unit and select DAB mode 2 Press and hold the MENU button until the display shows Press SELECT to confirm reset 3 Release the MENU butto...

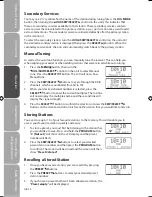
Page 13: ...as finished the unit will select the last alphanumerically found station To explore the found stations press the JOG MODE button and then turn the VOL SKIP SELECT control on the unit When you find a station that you would like to listen to press the SELECT button 1 To activate auto scan first press the MENU button to enter the Tune Select Menu Press the SKIP SELECT buttons on the remote control to...

Page 14: ...s the auto tune function you can manually tune the receiver This can help you when aligning your aerial or when adding stations that were missed while auto tuning 1 Press the MENU button then turn the VOL SKIP SELECT control on the unit to select Manual tune Press the SELECT button The LCD will now show Manual tune 2 Press the SKIP SELECT buttons to cycle through the DAB channels which are numbere...

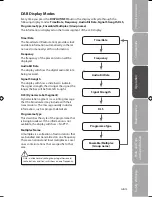
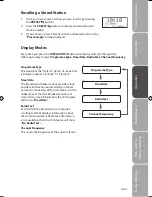
Page 15: ... displayed Audio Bit Rate The display will show the digital audio bit rate being received Signal Strength The display will show a slide bar to indicate the signal strength the stronger the signal the longer the bar will be from left to right DLS Dynamic Label Segment Dynamic label segment is a scrolling message that the broadcaster may include with their transmissions The message usually includes ...

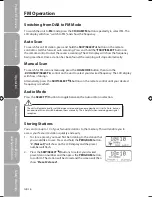
Page 16: ... LCD display will show switch to FM and show the frequency Auto Scan To search for an FM station press and hold the SKIP SELECT button on the remote control to start the forward auto scanning Press and hold the SKIP SELECT button on the remote control to start the reverse scanning The LCD display will show the frequency being searched Once a station has been found the scanning will stop automatica...

Page 17: ...ion provides clock and date information automatically so there s no need to manually set this information In the unlikely event that the broadcaster does not transmit any clock information the LCD display will show Time Date Radio Text As with DAB the broadcaster can include a scrolling text that displays information about the current program If Radio text information is not available then the LCD...

Page 18: ... If there is no disc inside or the CD door is not closed the display window will display NO DISC 2 Press the SELECT button to start playback the first track will be played The display window will also display the number of the currently playing track 3 To interrupt playback press the SELECT button once again The time elapsed indicator will flash Press the SELECT button once more again to resume pl...

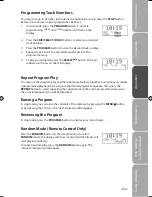
Page 19: ...lay your stored tracks 2 Press the SKIP SELECT buttons to select your desired track number 3 Press the PROGRAM button to store the desired track number 4 Repeat steps 2 and 3 to enter additional tracks into the program memory 5 To play your program press the SELECT button The MEM indicator will show on the LCD display Programming Track Numbers You may store up to 20 tracks in the desired sequence ...

Page 20: ...c repeatedly with REPEAT mode During playback press the REPEAT button once to repeat a single track The REP 1 indicator will illuminate Press the REPEAT button twice to repeat the whole disc The REP ALL indicator will illuminate To return to normal playback press the REPEAT button repeatedly until all repeat indicators disappear REPEAT 1 REPEAT ALL NORMAL PLAYBACK ...

Page 21: ...you cannot wipe off the dust with a soft cloth wipe the disc lightly with a slightly moistened soft cloth and finish with a dry cloth Do not use any type of solvent such as thinner benzine commercially available cleaners or antistatic spray They may damage the disc Storing Discs Do not store discs in places subjected to direct sunlight or near heat sources Do not store discs in places subjected to...

Page 22: ...he unit won t play Make sure the disc label is facing up Make sure the disc is clean PAUSE mode may be activated deactivate it Disc may be damaged or dirty check and clean the disc Disc skips Make sure the unit is on a flat secure spot Vibrations or jarring can cause the disc to skip RADIO Poor FM reception Make sure the FM aerial wire is fully extended Electrical interference in your home can cau...

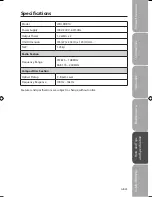
Page 23: ... LCDCRDB10 Power Supply 100V 240V 60 50Hz Output Power 1 2 Watts x 2 Unit Dimension 155 W x 202 D x 120 H mm N W 1 25 kg Radio Section Frequency Range FM 87 5 108 MHz DAB 174 240 MHz Compact Disc Section Optical Pickup 3 Beam Laser Frequency Response 100Hz 16kHz Features and specifications are subject to change without notice ...

Page 24: ...y Withdraw the mains plug and consult your dealer Ventilation To prevent the risk of electric shock or fire hazard due to overheating ensure that curtains and other materials do not obstruct the ventilation vents Do not install or place this unit in a bookcase built in cabinet or in another confined space Ensure the unit is well ventilated Safety Always disconnect the unit from the mains supply be...

Page 25: ...pty Always remove the disc when the unit is not in use Failure to do so will risk severely damaging the disc and the unit Do not stack devices heat from other devices may affect the performance of the unit CAUTION RISK OF ELECTRIC SHOCK DO NOT OPEN The lightning flash with arrowhead symbol within an equilateral triangle is intended to alert the user to the presence of uninsulated dangerous voltage...

Page 26: ......

Page 27: ......

Page 28: ...quipment should be disposed at the end of its life separately from your household waste There are separate collection systems for recycling in the EU For more information please contact the local authority or your retailer where you purchased the product NOTE If you require a replacement for any of the items listed below please quote their corresponding part numbers Replacement Part Part Number Re...

Reviews: