background image


URRACO 75 D 


S

ERVICE GUIDELINES


Managing director 

LINDNER  
Mobile Shredder GmbH 


Industriestrasse 1A 
D-99820 Hörselberg / Eisenach


Service hotline: 

+49 (0) 36920 - 7269 - 600 


[email protected] 

Manuel Lindner 

Gerhard Buhl 

Walter Geiger 

Page - 20 - of - 38 - 

1.7.-8 

Checking the Hydraulic Oil Level / Changing the Hydraulic Oil 


Maximum oil filling is only permissible with retracted hydraulic cylinders. 


Checking the oil level 

If the oil drops below the minimum level, the <Hydraulic oil level> indicator light lights up on 

the control panel. In this case, the machine switches off immediately. 

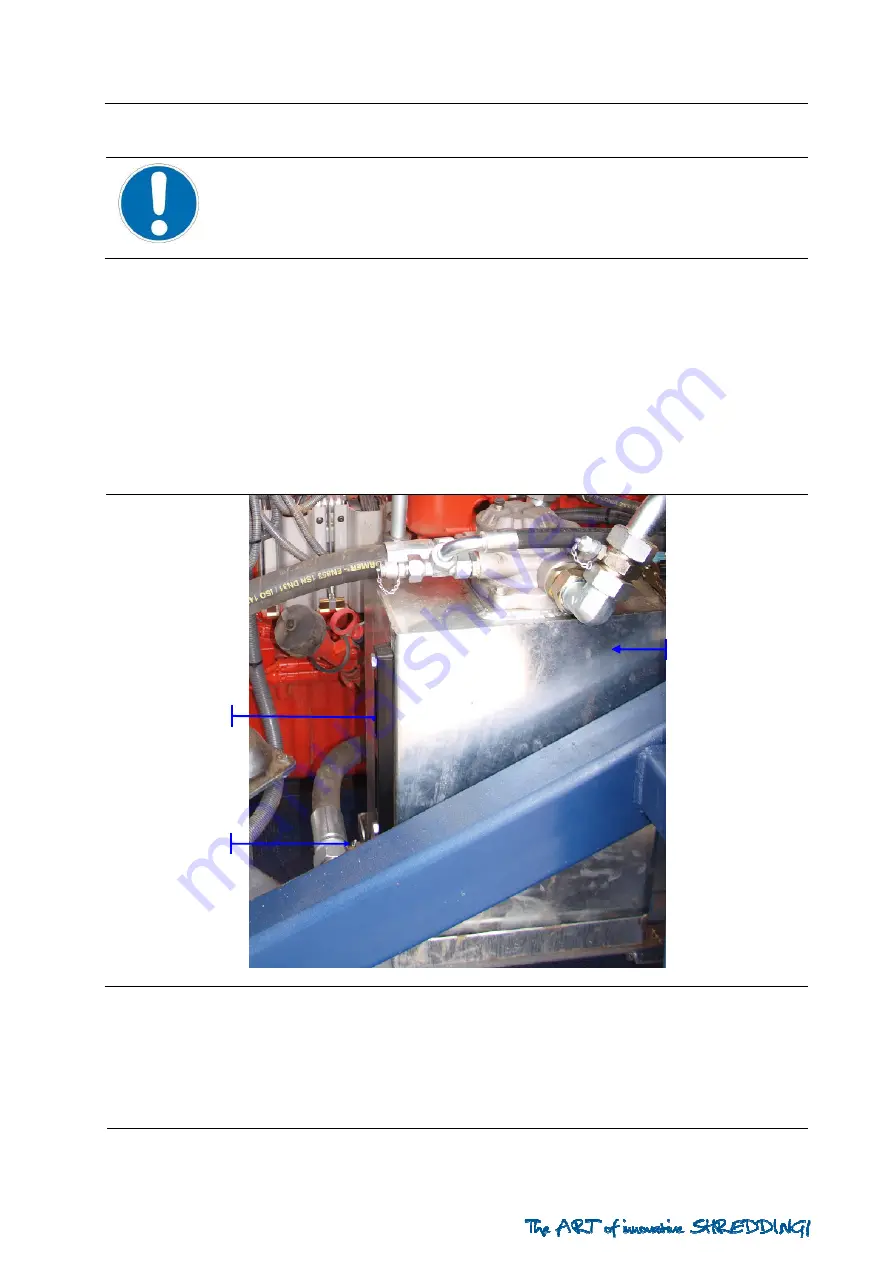
The  hydraulic  oil  level  must  be  checked  daily  via  the  sight  glass;  the  oil  should  be 

approximately  in  the  upper  third  of  the  sight  glass.  Ensure  that  the  shedder  is  standing 

horizontally. 


Oil drain plug 

Sight glass 

Hydraulic oil tank 

Summary of Contents for URRACO 75 D

Page 1: ...r e d d i n g S y s t e m s 1 1 7 7 M MA AI IN NT TE EN NA AN NC CE E I IN NS ST TR RU UC CT TI IO ON NS S LINDNER Shredder Type URRACO 75 D Date 2013 11 29 Copyright LINDNER Mobile Shredder GmbH 2012 2013 ...

Page 2: ... 1 7 7 Replacing the Tank Aeration Filter 19 1 7 8 Checking the Hydraulic Oil Level Changing the Hydraulic Oil 20 1 7 9 Checking the Gearbox Oil Level Changing the Gearbox Oil 23 1 7 10 Checking Changing Engine Oil and Filter 24 1 7 11 Checking the Coolant Level Changing the Coolant 25 1 7 12 Changing the Air Filter 26 1 7 13 Maintaining the Water Sprinkler Filter Option 28 1 7 14 Adjusting the Be...

Page 3: ...any maintenance work carefully read the instructions contained in the Safety instructions section The following must be done before entering the machine and before taking up and maintenance or repair work set the key switch Start to the centre position and remove the ignition key set the key switch Manual 0 Automatic to 0 and remove the key turn battery disconnecting switch out keep keys and the b...

Page 4: ...orking under particularly difficult conditions it may be necessary to shorten the recommended intervals The following maintenance schedule should therefore be used as a basis for preparing your own schedule which should take into account your individual operating conditions Thanks to their special training the staff of LINDNER GmbH are able to provide first class technical assistance as well as al...

Page 5: ...electronics is possible in the case of nonobservance All material residues must be removed from the shredder before each welding procedure Risk of fire For performing welding work prepare the shredder as follows 1 Switch off the drive engine 2 Turn out battery disconnecting switch and secure it against being switched lock it 3 Disconnect the two plugs from the electronic engine control ECM Put the...

Page 6: ...NDNER Mobile Shredder GmbH Industriestrasse 1A D 99820 Hörselberg Eisenach Service hotline 49 0 36920 7269 600 service l ms de Manuel Lindner Gerhard Buhl Walter Geiger Page 6 of 38 Battery disconnecting switch Plug of the electronic engine control ECM ...

Page 7: ... nd de ed d f fi il ll li in ng g l li iq qu ui id ds s f fo or r y yo ou ur r L LI IN ND DN NE ER R s sh hr re ed dd de er r Total filling capacity including filters as required Changing interval Fuel1 approx 450 litres Diesel oil according to DIN 51601 as required Coolant11 approx 55 litres coolant mix of distilled water and antifreeze according to ASTM D4985 89 ethylene glycol basis every 3000 ...

Page 8: ...F Factory filled SAE 10W 40 every 250 hours or every 6 months ATTENTION Mandatory After 100 200 operating hours the customer must order an inspection to be performed by LINDNER After 100 200 operating hours the engine inspection has to be performed by the responsible authorised dealer or OEM dealer to ensure the warranty for the engine The customer must order this inspection independently Gearbox ...

Page 9: ...e S summerly conditions in Middle Europe T tropische Verhältnisse oder Räume mit starkem Wärmeanfall T tropical conditions or rooms with high heat exposure U übermäßig starker Wärmeanfall z B durch Verbrennungsmaschinen U excessively high heat exposure e g by combustion engines Max zul Viskosität kurzzeitig max permissible viscosity short term Optimaler Betriebsviskositätsbereich optimaler Wirkung...

Page 10: ...no account be exceeded 1 7 4 Initial Maintenance Work When servicing the drive engine observe the separately enclosed operating and maintenance manual of the engine manufacturer ATTENTION Mandatory After 100 operating hours the customer must order an inspection to be performed by LINDNER After 100 200 operating hours the engine inspection has to be performed by the responsible authorised CAT deale...

Page 11: ...ay ys s t to o b be e e ex xe ec cu ut te ed d b by y t th he e c cu us st to om me er r Filter elements Hydraulic system Conveyor belt Cooler Gearbox Others Daily maintenance tasks to be executed Daily maintenance tasks to be executed Daily maintenance tasks to be executed Daily maintenance tasks to be executed Daily maintenance tasks to be executed Daily maintenance tasks to be executed Retighte...

Page 12: ...a an n L LI IN ND DN NE ER R G Gm mb bH H e en ng gi in ne ee er r Filter elements Hydraulic system Conveyor belt Cooler Gearbox Others Daily maintenance tasks to be executed Daily maintenance tasks to be executed Daily maintenance tasks to be executed Daily maintenance tasks to be executed Daily maintenance tasks to be executed Daily maintenance tasks to be executed Replace suction filter Replace...

Page 13: ...ge 13 of 38 1 7 5 Maintenance Intervals When servicing the drive engine observe the separately enclosed operating and maintenance manual of the engine manufacturer All maintenance work may only be executed by trained and instructed personnel Before carrying out servicing work you must always read the safety instructions The long term maintenance tasks always include the performance of all more fre...

Page 14: ...cessary Visual check for damage Check alignment and functioning of the rollers Check the belt support and clean if necessary Remove any jammed material from the conveyor belt Check belt tensioning and alignment Check coolant level and refill if necessary Check if clean Visual check for damage and leaks Check oil level and refill if necessary Visual check for damage and leaks Check engine oil level...

Page 15: ...i in nt te en na an nc ce e e ev ve er ry y 2 25 50 0 h ho ou ur rs s o or r q qu ua ar rt te er rl ly y Filter elements Hydraulic system Conveyor belt Cooler Gearbox Others Check the main air filter element and clean if necessary max six times or replace Replace the safety elements after every third cleaning of the main element Check oil and filters Change oil of the main gearbox Engine mainten a...

Page 16: ...earbox Others Replace suction filter Replace suction ret urn filter Replace the tank aeration filter Check preset pressure settings Change the hydraulic oil filters Check belt tension and adjust if necessary Change oil of the main gearbox Functional test of all safety devices Check shredding tools and scrapers for wear Check all bolted connection s Engine mainten ance in accordanc e with the engin...

Page 17: ...ments Hydraulic system Conveyor belt Cooler Gearbox Others Replace the main air filter element M Ma ai in nt te en na an nc ce e e ev ve er ry y 3 30 00 00 0 h ho ou ur rs s o or r a an nn nu ua al ll ly y Filter elements Hydraulic system Conveyor belt Cooler Gearbox Others Check and clean the cooling system and change the coolant M Ma ai in nt te en na an nc ce e e ev ve er ry y 6 6 y ye ea ar rs...

Page 18: ...aulic oil temperature Danger of scalding All installed filter elements are also listed in the enclosed machine data sheet Suction return filter of the hydraulic oil tank The integrated suction return filter is equipped with a return and a suction connector It is equipped with an integrated oil temperature control device Furthermore it is equipped with intelligent valve technology to control the oi...

Page 19: ...e filter head sealing surface The old sealing ring may still be sticking to the filter head If this is the case remove it carefully 4 Fill the oil filter with clean hydraulic oil 5 Apply a thin hydraulic oil film on the filter seal 6 Screw the filter onto the filter head Tighten the filters until the seal touches the surface of the filter head 7 Tighten the filter by about another half to three qu...

Page 20: ...c Oil Maximum oil filling is only permissible with retracted hydraulic cylinders Checking the oil level If the oil drops below the minimum level the Hydraulic oil level indicator light lights up on the control panel In this case the machine switches off immediately The hydraulic oil level must be checked daily via the sight glass the oil should be approximately in the upper third of the sight glas...

Page 21: ...old oil 1 Unscrew the protective cap from the oil drain plug of the hydraulic tank 2 Remove the hydraulic hose with quick release coupling from the hand operated pump and connect it to the oil drain plug 3 Hang the second hydraulic hose into a suitable container 4 Pump the oil out with the hand operated pump Remove the hydraulic hose from the tank and screw on the protective cap 5 Dispose of the u...

Page 22: ... operated pump to the oil drain plug of the hydraulic tank and continue to pump oil into the hydraulic circuit until the oil level reaches the top edge of the sight glass on the hydraulic tank 8 Remove the hydraulic hose of the hand operated pump from the oil tank and screw on the protective cap 9 Start the shredder and allow the shredding tools to run and actuate fitting functions until the corre...

Page 23: ...il while the plant is at operating temperature not later than 15 minutes after switching off the shredder Pumping out the old gearbox oil The old gearbox oil must be pumped out in the same way as the hydraulic oil is pumped out Refilling new gearbox oil 1 Hang the hydraulic hose of the hand operated pump without quick release coupling into a container containing fresh oil 2 Release the hydraulic h...

Page 24: ... 10 Checking Changing Engine Oil and Filter Change the oil while the plant is at operating temperature not later than 15 minutes after switching the shredder off Checking the engine oil level and changing the engine oil and the engine oil filter is to be performed in accordance with the drive engine operating and maintenance manual enclosed separately The engine oil can be changed using the hand o...

Page 25: ...essure cap of the cooler unless the temperature is below 50 C Otherwise high pressure steam can be released and cause injuries due to hot coolant Procedure 1 Remove cover sheet with butterfly screws 2 Remove filler cap In doing so take the filler cap off slowly in order to reduce any possible pressure 3 Refill coolant 4 Check the filler cap seal for damage and replace if necessary 5 Fasten filler ...

Page 26: ...g the second hose into a suitable container such as a barrel 3 Pump out the coolant 4 After all coolant has been pumped out disconnect the hose from the drain socket and screw the protective cap back on 1 7 12 Changing the Air Filter The air filter consists of two elements main element and safety element The main air filter element can be cleaned up to three times before it has to be replaced The ...

Page 27: ...oints 3 5 and 6 1 Loosen the snap locks and lift off the cap 2 Take out the main element 3 Take out the safety element 4 Check or replace the main air filter element as required 5 Check and clean or if necessary replace the safety element 6 Insert new or cleaned safety element 7 Insert new or cleaned main filter element 8 Set the cap back on and fasten it Do not knock or hit the filter elements to...

Page 28: ...n The water jet pressure can be set using the hand wheel for setting the holding pressure We recommend a pressure of between 2 and 3 bar for optimal sprinkling of the material to be shredded The filter is suitable for use in cold water up to maximum water and ambient temperatures of 30 C Material damage may occur at higher temperatures or due to direct sunlight Initial commissioning or start up af...

Page 29: ...vals in case of heavy soiling Procedure 1 For backwashing turn the rotating basket fully to the left The sieve and glass bell are cleaned by the backwash water Collect or drain off the backwash water 2 After cleaning visual inspection of the sieve turn the rotating basket to the right until it engages until no more water comes out 3 If necessary repeat the backwashing several times until the sieve...

Page 30: ...onveyor belt is running involves danger of death Wear work gloves when carrying out repair work to reduce the risk of injuries The belt tensioning and belt alignment must be checked and if necessary be readjusted after each change of location Tensioning the conveyor belt Drive roller Tensioning device discharge conveyor belt Conveyor belt deflection roller both sides Conveyor belt drive Supporting...

Page 31: ...les of the belt are always running parallel i e the distance of the axes between the drive roller and the bending point of the belt and between the bending point of the belt and the deflection roller must be equal both on the right and on the left hand side of the conveyor belt If the belt is tensioned too tightly the rubber will be pushed into the deflection rollers at the bending point Ideally t...

Page 32: ...the belt tensioning and make sure that the axes of the drive roller the bending points and the deflection roller are in parallel Never adjust the belt alignment on the tensioning device of the drive roller If you set the return strand roller higher using the adjusting screw the belt will run more to the left on the drive roller towards the operator If you set the return strand roller lower the bel...

Page 33: ...e following order 1 Drive belt into lowest position 2 Slacken belt on tightening screws of the head pieces as far as possible 3 Remove holding screw shaft mounted bevel gear 4 Remove holding screw drive roller on the opposite side 5 Pull off shaft mounted bevel gear 6 The hydraulic hoses can remain installed Put shaft mounted bevel gear with mounted hoses carefully down on the belt in the upper be...

Page 34: ...senach Service hotline 49 0 36920 7269 600 service l ms de Manuel Lindner Gerhard Buhl Walter Geiger Page 34 of 38 Conveyor belt drive hydraulic motor Flange bearing drive roller Shaft mounted bevel gear Left hand drive roller head piece Right hand drive roller head piece Drive roller Fixing Holding screws Cleated belt ...

Page 35: ...pper 1 1 Set the key switch Manual 0 Automatic to Manual 2 Switch to Prepare 3 Activate tilting hopper 1 with the icon 4 When the tilting hopper reaches the upper position close ball valve tilting hopper 1 on the valve block in the engine compartment 5 The tilting hopper must be secured mechanical against lowering It is not sufficient to have the hydraulic cylinders fully extended Remove the mecha...

Page 36: ... of the hoses for re installation of the hoses 3 Secure the overbelt magnet using suitable sling gear e g ropes chain set with suspension bar In doing so make sure to observe their load bearing capacity 4 Remove the securing screws on both sides 5 Bring the magnet slightly into tension by means of lifting equipment 6 Remove the securing screws on both sides 7 Take the overbelt magnet down under co...

Page 37: ...eratures Danger of scalding The oil escaping while dismounting must be collected in a container and must never flow onto the ground 1 7 18 Welding in new Knives Breakers and Blocks Remove the shredding tools before proceeding Knife breakers and blocks are welded using basic coated rod electrodes under inert gas MAG The following parameters should be observed when performing welding work R Re ec co...

Page 38: ... ru uc ct ti io on ns s Observe occupational health and safety regulations protective goggles No combustible material in the working area 1 Remove the shredding tools Only use hoisting and sling gear that complies with the regulations 2 Place the shredding tool down in such that welding can be performed in a horizontal position Secure the shredding tool against turning 3 Remove all pieces of the b...

Reviews: