background image

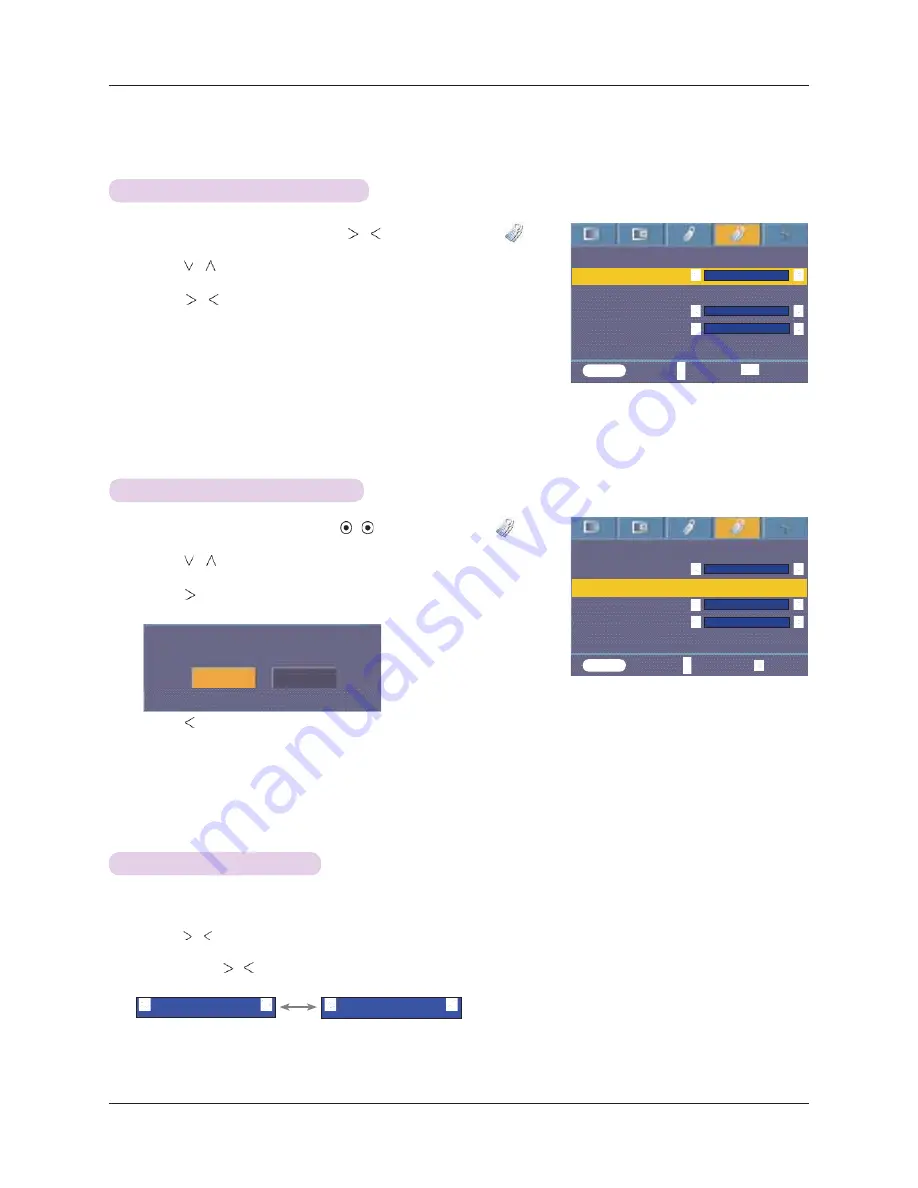
Function

29

1. Press the 

MENU

 button and then use  


,


 button to select the         menu.

2. Press the 


,


 button to select 

Blank image

 item.

3. Press the  


,


 button to select the color you want to use.


l

  Background image will be altered to the selected Blank image function.


l

   You can choose blue, black, green, or captured image for the Blank image.


l

   If you have a captured image, you can use it as a blank image instead of logo 

image. And you only have one last captured image.


l

   When you select the Captured image, displays a logo, if you don’t have a cap-

tured image.


l

  Press the 

MENU

 button twice or the 

EXIT

 button to exit the menu screen.

Selecting Blank image

Captured Image Function

1. Press the 

MENU

 button and then use 


,


 button to select the         menu.

2. Press the 


,


 button to select 

Captured Image

 item.

3. Press the 

OK 

button to capture actual screen image. 

4. Press the 

OK 

button again to save Screen capture image.


l

 You can use the captured image as a Blank image.


You can not use the remote control when this function is in use. 


l  

If you want see your captured image, select Captured image in the Blank image 
function. 


l

 Press the 

MENU

 button twice or the 

EXIT

 button to exit the menu screen.

Keystone

Blank Image

Captured Image

Lamp mode

Monitor Out

Lamp time                             11 Hr

Black

High bright

RGB1

To set

MENU 

  Prev.          Move            OK

Confirm Screen Capture

OK

Cancel

Keystone

Blank Image

Captured Image

Lamp mode

Monitor Out

Lamp time                             11 Hr

Black

High bright

RGB1

MENU 

  Prev.        Move            Select

1. Press the 

LAMP

 button of remote control.

2. Press the 


,


 button to adjust the screen condition as you want.


l


Each press of the


 button changes the screen as shown below.


 l 

The menu automatically disappears at specific temperature (more than 35°C).

 l 


It is automatically changed into power saving mode at specific temperature (more than 35°C).

 l 

You can use this function through the 

MENU

 button.

 l 


To exit the menu display, press the 

EXIT

 button.

Lamp mode Function

       High Bright 

       Economic 

Summary of Contents for BX403B

Page 1: ...Order Number GETEC C1 10 110 FCC Part 15 subpart B Test Report Number GETEC E3 10 052 Page 1 1 EUT Type DLP PROJECTOR FCC ID BEJBX503JD APPENDIX G USER S MANUAL ...

Page 2: ...OWNER S MANUAL DLP PROJECTOR BX503 BX403B Please read this manual carefully before operating your set and retain it for future reference www lg com ...

Page 3: ...requency energy and if not installed and used in accordance with the instructions may cause harmful interference to radio communications However there is no guarantee that interference will not occur in a particular installation If this equipment does cause harmful interference to radio or television reception which can be determined by turning the equipment off and on the user is encouraged to tr...

Page 4: ... of the Projector 13 Using Kensington Security System 14 Turning on the Projector 15 Turning off the Projector 15 Focus and Position of the Screen Image 16 Selecting source mode 16 Connection Connecting to a Desktop PC 17 Connecting to a Notebook PC 17 Connecting to a Video Source 18 Connecting to a DVD 18 Connecting to a D TV Set Top Box 18 Function Video Menu Options Adjusting Video 19 Picture m...

Page 5: ...t to avoid a fire hazard This may cause a fire hazard or damage the unit Do not place heavy objects on the power cord This may cause a fire or an electric shock hazard Do not place the projector close to sources of steam or oil such as a humidifier This may create a fire hazard or an electric shock hazard Do not place the projector where it might be exposed to dust This may cause a fire hazard or ...

Page 6: ...t touch metal parts during or soon after operation since the vents will remain very hot Power WARNING Power NOTES Do not plug in too many items into one power outlet It may result in overheating of the out let and create a fire hazard Never touch the power plug with a wet hand This may cause an electric shock hazard Prevent dust from collecting on the power plug pins or outlet This may cause a fir...

Page 7: ...l outlet and contact your dealer or service center This may cause a fire or an electric shock hazard or damage to the unit Use an air spray or soft cloth that is moist with a neutral detergent and water for removing dust or stains on the projection lens Others WARNING Do not attempt to service the projector yourself Contact your dealer or service center This may cause damage to the projector and c...

Page 8: ...is can be a normal result of the manufacturing process and does not always indicate a malfunction Focus ring Zoom ring Power button Control Panel OK Button Checks present mode and saves the function changes INPUT Button Switches to RGB Component HDMI Video mode ġ2Ģ2 2 Button Adjusts functions of menus POWER Button Turn ON OFF the projector MENU Button Selects or closes menus AUTO Button It automat...

Page 9: ...Names of parts 9 Connecting Part AC IN Kensington Security System Connector Refer to page 14 USB SVC only VIDEO IN HDMI IN RGB OUT RGB IN 2 RGB IN 1 Rear remote control sensor RS 232C RJ45 ...

Page 10: ...atteries with correct polarity match with and match with Install two 1 5V AAA batteries Don t mix used batteries with new batteries CAUTION RISK OF EXPLOSION IF BATTERY IS REPLACED WITH AN INCORRECT TYPE DISPOSE OF USED BATTERIES ACCORDING TO THE INSTRUCTIONS ᣏ ㆇ ᴮ ጞ ᴮ 㖞 㬉 㛾ᬞㄖ ᴮ 㖞㘫 ⳂⰦ 㬉 〤 㬉 Თ㶚 Όᥴ 㬉 㬉 㬉 㢰 㧏 㬉 㛿 ġ2Ģ2 2 ᴮ ᴮ ᴮ ᴮ 㛾ᬞ ᴮ 㛾ᬞ ಪᩦ ᴮ ㅪ ᴮ 㛾ᬞ ᶞ ᴮ 㷸 㬉 ...

Page 11: ... is turned on Projector lamp is cooling 10 sec Power off Standby This mode cools the projector naturally for 4 minutes after it is turned off This indicates a Colour Wheel problem Please contact your local service centre Projector lamp is reaching the end of its life and needs to be replaced with a new lamp The projector is experiencing an error Retry Power On again later If lamp indicator is red ...

Page 12: ...ne when it is burned out Optional parts can be changed without notice to improve the quality of the product and new optional parts can be added Remote Control Power Cord Video Cable HDMI to DVI Cable Owner s manual Computer Cable Lamp Projection Screen 2 Batteries Component Cable Lens cap and Strap RS 232C Cable RCA to D Sub Adapter HDMI Cable h 0qhw Surjudp FG LAN Cable Ceiling installer for proj...

Page 13: ...ush projector or spill any kind of liquid into the projector Leave an adequate distance 30cm 12 inches or more around the projector Don t place the projector where it can be covered with dust This may cause overheating of the projector Do not obstruct the slots and openings of the projector This may cause overheating and create a fire hazard The projector is manufactured using high precision techn...

Page 14: ...l be crooked If this is so then the keystone adjustment may correct this Refer to page 27 4 Connect the cables of the projector to a wall power socket and other connected sources projection distance based on the picture format Projection distance D Projection off set ratio 100 Projection distance D Basic Operation of the Projector The longest shortest distance show status when adjusted by the zoom...

Page 15: ...on and use of the Kensington Security System refer to the user s guide attached to the Kensington Security System set And for further information contact http www kensington com the internet homepage of the Kensington company that deals with expensive electronic equipment such as notebook PCs or projec tors Kensington Security System is an optional item Using Kensington Security System ...

Page 16: ...cator light turns Green Select the source mode with the INPUT button 1 Press the POWER button on the top cover or remote control 2 Press the POWER button on the top cover or remote control again to turn off the power 3 If the operation indicator LED is orange and blinking do not disconnect 10 sec the supply until the operation indicator LED is lit constantly orange If the operation indicator LED i...

Page 17: ...ble is plugged in and there s a signal the selecting item is activated as white and if there s no signal the selecting item is deactivated as gray If pressing the input selection button it is possible to select activated item It is possible to watch by selecting RGB 1 for Component 1 input and RGB 2 for Component 2 input and in case of Component even though there s an input signal the OSD item is ...

Page 18: ...both the dis play of your computer and the external projector the picture of the external projector may not appear properly In such cases set the output mode of your computer to output the signal only to the external projector For details refer to the operating instructions supplied with your computer You can also connect to the RGB IN 2 port Computer Cable To use by connecting to HDMI terminal Pl...

Page 19: ...able to the RCA to D Sub Adapter and then connect the RCA to D Sub Adapter to RGB IN of the projector When connecting the component cable match the jack colors with the component cable Y green PB blue PR red You can also connect to the RGB IN 2 port No support of audio D TV Set Top Box D TV Set Top Box Connecting to a DVD How to connect a Connect the DVD Component cable to the RCA to D Sub Adapter...

Page 20: ...pressing the button on the remote control You can adjust brightness by pressing the button on the remote control Press the MENU button twice or the EXIT button to exit the menu screen Adjusting Video 1 Press the MODE button on the remote control 2 Press the 䰽 䰿 button to adjust the screen condition as you want Picture mode Use Picture mode function to set the projector for the best picture appeara...

Page 21: ... To exit the menu display press the EXIT button 1 Press the MENU button and then use button to select the menu 2 Press the 䯁 䯂 button to select Gamma curve shift item 3 Press the OK button 4 When the window below appears press 䯁 䯂 button to move between the items and the 䰽 䰿 buttons to adjust the screen as you want Gamma curve shift Red Green Blue can be adjusted between 20 and 20 Press the MENU b...

Page 22: ...ess of the screen or decreases it a little to make the rich grayscale color Brilliant color TM Function 1 Press the MENU button and then use 䰽 䰿 button to select the menu 2 Press the 䯁 䯂 button to select Black level item 3 Press the 䰽 䰿 button to select Low or High l This function works in the following mode HDMI Only activates in DTV signal Video l To exit the menu display repeatedly press the ME...

Page 23: ...justed between 0 and 100 l Saturation Red Green Blue Cyan Magenta and Yellow can be adjusted between 0 and 100 l Hue Red Green Blue Cyan Magenta and Yellow can be adjusted between 50 and 50 l Press the MENU button twice or the EXIT button to exit the menu screen l An advanced settings function is possible to be saved according to an image mode Red Gain 50 Green Gain 50 Blue Gain 50 Cyan Gain50 Mgt...

Page 24: ...n and then use button to select the menu 2 Press the button to select Overscan item 3 Press the buttons l The Overscan function can be adjusted only in RGB HDMI and Component modes l The Overscan function can be adjusted between Off and 10 l The Overscan function can not be adjusted if the Zoom in Digital Zoom is set to a value other than 100 l Press the MENU button twice or the EXIT button to exi...

Page 25: ...cal item 3 Press the OK button to see reversed image l Each time you press the OK button the image will be reversed l Press the MENU button twice or the EXIT button to exit the menu screen The sleep timer turns the projector off at the preset time 1 Press the SLEEP TIME button of remote control 2 Press the button to select the desired preset time l Each press of the button changes the screen as sh...

Page 26: ...lickers 10 times at 1 second intervals and then disap pears l Time keeper function If you select a specific time it continues to be displayed in minute and second units Even though other OSD windows appear the remaining time is displayed again after the windows are closed When the set time is reached 0 00 flickers 10 times at 1 second intervals and then disappears 5 If the set time disappears beca...

Page 27: ... Zoom Position Reset 110 MENU Exit Move OK Press OK to Start 3 Press the button to adjust Zoom to your choice l You can adjust Zoom in 5 increments from 100 to 250 l You can also use this function by using the MENU but ton l Press the EXIT button to exit the menu screen 3 Press the OK button When the window below appears at the bottom right corner of the screen press the to adjust the position Whe...

Page 28: ...ess the button to adjust it l You can adjust each item from 0 to 100 l The default value may change depending on input mode l You can also use this function by using the MENU button l Press the MENU button to exit the menu screen 1 Press the BLANK button l The screen turns off to a background color l You can choose the background color Refer to Selecting blank image color 2 Press any button to can...

Page 29: ...o save Screen capture image l You can use the captured image as a Blank image l You can not use the remote control when this function is in use l If you want see your captured image select Captured image in the Blank image function l Press the MENU button twice or the EXIT button to exit the menu screen Keystone Blank Image Captured Image Lamp mode Monitor Out Lamp time 11 Hr Black High bright RGB...

Page 30: ... release automatically after approximately 10 minutes Using Still Function Moving Image Still Image 1 Press the MENU button and then use button to select the menu 2 Press the button to select Monitor Out item 3 Press the button to select RGB1 RGB2 or Auto l Press the MENU button twice or the EXIT button to exit the menu screen l Auto mode is the mode to output an image of currently seeing input am...

Page 31: ...est results perform this function while displaying a still image Screen Menu Options 1 Press the MENU button and then use button to select the menu 2 Press the button to select Phase item 3 Press the button to make desired adjustments l Phase adjustment range is 0 63 l The variable range can be different depends on input resolutions l Press the MENU button twice or the EXIT button to exit the menu...

Page 32: ...t the menu screen 1 Press the MENU button and then use button to select the menu 2 Press the button to select Vertical item 3 Press the button to make desired adjustments l Vertical adjustment range is 25 25 l The variable range can be different depends on input resolutions l Press the MENU button twice or the EXIT button to exit the menu screen Using Vertical Function Using Horizontal Function Au...

Page 33: ...te control l Press the MENU button twice or the EXIT button to exit the menu screen Connect the serial port of the PC to the RS 232C jack on the projector back panel RS 232C cable is not supplied with the projector 2 3 4 5 6 7 8 PC RXD TXD DTR GND DSR RTS CTS RXD 9 6 1 5 TXD DTR GND DSR RTS CTS Projector 1 9 Pin No Connection Fig 1 RS 232 Interface Cable 2 3 4 5 6 7 8 Use the RS232C cable to contr...

Page 34: ...2 03 Screen Mute k d 0 1 04 Contrast k g 0 64 05 Brightness k h 0 64 06 Color k i 0 64 07 Tint k j 0 64 08 Sharpness k k 0 64 09 OSD Select k l 0 1 10 Remote Control Lock Key Lock k m 0 1 11 Color Temperature k u 0 3 12 Red ADC gain adjustment j w 0 64 13 Green ADC gain adjustment j y 0 64 14 Blue ADC gain adjustment j z 0 64 15 Low Power j q 0 1 Real data mapping 1 Real data mapping 2 ...

Page 35: ...See previous page Adjustment range is 1 99 When selecting Set ID 0 every connected projector set is controlled Refer to Real data mapping 1 DATA To transmit command data Transmit 2 character when organized ASCII code Transmit FF data to read status of command Cr Carriage Return ASCII code 0x0D ASCII code character correspond to Space Bar which is in order to classify command set ID and Data Comman...

Page 36: ...and kl To select OSD On Off Transmission Data 0 OSD Select Mode Off 1 OSD Select Mode On Data 0 OSD Select Mode Off 1 OSD Select Mode On k l Set ID Data Cr l Set ID OK Data x Ack 10 Remote Control Lock Key Lock Command km To lock the front panel controls on the projector and remote control Transmission Data 0 Lock Off 1 Lock On Data 0 Lock Off 1 Lock On k m Set ID Data Cr m Set ID OK Data x Ack If...

Page 37: ...input source for the Set Transmission Data 20 Video 60 RGB1 61 RGB2 80 HDMI Data 20 Video 60 RGB1 61 RGB2 80 HDMI x b Set ID Data Cr b Set ID OK Data x Ack External control device setup 18 Key Command mc To send Key code of IR romote control Transmission Data Key code Key code m c Set ID Data Cr b Set ID OK Data x Ack 12 Red ADC gain Adjustment Color R Command jw Adjust the Red gain of ADC part RG...

Page 38: ...tion of 640X480 or 800X600 Maintenance Cleaning the lens Clean the lens whenever you notice dirt or dust on the surface of it Wipe the lens surface gently with an air spray or a soft dry lint free cloth To remove dirt or stains on the lens moisten a soft cloth with water and a neutral detergent and wipe the lens surface gently Cleaning the Projector Case To clean the projector case first unplug th...

Page 39: ...LG Electronics Service Center Using another manufacturers lamp may cause damage to the Projector and lamp Pull out the lamp only when replacing the lamp Keep the lamp unit out of reach of children Keep the Lamp away from heat sources such as radiators stoves etc To reduce the risk of fire do not expose the lamp to liquids or foreign materials Do not place the lamp near any heat source Make sure th...

Page 40: ...d remove the lamp case 6 Insert the new lamp gently into the correct posi tion Make sure it is inserted correctly 7Tighten the screws you removed in step 3 Make sure they are fixed firmly 8 Close the lamp cover and install the screws from step 2 to install the cover If the lamp cover is not installed correctly the unit will not power on Replacing the Lamp Screws Using another manufacturers lamp ma...

Page 41: ... power cord while activating the projector and the cooling fan It may cause the lamp life span to shorten and get damaged l The life span of projector may considerably depend on the use environment and treatment conditions l The projector uses the high pressure mercury lamp so that the serious caution is essential The shock or abuse while using may cause lamp to blow off with explosion l When you ...

Page 42: ...tical pixel 4 3 horizontal vertical BX503 BX503 JD BX403B BX403B JD Temperature In operation 32 104 F 0 C 40 C In storage and transit 4 140 F 20 C 60 C Humidity In operation 0 75 relative humidity by dry hygrometer Not in operation 0 85 relative humidity by dry hygrometer Lamp model AJ LBX50 Lamp power consumption 330W 0 7 inches Wide 1 0 7 5m 40 296 inches Tele 1 2 8 7m 48 343 inches 100 12m 1 1 ...

Page 43: ...The model and serial number of the projector is located on the back or one side of the projector Record it below should you ever need service MODEL SERIAL ...

Page 44: ...e used with this System Canadian DOC Notice This Class B digital apparatus meets all requirements of the Canadian Interference Causing Equipment Regulations Cet appareil numérique de la classe B respecte toutes les exigences du Règlement sur le matériel brouilleur du Canada CE Conformity Notice for Europe Products with the CE Marking comply with the EMC Directive 89 336 EEC and LOW VOLTAGE Directi...

Page 45: ...one or more stages The length of time to reactivate the system unit shall be reasonable for the user Labelled products must meet strict environmental demands for example in respect of the reduction of electrical and magnetical fields as well as work load and visual ergonomics Below you will find a brief summary of the ecological requirements met by this product The complete ecological criteria doc...

Page 46: ...ty Emissions Electromagnetic fields Noise emissions Ecology The product must be prepared for recycling and the manufacturer must have a certified environmental management system such as EMAS or ISO 14 001 Restrictions on chlorinated and brominated flame retardants and polymers heavy metals such as cadmium mercury and lead The requirements included in this label have been developed by TCO Developme...

Page 47: ...ser Recyclingprogramm erfahren möchten wenden Sie sich bitte an Ihren lokalen LG Händler oder einen Unternehmensvertreter von LG Wir richten unsere Firmenpolitik auf eine sauberere Umwelt hin aus indem wir umweltspezifische Aspekte als wichtigen Punkt in die Weiterentwicklung unseres Unternehmens einfließen lassen Zusätzliche Informationen über unsere grüne Firmenpolitik erhalten Sie auf unserer W...

Page 48: ...limpio de LG en 1994 y este ideal ha servido para guiar nuestros principios empresariales desde entonces La Declaración es la base que nos ha permitido llevar a cabo tareas que respetan el medio ambiente siempre teniendo en cuenta aspectos sociales económicos y medioambientales Promocionamos actividades orientadas a la conservación del medio ambiente y desarrollamos nuestros productos específicame...

Page 49: ...houden bij het ontwikkelen onze producten specifiek rekening met de milieuvriendelijkheid van onze producten Wij minimaliseren het gebruik van schadelijke stoffen in onze producten Er wordt bijvoorbeeld geen cadmium verwerkt in onze monitors Nederlands Informatie met betrekking tot recycling Deze monitor bevat materialen die schadelijk zouden kunnen zijn voor het milieu Het is belangrijk dat deze ...

Page 50: ...ÏÔÓÌÂÌÚ Û ÛÚ ÚÓ Ë ÌÓ ËÒÔÓÎ ÁÓ Ì Ë ÛÚËÎËÁË Ó Ì ÚÓ ÂÏˇ Í Í Â Ì Â Â ÂÒÚ Ë ÚˇÊÂÎ Â ÏÂÚ ÎÎ Û ÛÚ Ó ÓÚ Ì Ò ÔÓÏÓ ÍÓÎÓ Ë ÂÒÍË Ô ËÂÏÎÂÏÓ Ó ÏÂÚÓ ÓΠÔÓ Ó ÌÓÈ ËÌÙÓ Ï ˆËÂÈ ÔÓ Ì ÂÈ Ô Ó ÏÏ ÛÚËÎËÁ ˆËË ÓÚıÓ Ó Ó ÈÚÂÒ Í ÏÂÒÚÌÓÏÛ ÔÓÒÚ ËÍÛ ËÎË Ô Â ÒÚ ËÚÂÎ ÍÓ ÔÓ ˆËË LG Ã Ó ËÂÌÚË ÛÂÏÒˇ Ì Ó ÂÒÔ ÂÌË ÍÓÎÓ Ë ÂÒÍÓÈ ÂÁÓÔ ÒÌÓÒÚË ÒÚ ˇ Ò  ˆÂÎ ÎÓ Î ÌÛ Á ËÚÛ ÓÍ ÛÊ ÂÈ Ò Â ƒÓÔÓÎÌËÚÂÎ ÌÛ ËÌÙÓ Ï ˆË Ó Ì ÂÈ ÔÓÎËÚËÍ ÔÓ Óı Ì ÓÍ ÛÊ...

Page 51: ...geven met het huishoudelijk afval maar moeten worden ingeleverd bij speciale inzamelingspunten die door de lokale of landelijke overheid zijn aangewezen 3 De correcte verwijdering van uw oude toestel helpt negatieve gevolgen voor het milieu en de menselijke gezondheid voorkomen Smaltimento delle apparecchiature obsolete Kassering av din gamla apparat Uw oude toestel wegdoen 1 Ce symbole représenta...

Page 52: ...saat ottamalla yhteyden paikallisiin viranomaisiin kierrätyskeskukseen tai myymälään josta ostit laitteen 1 Når der er et tegn med et kryds over en skraldespand betyder det at produktet er omfattet af EU direktiv 2002 96 EC 2 Alle elektriske og elektroniske produkter skal smides ud et andet sted end gennem den kommunale affaldsordning ved hjælp af specielle indsamlingsfaciliteter der er organisere...

Page 53: ...Regulatory Information cont 10 Portuguese Slovak Czech Croatian Hungarian Polish ...

Page 54: ...Regulatory Information cont 11 Estonian Latvian Lithuanian ...

Reviews: