background image

37

13 LCD 

CONSOLE

Network Status:

 This option will test the ethernet connection by attempting to ping the following addresses: 

localhost, ethernet IP address, gateway, DNS1, DNS2. The localhost ping will verify the kernel IP stack is 
properly initialized. The ethernet ping will verify the ethernet card’s IP address is set and communicating 
with the kernel. The ethernet ping test does not send any packets over the ethernet cable however. The 
gateway ping test will verify that the gateway address responds to queries. This test is the first one that 
actually sends packets over the ethernet wire. The gateway test does not verify the IP address of the 
gateway is correct, or that the gateway is working correctly, it only tests that the address specifed as a 
gateway responds to a ping request. The DNS1 and DNS2 ping tests verify the IP addresses listed for DNS 
servers respond to ping requests. This test does not verify if the DNS servers can actually resolve DNS 
names to IP addresses.

For a more complete test, use the connection test web page in the DAS diagnostics menu.

Modbus Status:

 This option will report the number of devices currently detected by the DAS. The display 

will show a device count for “Devices OK”, “New”, and “Failed”. These are as follows:


Devices OK

: The number of Modbus devices that are presently working, and have been configured.


New:

 Devices that the DAS supports, and are working, but have not yet been given a name.


 Failed:

 The number of modbus devices that either stopped responding, or are not supported by  

the DAS.

Note: selecting the modbus status option from the DAS console does not cause the DAS to search for 
new devices. The DAS checks for new devices in the background all the time, taking about 2.5 minutes to 
complete each pass through all 255 possible addresses. The modbus test console option simply displays 
the number of devices the DAS presently knows about.

Upload Data Now: If the DAS is configured to upload data using HTTP/POST to a webserver/database such 
as BMO,this option will cause the DAS to upload all stored data immediately.

Reboo

t: This option will reboot the DAS.

Shutdown:

 This option will stop the data logging processes and secure the flash memory. When secured, 

the console will state that the power may be disconnected. It is important to shut down the DAS cleanly 
prior to disconnecting the power from the device.

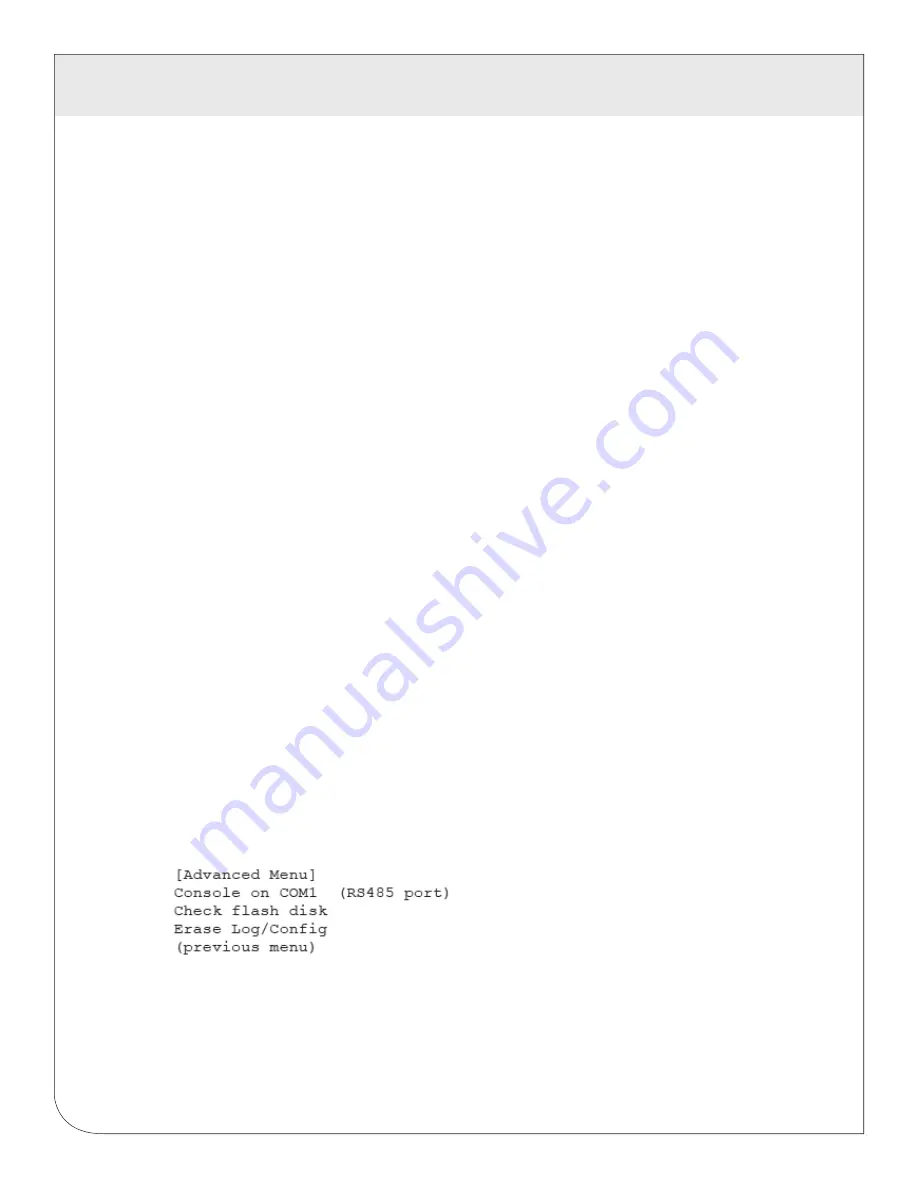
The DAS has an advanced menu that can be used to perform system checks and clear all configuration 
options to the default settings. To access the advanced menu, wait until the LCD shows  
“EnergyHub Ready” and press both the Menu and Select buttons at the same time. Hold both down 
together for about 10 seconds. When the advanced menu is displayed, you may release the two buttons. 
The following is a tree display of the advanced menu.

The 

Check Flash Disk

 option will force the DAS to check the entire flash disk for file system integrity. This 

will require you to reboot the DAS.

The 

Enable Console

 feature will provide a shell prompt on the serial port for remote diagnostics. This is 

intended to be used by Leviton technical support only.

The 

Reset Configuration

 option will remove all the user settings, data, and passwords that have been 

configured and will return the DAS to the factory default settings. This is mainly useful when reconfiguring a 
DAS that has been used previously on a different job or project.

WEB 

VERSION

Summary of Contents for A8812

Page 1: ...DI 001 A8812 00A Energy Monitoring HubTM Data Acquisition System Cat No A8812 Installation and Operation Manual WEB VERSION ...

Page 2: ...WEB VERSION ...

Page 3: ...4 Installation 8 5 Configuration 11 6 EAS Administration Overview 15 7 Security 17 8 Modbus 18 9 Wireless 29 10 Networking 30 11 System Options 32 12 Diagnostics 35 13 LCD Console 36 14 Log File Data 38 15 Retrieving Data From The EAS 43 16 Mechanical Drawings 45 17 Warranty and Contact Infromation 46 WEB VERSION ...

Page 4: ...s in continuous improvement therefore we must reserve the right to change specifications and product offerings without notice Where possible we will substitute products with equivalent functionality when necessary NOTICE This product is not intended for life safety applications Do not install this product in hazardous or classified locations The installer is responsible for conformance to all applic...

Page 5: ...stantaneous data accuracy 0 25 of full scale at 20 c Current mode 4 20mA min max average instantaneous data accuracy 0 25 of full scale at 20 c Resistance mode 100 ohms to 100k accuracy 1001 1k1 1 of 1k1 20 c 1k1 10k1 1 of 10k1 20 c 10k1 47 5k1 1 of 47 5k1 20 c 47 5k1 1001 1 of 100k1 20 c 100k1 10M1 accuracy unrated Pulse mode Intended for use with dry contact outputs consumption rate runtime stat...

Page 6: ...2 FEATURES AND SPECIFICATIONS 6 Not available with this model A8812 Internal View 2 1 Electrical Connections WEB VERSION ...

Page 7: ...ulse output transducers for measuring gas electricity water etc from existing meters and sensors Next choose one or more of the following connection methods For LAN installations only Ethernet 10 100Mbit connection point hub or switch IP address and Netmask check with system administrator Gateway address check with system administrator DNS server address check with system administrator HTTP Proxy ...

Page 8: ... Connect each device in the chain by daisychaining the devices together Observe and polarity on the Modbus devices For more information about Modbus loops please read our Modbus FAQ available at www leviton com Low Voltage analog pulse and RS485 wiring that enter electrical panels must have a minimum insulation rating that exceeds the voltage inside the panel In addition other regulations may appl...

Page 9: ...m Inputs 1 8 in pulse or status mode the LED is on when contacts are closed In analog 4 20mA and 0 10V mode the led blinks quickly 2 Hz to indicate an over range alarm error In 4 20mA mode when the input current is less than 4mA or in resistance mode where the input resistance is above 10Mohm the led will blink a pattern blink blink off to indicate a broken wire alarm Ethernet Link Act On when con...

Page 10: ...time installation all devices should appear as new The A8812 Internal IO pulse and analog inputs appear as one device in this list Note A device is the Modbus connected device not necessarily the sensor For example an A8332 module with 4 sensors connected is only one Modbus device not 8 For further information on the LCD console please review the console section of this manual 4 4 5 The DAS comple...

Page 11: ... will need the following information from your network administrator The addresses will be in the form of where refers to the numbers 0 to 9 5 1 2 Configure the IP address as selected from the table above For direct connection to laptop the address settings above are set as the factory default and you may be able to skip to the Laptop Computer Setup section if the factory default settings are prese...

Page 12: ...e as shown above The only change is that after Step 5 1 2 2 press the menu top button multiple times to see the netmask gateway and dns setup menu then push the select button to set the option Note If DHCP configuration is selected the IP netmask gateway and dns server addresses will be obtained automatically Simply select the Enable DHCP from the first TCP IP configuration menu 5 1 4 After the addre...

Page 13: ...tached to an existing LAN obtain a static IP address or use DHCP addressing from the network administrator 5 CONFIGURATION 5 2 Laptop Computer Setup 5 2 1 You must have a computer to access and configure the DAS This computer must have an ethernet connection on the LAN or by direct connection and must have a web browser installed Note If your building already has an existing LAN that the DAS is att...

Page 14: ...ocol TCP IP Note If you have multiple ethernet cards you may have multiple lines labeled TCP IP ethernet card Locate the ethernet card that corresponds to the physical connection to the DAS and then select the TCP IP option that is linked with that ethernet card 5 3 3 Double click the TCP IP option you selected in step 5 3 2 above The Internet Protocol properties dialog will be shown This page all...

Page 15: ...each Modbus device attached to the DAS Before the DAS can begin logging data each Modbus device must be assigned a unique name 6 5 1 Click the device number to the left of the unconfigured Modbus device 6 5 2 A page with the current device status and readings will be displayed Click on the configure button at the bottom of the page 6 5 3 Enter a name for the device in the supplied field 6 5 4 Change ...

Page 16: ...ng to connect directly to the DAS 6 7 4 Specify the Target address to upload data This is the website address where the DAS will send the collected data If you have an in house data collection service you should enter the address of your data server in this field Leviton also provides a service called Building Manager Online that can collect and report data for you If you are using the BMO service ...

Page 17: ...erator This account may view settings however may only change Modbus alarm ranges and device user This account can view some system settings including the Modbus device status pages and can change When using FTP to access the DAS you may use the admin account username password for read only access Log information is stored in var log modbus For read write delete access use the login name root and ...

Page 18: ...s column you may need to upgrade the firmware on the DAS to access the device At the bottom of the device list page under the Type column a link is shown that will show all the Modbus devices with built in driver support provided in the firmware Use the System Firmware update page to check for newer versions of the firmware The leviton com website FAQ also has a list of supported Modbus devices Modbu...

Page 19: ... devinfo Display the communications options including baud rate serial number and firmware version when available for all devices in the Modbus device list Show stats show packet counters for all devices in the device list These include Sent Total number of packets sent to this Modbus Received Total number of valid packets received from this Modbus address Error Total number of packets received tha...

Page 20: ...A list of device errors is available in the log file details section of this manual At the bottom of the page several buttons are present Configure This button will allow you to change the device parameters such as the alarm and console settings Done Returns you to the device list Log File This icon will display a table view of the most recent data in the current log file Use the log file export page ...

Page 21: ... DAS to display this data point on the LCD console Multiple data points are rotated about every 10 seconds The values on the LCD console are updated when the next log interval occurs Point Config Some devices have configurable point features Most data points are automatically configured and this option may not be displayed Advanced At the lower right corner of the page an advanced configuration button...

Page 22: ...TCP port of the remote gateway must be specified The default TCP port is 502 on most gateways For local Modbus devices attached to the DAS RS485 port use 502 Device Name You must provide a name for the Modbus device to identify it in the device list This should be something that will identify the meter location and purpose Device Type This menu will allow the selection of any built in driver or any...

Page 23: ...page Analog inputs have one line each for an instantaneous min max and average value Pulse inputs have a line for the accumulated value rate runtime and status 8 7 2 Click the Configure button at the bottom of the page The page will be displayed again however the device name and alarm level fields will allow editing Type in a name for the device in the space provided at the top of the page The name ...

Page 24: ... degrees F Enter the low range number here Sensor Maximum Range Enter the high range value of the analog sensor here Pulse Multiplier For pulse mode inputs this option specifies the multiplier for the input Curve Scaling Some sensors such as thermistors have a non linear output This option allows a lookup table to be specified to convert from the input reading to an engineering unit data output Seve...

Page 25: ... go above 20K ohms and will cause an alarm condition The Pulse count for instantaneous rate value specifies the number of pulses to use to calculate the instantaneous rate min and max fields in pulse mode 8 7 7 After returning to the device configuration page click Save at the bottom of the page to return to the device display page The internal I O device 250 is also available to the Modbus TCP gatew...

Page 26: ...ess Click the Troubleshooting link at the bottom of the Modbus device list page for further diagnostics 8 8 Modbus Setup The Modbus setup page provides several options related to the Modbus RS485 serial port DAS Name This is the name of the DAS This name will be present on all log file descriptors when uploaded to a central database website such as BMO It is helpful to name the DAS based on the phy...

Page 27: ... however we have not seen any problems with this in any of the Modbus devices we provide drivers for Most Modbus devices simply ignore packets received at the wrong baud rate If you are experiencing Modbus communications problems you should set the baud rate to a fixed 9600 before troubleshooting Modbus RS485 Parity This feature allows alternate parity options to be set Default is no parity Modbus ...

Page 28: ...sage is sent to each of the trap host addresses Specify the trap host by IP address not DNS name Direct email on alarm When checked the DAS will send an email message when any data point changes its alarm state SMTP Mail Server Address The IP address of the email server on the LAN that will process and forward the email message to the recipient Sender Address The address that will be used in the F...

Page 29: ... the ModHoppers menu from the Wireless section in the DAS menu tree as shown below The graph will draw a blue box for each ModHopper that is attached to the system The blue number inside the box icon is the Modbus address of the ModHopper To the side of each icon three lines of information will be shown The device list name will be shown to the side of each ModHopper icon The link quality hops and...

Page 30: ...traffic from the LAN to the internet The default is 192 168 40 1 If you do not have an internet connection for your LAN or you are using a crossover ethernet cable leave this field blank DNS1 DNS2 These are the primary and secondary DNS servers If you are using a dialout connection these must be set to the DNS server provided by your dialup isp If you only use the DAS on a crossover cable and or dia...

Page 31: ... your computer has the proper IP address on the same subnet to access the DAS NOTE one common mistake is configuring the Laptop IP to the same address as the IP address of the DAS In order for the laptop and DAS to communicate the IP addresses should not be identical See the basic network config for suggested IP addresses Use the LCD console to run the Network Status test This will attempt a number ...

Page 32: ...ted to local time for the convenience of the installer The date time configuration page provides the following options Date time in UTC and Local time Date time dropdown menus to select the current local time manually Timezone a drop down list of the supported zones Time sync protocol Select NTP or Rdate Most Linux Unix systems provide rdate however many provide NTP as well Windows domain servers c...

Page 33: ... is 8 hours ahead of local time This example is for Pacific which is 8 hours off from UTC This will return a list of data points between the two specified time ranges Next plot the data on a graph using the UTC times for start and end points Finally when drawing the time legend on the graph convert the values back to Local time before displaying i e 2003 01 01 00 00 00 to 2003 01 02 00 00 00 Any div...

Page 34: ...ware using the firmware update page The DAS must have an Internet connection to communicate with the leviton com website for firmware updates If a LAN connection is present and configured it will be used by default If the DAS uses a dialout connection you must first enable the dialout by clicking the dialout now button on the Networking Modem ppp Status page After clicking the Check for updates button...

Page 35: ...Setup webpage To run a network test enter the IP address or DNS name in the field provided check the checkbox next to the test you wish to use and click the OK button Multiple tests can be specified 12 2 Connection Test The connection test page will attempt to establish an HTTP session with the specified upload server Click the begin test to start this process Information will be printed in black Suc...

Page 36: ...sole the menu button will change the menu option and the select button will take action on the currently displayed option Some options provide sub menus others allow you to edit the option value The following is a tree display of the main menu and sub menus The TCP IP sub menu will allow you to configure the ethernet settings for the DAS To edit the IP settings use the menu button to change options...

Page 37: ...nsole does not cause the DAS to search for new devices The DAS checks for new devices in the background all the time taking about 2 5 minutes to complete each pass through all 255 possible addresses The modbus test console option simply displays the number of devices the DAS presently knows about Upload Data Now If the DAS is configured to upload data using HTTP POST to a webserver database such as...

Page 38: ...name will be a link that will open up a browser window to view the contents of the single log file Clicking on the single log file will only show the contents of that log file and not all historical data for the device Use the log export feature if all log data is required 14 2 Log File Format Once you have downloaded the data from the DAS you will need to process it The file is an ASCII text file with...

Page 39: ... reporting the final data you should adjust the time to reflect the local timezone for which you are reporting The data export option on the BMO website will pro mpt you for a time zone when you export the data and will adjust the log date time accordingly Note UTC is sometimes referred to as GMT Greenwich Mean Time Modbus Error If the error value is not 0 the remainder of the columns for this line ...

Page 40: ...se B current on a single phase H8163 meter hookup the point will be logged as blank This preserves the column structure of the file and allows notation of invalid data SQL databases often accept blank or NULL as a valid entry in a data table to represent invalid data For data exported from the BMO website the columns that are invalid NULL are reported as blank fields This makes it easier to import i...

Page 41: ...name for this DAS to uniquely identify it on the BMO website Because the BMO site can show multiple DAS devices it is important to have a descriptive name in this field 14 4 2 Select the Log File Data Setup Upload menu option The following features are available DAS Serial Number This is the serial number that uniquely identifies this DAS This number can not be changed When uploading data to the BMO...

Page 42: ...elect a password other than the default and make note of it for future reference Number of times to retry In the event of a failure often due to dial up problems busy signals etc this option specifies the number of retries to attempt the upload again If all retries fail the DAS will wait until the next scheduled upload time before trying again Time to wait before retry In the event of a failure the...

Page 43: ... web site Note All timestamps are in UTC When importing log files into Microsoft Excel be sure to specify the log data is comma separated and use a single quote mark as the text delimiter 15 2 FTP Direct from the DAS The DAS will allow inbound connections for transfer of log data files using the FTP protocol FTP to the DAS and log in using the system admin password Files are located in var log modbu...

Page 44: ...e status page in your browser To do this right click on the page and select properties The URL for the page will be shown on that dialog Simply copy paste this URL into your link The DAS can provide Modbus device data in XML format This feature coupled with browser based AJAX Javascript can provide a very powerful tool to allow the creation of custom web pages Further examples of XML and its uses ...

Page 45: ...n x 2 in deep The Enclosure has a tab on the bottom that requires 2 5 in clearance Two 1 2 in holes are provided in the bottom of the DAS for wiring purposes The DAS has 4 mounting holes for use with a 6 or 8 screw The drawing above shows the relative position of the mounting holes WEB VERSION ...

Page 46: ...Co Inc Modhopper is a registered trademark of Obvius LLC Use herein of third party trademarks service marks trade names brand names and or product names are for informational purposes only are may be the trademarks of their respective owners such use is not meant to imply affiliation sponsorship or endorsement Modbus is a U S registered trademark of Schneider Electric USA Inc Belden is a trademark ...

Page 47: ...WEB VERSION ...

Page 48: ...DI 001 A8812 00A WEB VERSION ...

Reviews: