With the trackpad, you also can perform a variety of touch gestures. For information about using the touch
gestures, see “Trackpad touch gestures” on page 34.
Trackpad touch gestures
The entire trackpad surface is sensitive to finger touch and movement. You can use the trackpad to perform
the same point and click actions as you would using a traditional mouse. You also can use the trackpad
to perform a variety of touch gestures.
This topic introduces the frequently used touch gestures such as tapping, dragging, and scrolling. For more
gestures, see the help information system of the ThinkPad pointing device.
Notes:
• When using two or more fingers, ensure that you position your fingers slightly apart.
• Some gestures are not available if the last action was done from the TrackPoint pointing device.
• Some gestures are only available when you are using certain apps.
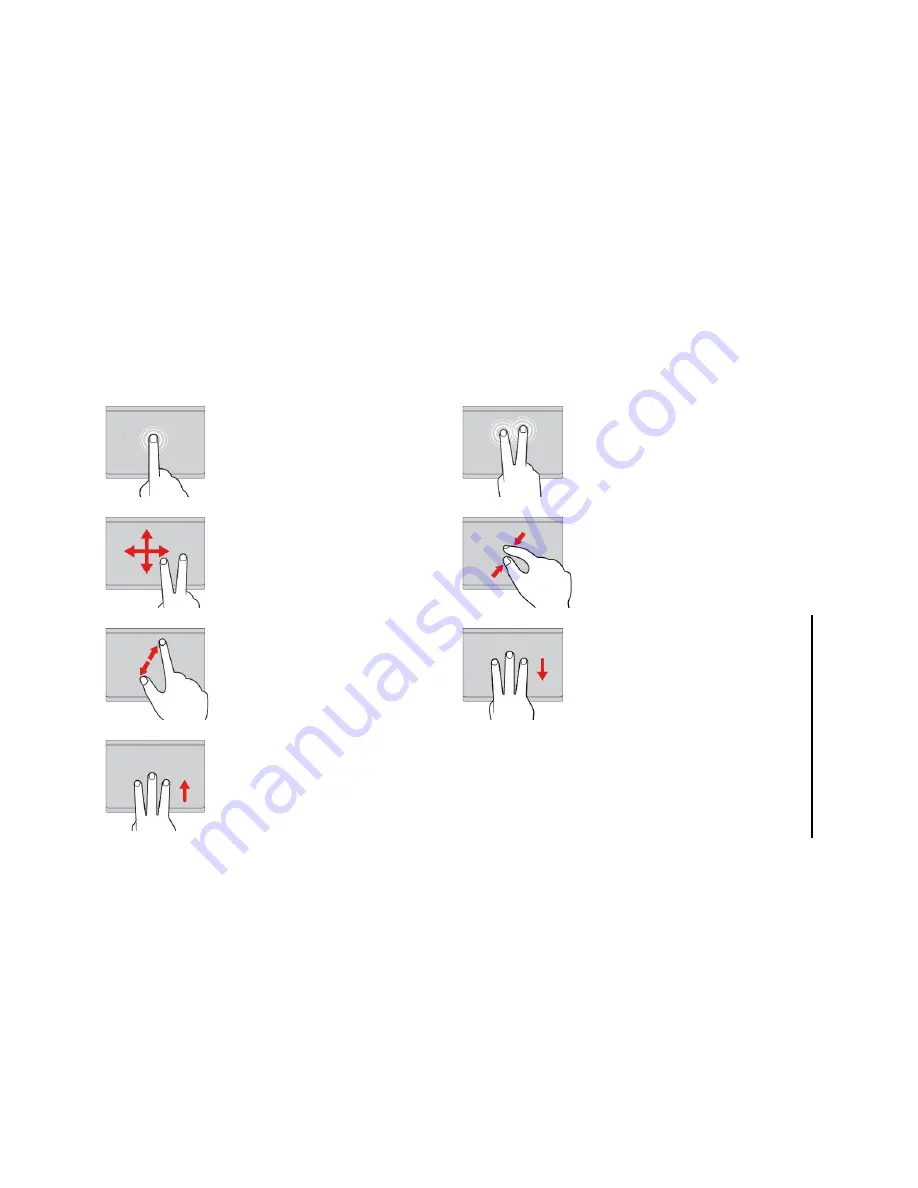
Tap
Tap anywhere on the trackpad
with one finger to select or open
an item.
Two-finger tap
Tap anywhere on the trackpad with
two fingers to display a shortcut
menu.
Two-finger scroll
Put two fingers on the trackpad
and move them in the vertical or
horizontal direction. This action
enables you to scroll through the
document, Web site, or apps.
Two-finger zoom out
Put two fingers on the trackpad and
move them closer together to zoom
out.
Two-finger zoom in
Put two fingers on the trackpad
and move them farther apart to
zoom in.
Swipe three fingers down
Put three fingers on the trackpad
and move them down to show the
desktop.
Swipe three fingers up
Put three fingers on the trackpad
and move them up to open the
task view to see all your open
windows.
Customizing the ThinkPad pointing device
You can customize the ThinkPad pointing device so you can use it more comfortably and efficiently. For
example, you can choose to enable the TrackPoint pointing device, the trackpad, or both. You also can
disable or enable the touch gestures.
To customize the ThinkPad pointing device, do the following:
1. Go to Control Panel.
2. Click
Hardware and Sound
➙
Mouse
. The Mouse Properties window is displayed.
3. In the Mouse Properties window, follow the instructions on the screen to complete the customization
34
ThinkPad S3, ThinkPad Yoga 14, and ThinkPad Yoga 460 User Guide
Summary of Contents for ThinkPad Hard Disk Drive
Page 1: ...ThinkPad S3 ThinkPad Yoga 14 and ThinkPad Yoga 460 User Guide ...
Page 6: ...iv ThinkPad S3 ThinkPad Yoga 14 and ThinkPad Yoga 460 User Guide ...
Page 16: ...xiv ThinkPad S3 ThinkPad Yoga 14 and ThinkPad Yoga 460 User Guide ...
Page 60: ...44 ThinkPad S3 ThinkPad Yoga 14 and ThinkPad Yoga 460 User Guide ...
Page 68: ...52 ThinkPad S3 ThinkPad Yoga 14 and ThinkPad Yoga 460 User Guide ...
Page 80: ...64 ThinkPad S3 ThinkPad Yoga 14 and ThinkPad Yoga 460 User Guide ...
Page 104: ...88 ThinkPad S3 ThinkPad Yoga 14 and ThinkPad Yoga 460 User Guide ...
Page 120: ...104 ThinkPad S3 ThinkPad Yoga 14 and ThinkPad Yoga 460 User Guide ...
Page 150: ...134 ThinkPad S3 ThinkPad Yoga 14 and ThinkPad Yoga 460 User Guide ...
Page 160: ...144 ThinkPad S3 ThinkPad Yoga 14 and ThinkPad Yoga 460 User Guide ...
Page 164: ...148 ThinkPad S3 ThinkPad Yoga 14 and ThinkPad Yoga 460 User Guide ...
Page 169: ......
Page 170: ......


