


To remove the RMM3, do the following:
1. Remove all media from the drives and turn off all attached devices and the server. Then, disconnect all
power cords from electrical outlets and disconnect all cables that are connected to the server. Wait
three to five minutes to let the server cool before removing the server cover.
2. Remove the server cover. See “Removing the server cover” on page 43.
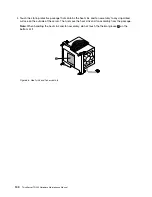
3. Lay the server on its side for easier operation.
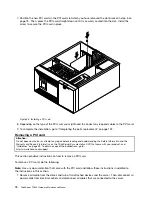
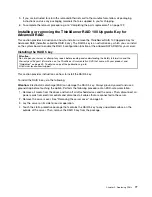
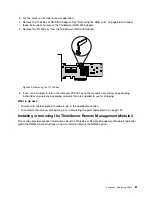
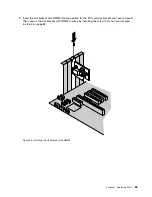
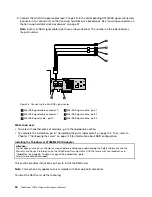
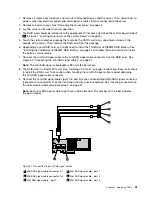
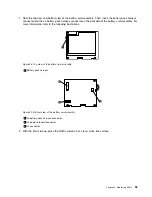
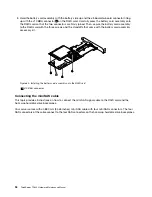
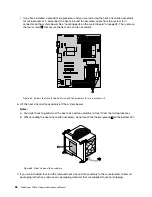
4. Locate the RMM3 in your server. Then, disconnect the ribbon cable from the RMM3 connector on the
system board. See “Locating parts on the system board” on page 33. Remove the screw that secures
the slot bracket with RMM3. Then, carefully lift the slot bracket with RMM3 out of the server.
Figure 55. Disconnecting the ribbon cable and removing the slot bracket with RMM3
5. Put the removed RMM3 kit (slot bracket with RMM3 and ribbon cable) into its original package. If
necessary, disconnect the ribbon cable from the RMM3.
6. If you are instructed to return the removed RMM3 kit to the manufacturer, follow all packaging
instructions and use any packaging materials that are supplied to you for shipping.
Chapter 5
.
Replacing FRUs
87
Summary of Contents for and 1040
Page 1: ...ThinkServer TD230 Hardware Maintenance Manual Machine Types 1027 1029 1039 and 1040 ...
Page 2: ......
Page 3: ...ThinkServer TD230 Hardware Maintenance Manual Machine Types 1027 1029 1039 and 1040 ...
Page 16: ...10 ThinkServer TD230 Hardware Maintenance Manual ...
Page 20: ...14 ThinkServer TD230 Hardware Maintenance Manual ...
Page 44: ...38 ThinkServer TD230 Hardware Maintenance Manual ...
Page 148: ...142 ThinkServer TD230 Hardware Maintenance Manual ...
Page 166: ...160 ThinkServer TD230 Hardware Maintenance Manual ...
Page 168: ...162 ThinkServer TD230 Hardware Maintenance Manual ...
Page 172: ...166 ThinkServer TD230 Hardware Maintenance Manual ...
Page 185: ......