• Read “Safety inspection checklist” on page 43 and “Installation Guidelines” on page 41 to ensure that you
work safely.
• Turn off the server and peripheral devices, and disconnect the power cords and all external cables, see
“Power off the server” on page 99.
• If the server is in a rack, remove it from the rack. See “Remove the server from the rails” on page 47.
• Remove any locking device that secures the server, such as a Kensington lock or a padlock.
• Place the server on its side with the cover up.
Watch the procedure
A video of this procedure is available at YouTube:
https://www.youtube.com/playlist?list=PLYV5R7hVcs-
.
Procedure
Step 1. Make preparation for this task.
a. Remove the server cover, see “Remove the server cover” on page 49.
Attention:
The heat sink and processor could be very hot. To avoid burning yourself, wait for a
few minutes after turning off the server before you remove the server cover.
Step 2. Disconnect every cable from the drive assembly.
Step 3. Remove the simple-swap drive assembly.
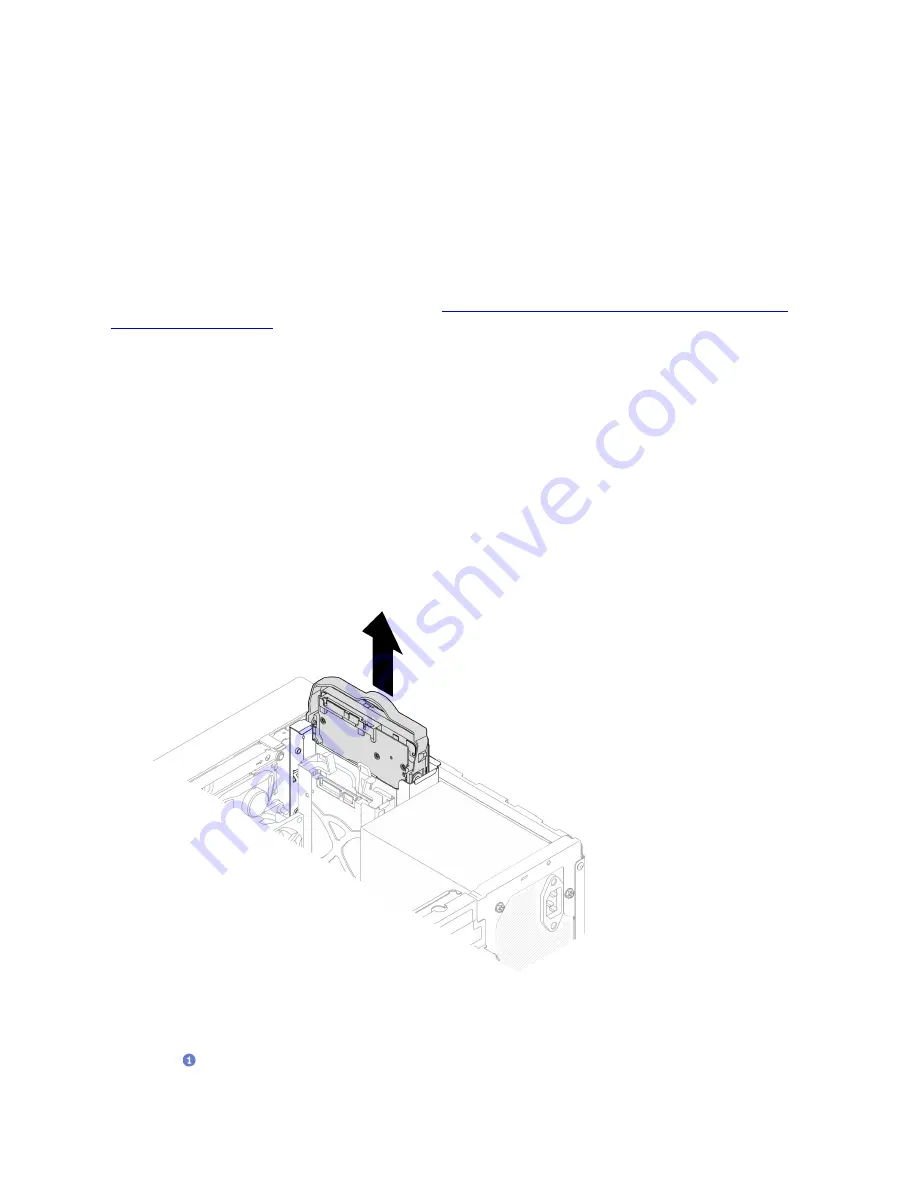
Remove the simple-swap drive assembly from drive bay 1
Grasp the retainer handle, and lift the drive assembly out of the drive bay.
Figure 37. Removing drive assembly from drive bay 1
Remove the simple-swap drive assembly from drive bay 2
a.
Pinch the retainer handles.
56
ThinkSystem ST50 V2 Setup Guide
Summary of Contents for 7D8J
Page 1: ...ThinkSystem ST50 V2 Setup Guide Machine Types 7D8J and 7D8K ...
Page 4: ...ii ThinkSystem ST50 V2 Setup Guide ...
Page 14: ...10 ThinkSystem ST50 V2 Setup Guide ...
Page 44: ...40 ThinkSystem ST50 V2 Setup Guide ...
Page 87: ...Figure 66 Opening the memory module retaining clips Chapter 3 Server hardware setup 83 ...
Page 104: ...100 ThinkSystem ST50 V2 Setup Guide ...
Page 116: ...112 ThinkSystem ST50 V2 Setup Guide ...
Page 120: ...116 ThinkSystem ST50 V2 Setup Guide ...
Page 121: ......
Page 122: ......


