background image

Cable routing for the RAID adapter and drives

Read this section to learn about cable routing for the RAID adapter and drives.

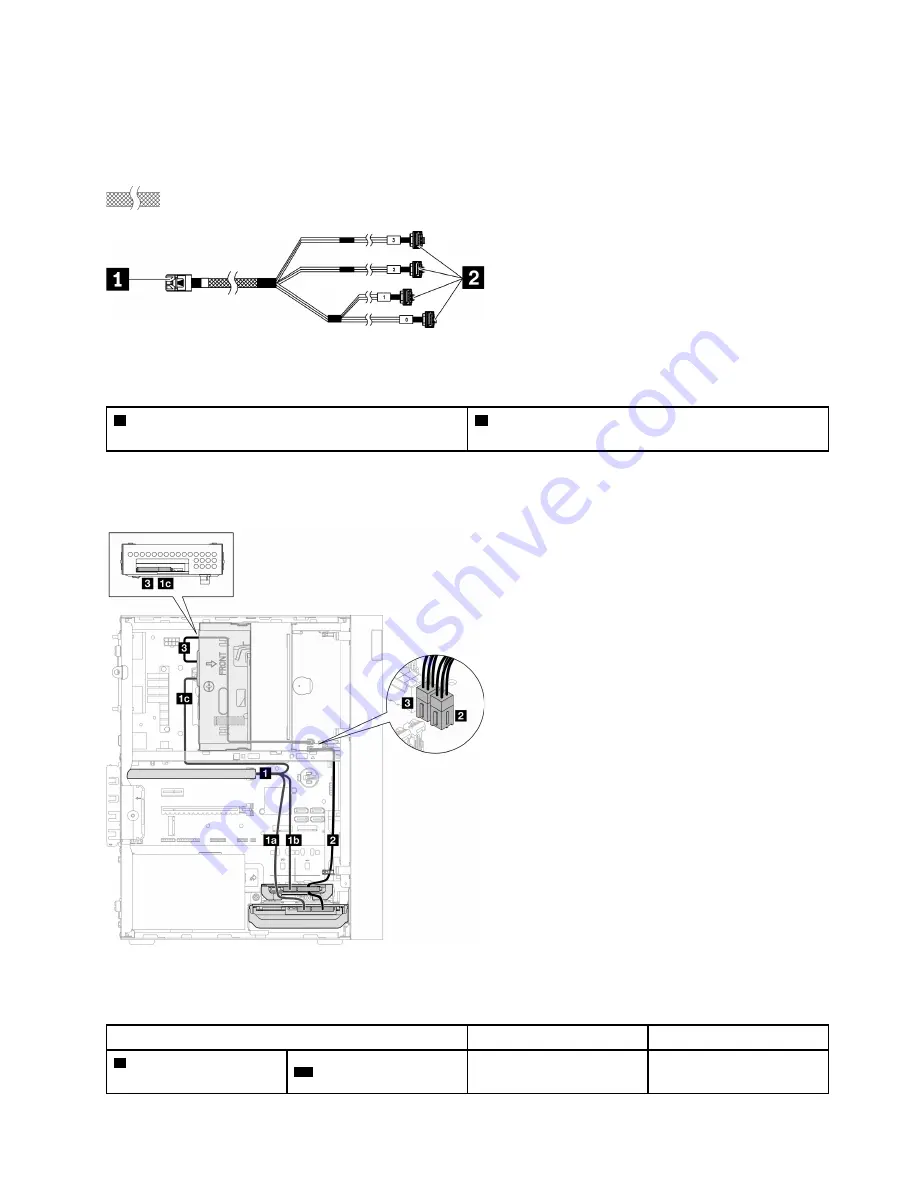
RAID adapter cable

The break lines indicate that part of the cable is hidden in the illustration.

Figure 17. 

Mini SAS HD to 4 SATA 7-pin cable

Table 15.  

Mini SAS HD to 4 SATA 7-pin cable

Connector for the RAID adapter (connector C0). See 

“RAID adapters” on page 19.

Connectors for the drives

Cable routing for three drives with the RAID adapter

Note:

The RAID adapter should be installed in PCIe slot 1.

Figure 18. Cable routing for three drives with the RAID adapter

Table 16.  Cable routing for three drives with the RAID adapter

Cable

From

To

Mini SAS HD to 4 SATA 

7-pin cable

1a 

cable labeled as “0”

Bay 1 drive signal 
connector

C0 connector on the RAID 
adapter

Chapter 2

.

Server components

25

Summary of Contents for 7D8J

Page 1: ...ThinkSystem ST50 V2 Setup Guide Machine Types 7D8J and 7D8K ...

Page 2: ...ddition be sure that you are familiar with the terms and conditions of the Lenovo warranty for your server which can be found at http datacentersupport lenovo com warrantylookup First Edition March 2022 Copyright Lenovo 2022 2022 LIMITED AND RESTRICTED RIGHTS NOTICE If data or software is delivered pursuant to a General Services Administration GSA contract use reproduction or disclosure is subject...

Page 3: ... bezel 51 Remove the CMOS battery CR2032 53 Install a simple swap drive and drive cage bay 1 2 55 Install a simple swap drive and the drive cage bay 3 65 Install an optical drive and the drive cage 71 Install the intrusion switch 78 Install the fan front and rear 80 Install a memory module 82 Install an M 2 drive 84 Install the M 2 drive retainer 85 Install a PCIe adapter 86 Install the CMOS batte...

Page 4: ...ii ThinkSystem ST50 V2 Setup Guide ...

Page 5: ...nd provide flexible expansion capabilities for the future The server comes with a limited warranty For details about the warranty see https support lenovo com us en solutions ht503310 For details about your specific warranty see http datacentersupport lenovo com warrantylookup Identifying your server When you contact Lenovo for help the machine type and serial number information helps support tech...

Page 6: ...isk are available on some models only 1 Server 2 Keyboard 3 Material box including items such as accessory kit power cords and documentation Server form factor The ThinkSystem ST50 V2 server is designed to support both tower and rack form factors You can change the server from tower form factor to rack form factor by installing the tower to rack conversion kit For instructions on how to install th...

Page 7: ...nager Lite optional Lenovo XClarity Provisioning Manager Lite allows you to configure Redundant Array of Independent Disks RAID install compatible operating systems as well as associated device drivers and run diagnostics For more details see http sysmgt lenovofiles com help topic LXPML LXPM_Lite_user_guide pdf Tremendous durability The system has been verified to run even enterprise workload 24 7...

Page 8: ...e bay 3 Optional One 3 5 inch hard disk drive or solid state drive ODD drive bay Optional One 9mm slim SATA Optical disk drive M 2 drive Optional One 2280 NVMe PCIe standard M 2 module for booting Expansion slots Three PCIe expansion slots are available PCIe slot 1 PCI Express 4 0 x16 FHHL 75W PCIe adapter PCIe slot 2 PCI Express 3 0 x1 FHHL 25W PCIe adapter PCIe slot 3 PCI Express 3 0 x4 in x16 s...

Page 9: ... the rear of the server One 1 GbE RJ 45 Ethernet connector with Intel I219 LM Two DisplayPort connectors 4K 60MHz One serial connector One audio line out port Note Supported by Windows Client OS only Supported by processor with integrated graphic feature only See the Processor section at Specifications on page 3 for more information Network One 1 GbE RJ 45 Ethernet connector with Intel I219 LM See...

Page 10: ...STe mode RAID RSTe mode supports RAID 0 1 and 5 Hardware RAID The server supports RAID level 0 and 1 The RAID adapter should be installed in PCIe slot 1 The following RAID adapter options are available for this server ThinkSystem 4350 8i SAS SATA 12Gb HBA ThinkSystem RAID 5350 8i PCIe 12Gb Adapter For a list of supported adapters see https static lenovo com us en serverproven index shtml Note Hard...

Page 11: ...el Maximum 5 0 Bel Operating Typical 5 4 Bel Maximum 5 4 Bel Sound pressure level LpAm Idling Typical 25 dBA Maximum 37 dBA Operating Typical 40 dBA Maximum 40 dBA Notes 1 These sound levels were measured in controlled acoustical environments according to procedures specified by ISO 7779 and are reported in accordance with ISO 9296 2 The declared acoustic sound levels are based on the following co...

Page 12: ...ontamination Attention Airborne particulates including metal flakes or particles and reactive gases acting alone or in combination with other environmental factors such as humidity or temperature might pose a risk to the device that is described in this document Risks that are posed by the presence of excessive particulate levels or concentrations of harmful gases include damage that might cause t...

Page 13: ...ditions present at that data center The deliquescent relative humidity of the particulate contamination should be more than 60 RH 4 Data centers must be free of zinc whiskers 5 1 ANSI ISA 71 04 1985 Environmental conditions for process measurement and control systems Airborne contaminants Instrument Society of America Research Triangle Park North Carolina U S A 2 The derivation of the equivalence ...

Page 14: ...10 ThinkSystem ST50 V2 Setup Guide ...

Page 15: ...igure 3 Front view Table 3 Front view 1 Slim SATA optical disk drive optional 2 Front panel See Front panel on page 11 for more information 3 Front thermal sensor Front panel Some crucial key controls connectors and LEDs are located on the front panel of the server The following illustration shows the controls connectors and LEDs on the front panel of the server Copyright Lenovo 2022 2022 11 ...

Page 16: ... Gen2 connector 2 Drive activity LED white 6 Two USB 3 1 Gen1 connectors 3 Mic in connector Windows Client OS only 7 Two USB 3 2 Gen 2 connectors 4 Headset connector Windows Client OS only Notes USB 3 2 Gen 1 5 Gbps 640 MB s USB 3 2 Gen 2 10 Gbps 1280 MB s 1 Power button with power status LED white 12 ThinkSystem ST50 V2 Setup Guide ...

Page 17: ...ector is only supported by Windows Client OS 4 Headset connector Plug in headset with microphone to this connector A standard headphone or microphone can also be plugged into the connector Note This connector is only supported by Windows Client OS 5 USB Type C 3 2 Gen2 connector One USB Type C 3 2 Gen2 connector on the front panel that is available for a device that require USB 2 0 or 3 0 connecti...

Page 18: ...tical disk drive 11 Drive bay 1 One 3 5 inch SATA drive 4 Front bezel 12 Power supply unit 5 3V CMOS battery CR2032 13 PCIe slot 1 3 6 SATA 1 4 connectors 14 PCIe adapter retainer 7 Front fan 15 Cage bar 8 Mono amplifier speaker 16 Rear fan Optional components Rear view Refer this section to identify important components on the rear of the server 14 ThinkSystem ST50 V2 Setup Guide ...

Page 19: ...11 DisplayPort 1 connector Supported by processor with integrated graphic feature only 5 Kensington lock 12 Serial port connector 6 Power cord connector 13 Audio line out connector Windows Client OS only 7 Two USB 3 2 Gen1 connectors Notes USB 3 2 Gen 1 5 Gbps 640 MB s USB 3 2 Gen 2 10 Gbps 1280 MB s 1 Padlock loop This loop is available for installing a padlock See Server locks on page 17 for mor...

Page 20: ...ect an Ethernet cable to this connector for a LAN This connector comes with LED for status indication Table 9 Ethernet connector LED behavior Color Description Yellow The network is connected and active Orange The network bandwidth is 1Gb Green The network bandwidth is 100MB 10 11 DisplayPort connectors Connect a DisplayPort compatible video device such as a monitor to this connector Supported by ...

Page 21: ...ear of the server and is operated with a key or combination The cable lock also locks the buttons used to remove the server cover This is the same type of lock used with many notebook computers You can order an integrated cable lock directly from Lenovo by searching for Kensington at http datacentersupport lenovo com Figure 7 Kensington style cable lock Padlock This server comes with a padlock loo...

Page 22: ...Figure 8 Padlock System board components The illustration in this section shows the component locations on the system board Figure 9 System board components 18 ThinkSystem ST50 V2 Setup Guide ...

Page 23: ...nnector 12 SATA power 2 connector 25 Intrusion switch connector 13 Front fan connector RAID adapters Use this information to locate the connectors on the optional RAID adapters Figure 10 Connectors on SATA SAS RAID adapter 8i Note The RAID adapter should be installed in PCIe slot 1 Internal cable routing Some of the components in the server come with internal cables meant for specific connectors C...

Page 24: ... before removing the cables will damage the cable sockets on the system board which are fragile Any damage to the cable sockets might require replacing the system board Figure 11 Pressing the release tab to disengage the connector Figure 12 Squeezing the release tabs at both sides to disengage the connector 20 ThinkSystem ST50 V2 Setup Guide ...

Page 25: ...ive bay 1 Cable From To 1 1st 3 5 or 2 5 HDD SATA cable 185 mm Bay 1 drive signal connector SATA 1 connector 2 1st 3 5 and 2 5 HDD Power Cable 300 mm 80 mm Bay 1 drive power connector SATA power 2 connector Make sure to follow the Cable routing guidelines in Internal cable routing on page 19 For the system board connector locations see System board components on page 18 Chapter 2 Server components...

Page 26: ...nal connector SATA 2 connector 2 1st 3 5 and 2 5 HDD Power Cable 300 mm 80 mm Bay 2 drive power connector and bay 1 drive power connector SATA power 2 connector Make sure to follow the Cable routing guidelines in Internal cable routing on page 19 For the system board connector locations see System board components on page 18 22 ThinkSystem ST50 V2 Setup Guide ...

Page 27: ... cable 1 latch 520 mm Bay 3 drive signal connector SATA 3 connector 2 Slim ODD second 3 5 inch drive and 2 5 inch drive power cable 300 mm 210 mm 110 mm Bay 3 drive power connector SATA power 1 connector Make sure to follow the Cable routing guidelines in Internal cable routing on page 19 For the system board connector locations see System board components on page 18 Chapter 2 Server components 23...

Page 28: ...SATA cable 1 latch 520 mm Optical disk drive signal connector SATA 4 connector 2 Slim ODD second 3 5 inch drive and 2 5 inch drive power cable 300 mm 210 mm 110 mm Optical disk drive power connector SATA power 1 connector Make sure to follow the Cable routing guidelines in Internal cable routing on page 19 For the system board connector locations see System board components on page 18 24 ThinkSyst...

Page 29: ...ble 1 Connector for the RAID adapter connector C0 See RAID adapters on page 19 2 Connectors for the drives Cable routing for three drives with the RAID adapter Note The RAID adapter should be installed in PCIe slot 1 Figure 18 Cable routing for three drives with the RAID adapter Table 16 Cable routing for three drives with the RAID adapter Cable From To 1 Mini SAS HD to 4 SATA 7 pin cable 1a cable...

Page 30: ...mm 80 mm Bay 2 drive power connector and bay 1 drive power connector SATA power 2 connector 3 Slim ODD second 3 5 inch drive and 2 5 inch drive power cable 300 mm 210 mm 110 mm Bay 3 drive power connector SATA power 1 connector Make sure to follow the Cable routing guidelines in Internal cable routing on page 19 For the system board connector locations see System board components on page 18 26 Thi...

Page 31: ...apter 1b cable labeled as 2 Bay 3 drive signal connector 2 1st 3 5 and 2 5 HDD Power Cable 300 mm 80 mm Bay 2 drive power connector and bay 1 drive power connector Note Depending on server configuration SATA power 2 connector 3 Slim ODD second 3 5 inch drive and 2 5 inch drive power cable 300 mm 210 mm 110 mm Bay 3 drive power connector SATA power 1 connector Make sure to follow the Cable routing ...

Page 32: ...r 8 pin SATA connector for processor power Processor power connector Note The 2x2 pins marked in grey are for 300W PSU 2 Micro fit to 1X15P and 1X4P Y splitter power cable 15 pin connector for system power System power connector Note 1 and 2 are parts of the same Y splitter cable Make sure to follow the Cable routing guidelines in Internal cable routing on page 19 For the system board connector lo...

Page 33: ...front fan and rear fan Table 19 Cable routing for the heat sink and fan module From To 1 Front fan cable Front fan connector 2 Rear fan cable Rear fan connector Make sure to follow the Cable routing guidelines in Internal cable routing on page 19 For the system board connector locations see System board components on page 18 Chapter 2 Server components 29 ...

Page 34: ...able routing for the heat sink and fan module for processor with TDP lower than 95W Figure 23 Cable routing for the heat sink and fan module for processor with 95W TDP Table 20 Cable routing for the heat sink and fan module From To 1 Heat sink and fan module cable Processor heat sink fan power connector 30 ThinkSystem ST50 V2 Setup Guide ...

Page 35: ...Make sure to follow the Cable routing guidelines in Internal cable routing on page 19 For the system board connector locations see System board components on page 18 Chapter 2 Server components 31 ...

Page 36: ...the intrusion switch Figure 24 Cable routing for the intrusion switch Table 21 Cable routing for the intrusion switch From To 1 Intrusion switch cable Intrusion switch connector For the system board connector locations see System board components on page 18 32 ThinkSystem ST50 V2 Setup Guide ...

Page 37: ...22 Cable routing for the thermal sensor From To 1 Thermal sensor cable Thermal sensor connector Note If applicable place the thermal sensor cable under the M 2 drive Make sure to follow the Cable routing guidelines in Internal cable routing on page 19 For the system board connector locations see System board components on page 18 Chapter 2 Server components 33 ...

Page 38: ...ing for the mono amplifier Table 23 Cable routing for the mono amplifier From To 1 Mono amplifier cable Mono amplifier connector Make sure to follow the Cable routing guidelines in Internal cable routing on page 19 For the system board connector locations see System board components on page 18 34 ThinkSystem ST50 V2 Setup Guide ...

Page 39: ...or the power button with LED Table 24 Cable routing for the power button with LED From To 1 Power button with LED cable Power button with LED connector Make sure to follow the Cable routing guidelines in Internal cable routing on page 19 For the system board connector locations see System board components on page 18 Chapter 2 Server components 35 ...

Page 40: ...listing of parts for your server Figure 28 Server components The parts listed in the following table are identified as one of the following Tier 1 customer replaceable unit CRU Replacement of Tier 1 CRUs is your responsibility If Lenovo installs a Tier 1 CRU at your request with no service agreement you will be charged for the installation Tier 2 customer replaceable unit CRU You may install a Tie...

Page 41: ...e for your server 2 Click Parts 3 Enter the serial number to view a listing of parts for your server 1 Intrusion switch 2 Optical disk drive 3 Bezel kit including the optical disk drive bezel and latch 4 Fan kit including the front fan and rear fan 5 Cable kit including the mono amplifier thermal sensor and the power button cable 6 Chassis with front bezel and server cover 7 3 5 inch hard disk dri...

Page 42: ...rts listing continued Index Description Tier 1 CRU Tier 2 CRU FRU Consumable and Structural parts 20 Heat sink and fan module for processor with 95W TDP 21 3V CMOS battery CR2032 38 ThinkSystem ST50 V2 Setup Guide ...

Page 43: ... Standards Association CSA For units intended to be operated at 115 volts Use a UL listed and CSA certified cord set consisting of a minimum 18 AWG Type SVT or SJT three conductor cord a maximum of 15 feet in length and a parallel blade grounding type attachment plug rated 15 amperes 125 volts For units intended to be operated at 230 volts U S use Use a UL listed and CSA certified cord set consist...

Page 44: ...40 ThinkSystem ST50 V2 Setup Guide ...

Page 45: ...he Ethernet cables and power cords to the server See Rear view on page 14 to locate the connectors See Cable the server on page 98 for cabling best practices d Power on the server See Power on the server on page 99 e Validate that the server hardware was set up successfully See Validate server setup on page 99 3 Configure the system a Update the firmware for the server if necessary See Update the ...

Page 46: ...s Make sure that you have an adequate number of properly grounded electrical outlets for the server monitor and other devices Back up all important data before you make changes related to the disk drives Have a small flat blade screwdriver a small Phillips screwdriver and a T8 torx screwdriver available You do not have to turn off the server to remove or install hot swap power supplies or hot plug...

Page 47: ...lowing checklist to verify that there are no potentially unsafe conditions 1 Make sure that the power is off and the power cord is disconnected 2 Check the power cord Make sure that the third wire ground connector is in good condition Use a meter to measure third wire ground continuity for 0 1 ohm or less between the external ground pin and the frame ground Make sure that the power cord is the cor...

Page 48: ...static sensitive devices Follow this procedure to handle static sensitive devices Attention Prevent exposure to static electricity which might lead to system halt and loss of data by keeping static sensitive components in their static protective packages until installation and handling these devices with an electrostatic discharge wrist strap or other grounding system Limit your movement to preven...

Page 49: ...server supports independent mode only Independent mode provides high performance memory capability You can populate all channels with no matching requirements Individual channels can run at different DIMM timings but all channels must run at the same interface frequency Make sure to adhere to the following rules All memory modules installed should be identical in type and capacity Do not mix memor...

Page 50: ...ed by same memory capacity Xeon E3 23XX up to 3200 MT s Pentium Gold up to 2666 MT s See the following for the maximum memory speed supported 8GB 1Rx8 DIMM Xeon E3 23XX up to 3200 MT s Pentium Gold up to 2666 MT s 16GB 2Rx8 Xeon E3 23XX up to 2933 MT s Pentium Gold up to 2400 MT s Drive bay locations See the following illustration for the locations of drive bays and the types of drives supported F...

Page 51: ...s Follow this procedure to remove the server from the rails S002 CAUTION The power control button on the device and the power switch on the power supply do not turn off the electrical current supplied to the device The device also might have more than one power cord To remove all electrical current from the device ensure that all power cords are disconnected from the power source S014 CAUTION Haza...

Page 52: ... of this procedure is available at YouTube https www youtube com playlist list PLYV5R7hVcs AU3iY3F7lq3qfqr5caGbIu Procedure Note Your system might looks slightly different from the illustration below Step 1 Remove the two M6 x 16 screws on the front of the rack cabinet Figure 31 Removing the screws on the front of the rack cabinet Step 2 Remove the server from the rails a Slide and pull the rack s...

Page 53: ... button on the device and the power switch on the power supply do not turn off the electrical current supplied to the device The device also might have more than one power cord To remove all electrical current from the device ensure that all power cords are disconnected from the power source S014 CAUTION Hazardous voltage current and energy levels might be present Only a qualified service technici...

Page 54: ...e cover up Watch the procedure A video of this procedure is available at YouTube https www youtube com playlist list PLYV5R7hVcs AU3iY3F7lq3qfqr5caGbIu Procedure Step 1 Place the server on its side with the cover up Step 2 Remove the serve cover a Use a screwdriver to remove the two screws that secure the server cover to the chassis b Slide the server cover away from the front bezel and lift it up...

Page 55: ...ive cage on page 75 then proceed to the following procedures a Push the latch on the cage bar until the cage bar is disengaged from the chassis b Rotate the cage bar and remove it from the chassis Figure 34 Removing the cage bar Remove the front bezel Follow this procedure to remove the front bezel Chapter 3 Server hardware setup 51 ...

Page 56: ...all external cables see Power off the server on page 99 If the server is in a rack remove it from the rack See Remove the server from the rails on page 47 Remove any locking device that secures the server such as a Kensington lock or a padlock Place the server on its side with the cover up Watch the procedure A video of this procedure is available at YouTube https www youtube com playlist list PLY...

Page 57: ...the CMOS battery CR2032 S002 CAUTION The power control button on the device and the power switch on the power supply do not turn off the electrical current supplied to the device The device also might have more than one power cord To remove all electrical current from the device ensure that all power cords are disconnected from the power source Chapter 3 Server hardware setup 53 ...

Page 58: ...t Recycle or discard the battery as instructed by local regulations About this task Attention Read Safety inspection checklist on page 43 and Installation Guidelines on page 41 to ensure that you work safely Turn off the server and peripheral devices and disconnect the power cords and all external cables see Power off the server on page 99 If the server is in a rack remove it from the rack See Rem...

Page 59: ...tery CR2032 on page 89 Note Make sure to install the CMOS battery before powering on the server Otherwise it might cause system abnormality 2 Dispose the CMOS battery as required by local ordinances or regulations Install a simple swap drive and drive cage bay 1 2 Follow this procedure to install a simple swap drive and drive cage into bay 1 or bay 2 Remove a simple swap drive bay 1 2 Follow this ...

Page 60: ...e https www youtube com playlist list PLYV5R7hVcs AU3iY3F7lq3qfqr5caGbIu Procedure Step 1 Make preparation for this task a Remove the server cover see Remove the server cover on page 49 Attention The heat sink and processor could be very hot To avoid burning yourself wait for a few minutes after turning off the server before you remove the server cover Step 2 Disconnect every cable from the drive ...

Page 61: ...b Lift the drive assembly out from the drive bay Figure 38 Removing drive assembly from drive bay 2 Chapter 3 Server hardware setup 57 ...

Page 62: ...ve a 3 5 inch drive from the retainer Figure 39 Removing a 3 5 inch drive from the retainer Note Depending on the configuration the 3 5 inch drive may be the model in the illustration below Remove a 2 5 inch drive from the retainer Figure 40 Removing a 2 5 inch drive from the retainer 58 ThinkSystem ST50 V2 Setup Guide ...

Page 63: ...d state drive in drive bay 2 For a complete list of supported optional devices for the server see https static lenovo com us en serverproven index shtml If there are more than one drives to be installed determine installation order based on the following rules Start with solid state drives and proceed with hard disk drives When installing one 3 5 inch solid state drive and one 3 5 inch hard disk d...

Page 64: ...the retainer apart b Align the four holes on the drive with the corresponding pins on the retainer then fit the drive into the retainer Note The drive connectors should face the retainer handles Install a 3 5 inch drive into the retainer Figure 42 Installing a 3 5 inch drive into the retainer 60 ThinkSystem ST50 V2 Setup Guide ...

Page 65: ...h drive into the retainer Figure 43 Installing a 2 5 inch drive into the retainer Step 2 Face the retainer handles upward and push the drive assembly into the drive bay Press the drive assembly firmly to ensure it is seated correctly Install 3 5 inch drive assembly into drive bay 1 Chapter 3 Server hardware setup 61 ...

Page 66: ... Figure 45 Install 2 5 inch drive assembly into drive bay 2 Step 3 Connect the signal and power cable to the system board see Internal cable routing on page 19 After you finish 1 Check the drive activity LED on the front panel to verify if the drives are operating correctly 62 ThinkSystem ST50 V2 Setup Guide ...

Page 67: ...device ensure that all power cords are disconnected from the power source About this task Attention Read Safety inspection checklist on page 43 and Installation Guidelines on page 41 to ensure that you work safely Watch the procedure A video of this procedure is available at YouTube https www youtube com playlist list PLYV5R7hVcs AU3iY3F7lq3qfqr5caGbIu Procedure Note Install the bay 1 drive cage f...

Page 68: ...and attache bay 2 drive cage to bay 1 drive cage then slide the bay 2 drive cage downward until the four hooks on both drive cages are fully engaged Make sure the latch on the bay 2 drive cage is also engaged with the hook on bay 1 drive cage Figure 47 Installing the drive bay 2 cage 64 ThinkSystem ST50 V2 Setup Guide ...

Page 69: ...sconnect the power cords and all external cables see Power off the server on page 99 If the server is in a rack remove it from the rack See Remove the server from the rails on page 47 Remove any locking device that secures the server such as a Kensington lock or a padlock Place the server on its side with the cover up Watch the procedure A video of this procedure is available at YouTube https www ...

Page 70: ...procedure to install a simple swap drive to bay 3 S002 CAUTION The power control button on the device and the power switch on the power supply do not turn off the electrical current supplied to the device The device also might have more than one power cord To remove all electrical current from the device ensure that all power cords are disconnected from the power source About this task Attention R...

Page 71: ...bay 3 Start with the drive with the lowest capacity Start with bay 1 proceed to bay 2 and bay 3 Note Drives of different types and different capacities are allowed to be installed in one server but not in the same RAID array The drives in a single RAID array must be the same type and the same capacity See https sysmgt lenovofiles com help topic LXPML RAID_setup html for more details Watch the proc...

Page 72: ...n page 19 3 Check the drive activity LED on the front panel to verify if the drives are operating correctly Table 29 Drive activity LED behavior Status Color Description Solid on White The drives are active Off None The drives are not active 4 Use the Lenovo XClarity Provisioning Manager Lite to configure the RAID if necessary For more information see https sysmgt lenovofiles com help topic LXPML ...

Page 73: ...kage that contains the component to any unpainted metal surface on the server then remove it from the package and place it on a static protective surface Watch the procedure A video of this procedure is available at YouTube https www youtube com playlist list PLYV5R7hVcs AU3iY3F7lq3qfqr5caGbIu Procedure Step 1 Optional Install the EMI shielding included in the component packaging to the chassis No...

Page 74: ...age with the corresponding hooks on the 3 5 inch drive cage then lower the optical drive cage onto the 3 5 inch drive cage and slide the optical drive forward until it secures into place Note Make sure the four hooks on both drive cages are fully engaged b Fasten the captive screw to secure the two drive cages together Figure 52 Installing the 3 5 inch drive cage to the optical drive cage 70 Think...

Page 75: ...eral devices and disconnect the power cords and all external cables see Power off the server on page 99 If the server is in a rack remove it from the rack See Remove the server from the rails on page 47 Remove any locking device that secures the server such as a Kensington lock or a padlock Place the server on its side with the cover up Watch the procedure A video of this procedure is available at...

Page 76: ...Pull out the retainer to disengage it from the optical drive b Slide the retainer downward and remove it from the optical drive Figure 54 Removing optical drive retainer Step 4 Optional Pull the optical drive bezel away to remove it from the optical drive 72 ThinkSystem ST50 V2 Setup Guide ...

Page 77: ...smitters are installed note the following Do not remove the covers Removing the covers of the laser product could result in exposure to hazardous laser radiation There are no serviceable parts inside the device Use of controls or adjustments or performance of procedures other than those specified herein might result in hazardous radiation exposure About this task Attention Read Safety inspection c...

Page 78: ...release tab on top of the drive bay shield b Rotate the drive bay shield and remove it from the front bezel Figure 56 Removing the optical drive bay shield Step 2 Optional Install the optical drive retainer a Align the pin on the bottom of the retainer and the corresponding slot on the optical drive then insert the pin into the slot b Insert the rest two pins on retainer to the corresponding slots...

Page 79: ...rive a From outside of the chassis insert the optical drive into the chassis b Slide the optical drive inward until the latch snaps into place Figure 59 Installing the optical drive Step 5 Connect the signal and power cable to the system board see Internal cable routing on page 19 Remove the optical drive cage Follow this procedure to remove the optical drive cage Chapter 3 Server hardware setup 7...

Page 80: ...e the server from the rails on page 47 Remove any locking device that secures the server such as a Kensington lock or a padlock Place the server on its side with the cover up Watch the procedure A video of this procedure is available at YouTube https www youtube com playlist list PLYV5R7hVcs AU3iY3F7lq3qfqr5caGbIu Procedure Step 1 Make preparation for this task a Remove the server cover see Remove...

Page 81: ...om the device ensure that all power cords are disconnected from the power source S006 CAUTION When laser products such as CD ROMs DVD drives fiber optic devices or transmitters are installed note the following Do not remove the covers Removing the covers of the laser product could result in exposure to hazardous laser radiation There are no serviceable parts inside the device Use of controls or ad...

Page 82: ...drive and the drive cage bay 3 on page 65 Step 3 Install the optical drive cage a Align the four pins on the sides of the optical drive cage with the four slots on the chassis and cage bar then lower the optical drive cage into the chassis b Ensure the optical drive cage is seated correctly then rotate the optical drive cage handle toward the front of the chassis to secure the optical drive cage i...

Page 83: ...ge that contains the component to any unpainted metal surface on the server then remove it from the package and place it on a static protective surface Watch the procedure A video of this procedure is available at YouTube https www youtube com playlist list PLYV5R7hVcs AU3iY3F7lq3qfqr5caGbIu Procedure Step 1 Optional If you are installing an intrusion switch option assemble the intrusion switch In...

Page 84: ...cord To remove all electrical current from the device ensure that all power cords are disconnected from the power source About this task Attention 1 Read Safety inspection checklist on page 43 and Installation Guidelines on page 41 to ensure that you work safely 2 Touch the static protective package that contains the component to any unpainted metal surface on the server then remove it from the pa...

Page 85: ...rs gently pull the tips of the four rubber mounts though the holes until the fan is secured to the chassis Figure 64 Installing the front fan or the rear fan Note Make sure the rubber mounts are fully pulled out of the holes to secure the fans steadily to the chassis Figure 65 Front fan and rear fan rubber mounts installation Step 3 Connect the fan cable to the system board see Internal cable rout...

Page 86: ...e to static discharge and require special handling In addition to the standard guidelines of Handling static sensitive devices on page 44 Always wear an electrostatic discharge strap when removing or installing memory modules Electrostatic discharge gloves can also be used Keep each memory module separated from one another Do not stack memory modules directly on top of each other during storage Ke...

Page 87: ...Figure 66 Opening the memory module retaining clips Chapter 3 Server hardware setup 83 ...

Page 88: ...er control button on the device and the power switch on the power supply do not turn off the electrical current supplied to the device The device also might have more than one power cord To remove all electrical current from the device ensure that all power cords are disconnected from the power source About this task Attention Read Safety inspection checklist on page 43 and Installation Guidelines...

Page 89: ... M 2 drive onto the M 2 drive retainer c Insert the retainer post into the retainer to secure the M 2 drive in place Figure 68 Installing the M 2 drive Install the M 2 drive retainer Follow this procedure to install the M 2 drive retainer S002 CAUTION The power control button on the device and the power switch on the power supply do not turn off the electrical current supplied to the device The de...

Page 90: ...e retainer toward the 2 5 inch drive to secure it in place Figure 69 Installing the M 2 drive retainer About this task Install an M 2 drive see Install an M 2 drive on page 84 Install a PCIe adapter Follow this procedure to install a PCIe adapter S002 CAUTION The power control button on the device and the power switch on the power supply do not turn off the electrical current supplied to the devic...

Page 91: ...apter Notes The RAID adapter should be installed in PCIe slot 1 Pentium processor supports up to PCI Express 3 0 When installing PCIe x8 x16 adapter to PCIe Slot 3 the PCIe adapter performance might be degraded due to the bandwidth of PCIe slot 3 x4 For a list of the supported PCIe adapters see https static lenovo com us en serverproven index shtml The PCIe adapter might look different from the il...

Page 92: ... page 3 Step 3 Install the PCIe adapter a Align the PCIe adapter to the slot then gently press both ends of the PCIe adapter until it is securely seated in the slot with the retaining clip clicks into the locked position b Rotate the PCIe adapter retainer towards the chassis until it snaps into locked position 88 ThinkSystem ST50 V2 Setup Guide ...

Page 93: ...follow the safety statements Lenovo has designed this product with your safety in mind The CMOS battery must be handled correctly to avoid possible danger If you install the CMOS battery do adhere to the following instructions Note In the U S call 1 800 IBM 4333 for information about battery disposal If you replace the original CMOS battery with a heavy metal battery or a battery with heavy metal ...

Page 94: ...ains lithium and can explode if not properly used handled or disposed of Do not Throw or immerse into water Heat to more than 100 C 212 F Repair or disassemble Dispose of the battery as required by local ordinances or regulations S005 CAUTION The battery is a lithium ion battery To avoid possible explosion do not burn the battery Exchange it only with the approved part Recycle or discard the batte...

Page 95: ...power control button on the device and the power switch on the power supply do not turn off the electrical current supplied to the device The device also might have more than one power cord To remove all electrical current from the device ensure that all power cords are disconnected from the power source About this task Attention Read Safety inspection checklist on page 43 and Installation Guideli...

Page 96: ...The power control button on the device and the power switch on the power supply do not turn off the electrical current supplied to the device The device also might have more than one power cord To remove all electrical current from the device ensure that all power cords are disconnected from the power source S014 CAUTION Hazardous voltage current and energy levels might be present Only a qualified...

Page 97: ...u are installing a new server cover attach the service label to the inside of the new server cover if necessary Note A new server cover comes without a service label attached If you need a service label order it together with the new server cover The service label is free of charge Watch the procedure A video of this procedure is available at YouTube https www youtube com playlist list PLYV5R7hVcs...

Page 98: ...e slots on the side of the chassis Ensure that all the tabs on the cover align are engaged with chassis properly then slide the cover towards the front bezel until it snaps in place b Use a screwdriver to fasten the two screws to secure the cover to the chassis 94 ThinkSystem ST50 V2 Setup Guide ...

Page 99: ...urn off the electrical current supplied to the device The device also might have more than one power cord To remove all electrical current from the device ensure that all power cords are disconnected from the power source S014 CAUTION Hazardous voltage current and energy levels might be present Only a qualified service technician is authorized to remove the covers where the label is attached Chapt...

Page 100: ...s and all external cables see Power off the server on page 99 Note To install rails to rack see the Rail Installation Guide at https thinksystem lenovofiles com help topic rail_options rail_options_tower_servers html Watch the procedure A video of this procedure is available at YouTube https www youtube com playlist list PLYV5R7hVcs AU3iY3F7lq3qfqr5caGbIu Procedure Step 1 Install the four brackets...

Page 101: ...en align the server with the brackets and the tab on the front of the tray and gently place the server on the tray Figure 78 Installing the server to the tray 1 Server cover 2 Server front bezel Step 4 Install the server into the rack cabinet a Lift the rail latches on both sides b Gently slide and push the tray into the rack cabinet Chapter 3 Server hardware setup 97 ...

Page 102: ...80 Securing the tray with screws Cable the server Attach all external cables to the server Typically you will need to connect the server to a power source to the data network and to storage In addition you will need to connect the server to the management network Connect to power Connect the server to power 98 ThinkSystem ST50 V2 Setup Guide ...

Page 103: ...em Security The system has been tempered with it means the server cover is not properly installed Remove and reinstall it see Remove the server cover on page 49 and Install the server cover on page 92 then restart the server For information about powering off the server see Power off the server on page 99 Validate server setup After powering up the server make sure that the LEDs are lit and that t...

Page 104: ...100 ThinkSystem ST50 V2 Setup Guide ...

Page 105: ...n to learn about how to set up the firmware for the server Starting the Setup Utility program Follow this procedure to start the Setup Utility program To start the Setup Utility program complete the following steps Step 1 Power on or restart the server Step 2 Before the operating system starts up repeatedly press and release F1 It will lead to the text based BIOS interface Note If a BIOS password ...

Page 106: ...l Defaults is selected the Intelligent Cooling Performance Mode will return to its default settings as Best Performance Make sure to set the Performance Mode according to your system configuration Three modes are available in Performance Mode menu Best Experience This mode allows the server to work with less noise at normal thermal level and applies to the following configuration Up to two drives ...

Page 107: ... the following topics if you decide to set any passwords To start the Setup Utility program complete the following steps Password Types The following types of passwords are available in the Setup Utility program Power on password When a power on password is set you are prompted to enter a valid password each time the server is turned on The server cannot be used until the valid password is entered...

Page 108: ...e of the screen to set change or delete a password Note A password can be any combination of up to 64 alphabetic and numeric characters For more information see Password considerations Step 5 To save settings and exit the Setup Utility program press F10 then select Yes in the displayed window and press Enter Erasing lost or forgotten passwords clearing CMOS To erase a lost or forgotten password co...

Page 109: ... are applicable as startup device To select a temporary startup device complete the following steps Step 1 Depending on the type of the storage device do one of the following If the storage device is internal skip to Step 2 the next step on page 105 If the storage device is a disc ensure that your server is turned on Then insert the disc into the optical drive If the storage device is an external ...

Page 110: ... across the drives A virtual drive also known as virtual disk or logical drive is a partition in the drive group that is made up of contiguous data segments on the drives Virtual drive is presented up to the host operating system as a physical disk that can be partitioned to create OS logical drives or volumes An introduction to RAID is available at the following Lenovo Press website https lenovop...

Page 111: ...efi boot bootX64 efi Step 4 Restart the system Before the operating system starts up press F1 to enter the Setup Utility Go to Security Secure Boot and disable the option Step 5 To save settings and exit the Setup Utility program press F10 then select Yes in the displayed window and press Enter Step 6 Restart the system Before the operating system starts up repeatedly press and release F12 until S...

Page 112: ...ve the USB flash drive and press ALT CTRL DEL to restart the system Step 9 Before the operating system starts up press F1 to enter the Setup Utility Go to Main System Summary to make sure VPD has been properly updated 108 ThinkSystem ST50 V2 Setup Guide ...

Page 113: ...er incompatible or too much for the power supply to support 2 Make sure the power cord is securely connected to the server and to a working electrical outlet Disconnect and reconnect or replace the server power cord 3 Remove and reinstall the power supply If the problem persists replace the power supply 4 Disconnect and reconnect the front panel cable see System board components on page 18 for the...

Page 114: ...ly connected 3 Make sure the drive is enabled Go to Setup Utility and select Devices ATA Drive Setup to see if the drive in question is enabled If not enable it 4 If the server comes with LXPM Lite go to Diagnostics HDD test to perform diagnostics on the drives Replace the drive that is displayed as faulty Otherwise skip to the next step 5 Remove the drives until the system reaches minimal drive r...

Page 115: ...nding driver is installed The device is seated correctly without physical damage on the device or connector System firmware has been updated to the latest version You followed the installation instructions that came with the device and the device is installed properly You have not loosened any other installed devices or cables 3 Reseat the device 4 Replace the device Voltage planar fault is displa...

Page 116: ...112 ThinkSystem ST50 V2 Setup Guide ...

Page 117: ... try to solve the problem yourself Check all cables to make sure that they are connected Check the power switches to make sure that the system and any optional devices are turned on Check for updated software firmware and operating system device drivers for your Lenovo product The Lenovo Warranty terms and conditions state that you the owner of the Lenovo product are responsible for maintaining an...

Page 118: ...mation such as error messages and logs As an alternative to calling Lenovo Support you can go to https support lenovo com servicerequest to submit an Electronic Service Request Submitting an Electronic Service Request will start the process of determining a solution to your problem by making the pertinent information available to the service technicians The Lenovo service technicians can start wor...

Page 119: ...Intel and Xeon are trademarks of Intel Corporation in the United States other countries or both Microsoft and Windows are trademarks of the Microsoft group of companies Linux is a registered trademark of Linus Torvalds Other company product or service names may be trademarks or service marks of others Copyright Lenovo 2022 2022 115 ...

Page 120: ...116 ThinkSystem ST50 V2 Setup Guide ...

Page 121: ......

Page 122: ......

Reviews: