6.
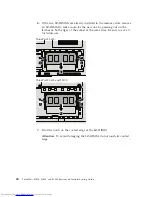
If the two SO-DIMMs are already installed in the memory slots, remove
an SO-DIMM to make room for the new one by pressing out on the
latches on both edges of the socket at the same time. Be sure to save it
for future use.
ThinkPad SL 300:
2
1
1
ThinkPad SL 400 and SL500:
2
1
1
7.
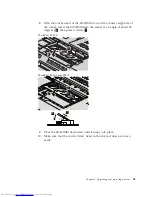
Find the notch on the contact edge of the SO-DIMM.
Attention:
To avoid damaging the SO-DIMM, do not touch its contact
edge.
40
ThinkPad
®
SL300, SL400, and SL500 Service and Troubleshooting Guide
Summary of Contents for 2746AD4 - ThinkPad SL500 2746
Page 1: ...ThinkPad SL300 SL400 and SL500 Service and Troubleshooting Guide ...
Page 2: ......
Page 3: ...ThinkPad SL300 SL400 and SL500 Service and Troubleshooting Guide ...
Page 36: ...28 ThinkPad SL300 SL400 and SL500 Service and Troubleshooting Guide ...
Page 40: ...32 ThinkPad SL300 SL400 and SL500 Service and Troubleshooting Guide ...
Page 47: ...ThinkPad SL 500 2 1 Chapter 5 Upgrading and replacing devices 39 ...
Page 52: ...44 ThinkPad SL300 SL400 and SL500 Service and Troubleshooting Guide ...
Page 60: ...52 ThinkPad SL300 SL400 and SL500 Service and Troubleshooting Guide ...
Page 68: ...60 ThinkPad SL300 SL400 and SL500 Service and Troubleshooting Guide ...
Page 78: ...70 ThinkPad SL300 SL400 and SL500 Service and Troubleshooting Guide ...
Page 81: ......
Page 82: ...Part Number 43Y6727 Printed in China 1P P N 43Y6727 ...


