


What to do next:
• To work with another piece of hardware, go to the appropriate section.
• To complete the removal procedure, go to “Completing the parts replacement” on page 90.
Installing the microprocessor
Attention:
Do not open your server or attempt any repair before reading and understanding the
Safety Information
and the
Warranty and Support Information
on the
ThinkServer Documentation DVD
that came with your product, and
“Guidelines” on page 21. To obtain a copy of the publications, go to:
http://www.lenovo.com/support
This section provides instructions on how to install the microprocessor.
CAUTION:
The heat sink and microprocessor might be very hot. Turn off the server and wait three to
five minutes to let the server cool before removing the server cover.
For optimal performance, follow these microprocessor installation rules:
1. When two microprocessors are installed, both must have the same core voltage and core speed.
2. When only one microprocessor is installed, it must be in the microprocessor 1 socket. The other
socket must be empty.
3. Always install the microprocessor first into the microprocessor 1 socket, and then install another
microprocessor into the microprocessor 2 socket if you want to install two microprocessors.
To install the microprocessor, do the following:
1. Remove all media from the drives and turn off all attached devices and the server. Then, disconnect all
power cords from electrical outlets and disconnect all cables that are connected to the server.
2. Remove the server cover. See “Removing the server cover” on page 23.
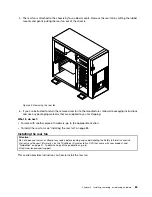
3. Lay the server on its side for easier operation.
4. Remove the heat sink and fan assembly if necessary. See “Removing the heat sink and fan assembly”
on page 71.
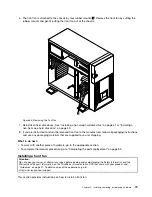
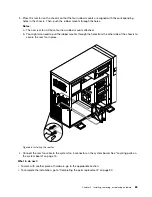
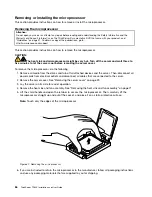
5. Press down and gently push the small handle a little bit outward on the microprocessor socket to lift the
handle to the open position.
Figure 68. Lifting the handle
Chapter 5
.
Installing, removing, or replacing hardware
87
Summary of Contents for 102912U
Page 1: ...ThinkServer TD230 Installation and User Guide Machine Types 1027 1029 1039 and 1040 ...
Page 2: ......
Page 3: ...ThinkServer TD230 Installation and User Guide Machine Types 1027 1029 1039 and 1040 ...
Page 12: ...x ThinkServer TD230 Installation and User Guide ...
Page 16: ...4 ThinkServer TD230 Installation and User Guide ...
Page 32: ...20 ThinkServer TD230 Installation and User Guide ...
Page 106: ...94 ThinkServer TD230 Installation and User Guide ...
Page 136: ...124 ThinkServer TD230 Installation and User Guide ...
Page 140: ...128 ThinkServer TD230 Installation and User Guide ...
Page 153: ......
Page 154: ......