background image

Operation

32 

PROVIDO Ref. 10732418 / Version 03


PROVIDO Ref. 10732418 / Version 03 33

8.2  Positioning the microscope 

8.2.1  Coarse positioning


X

Hold the microscope by both handles.


X

Press the button for releasing all brakes and position the 
microscope.


X

Release the brakes button.

Also refer to the "Handles" chapter on page 22.

CAUTION
Damage to the PROVIDO due to uncontrolled tilting.


X

Hold the handle when releasing the brake.

8.2.2  Fine positioning (optional)


X

Position the microscope with the XY drive using the joystick on 
the handle or the joystick on the footswitch.

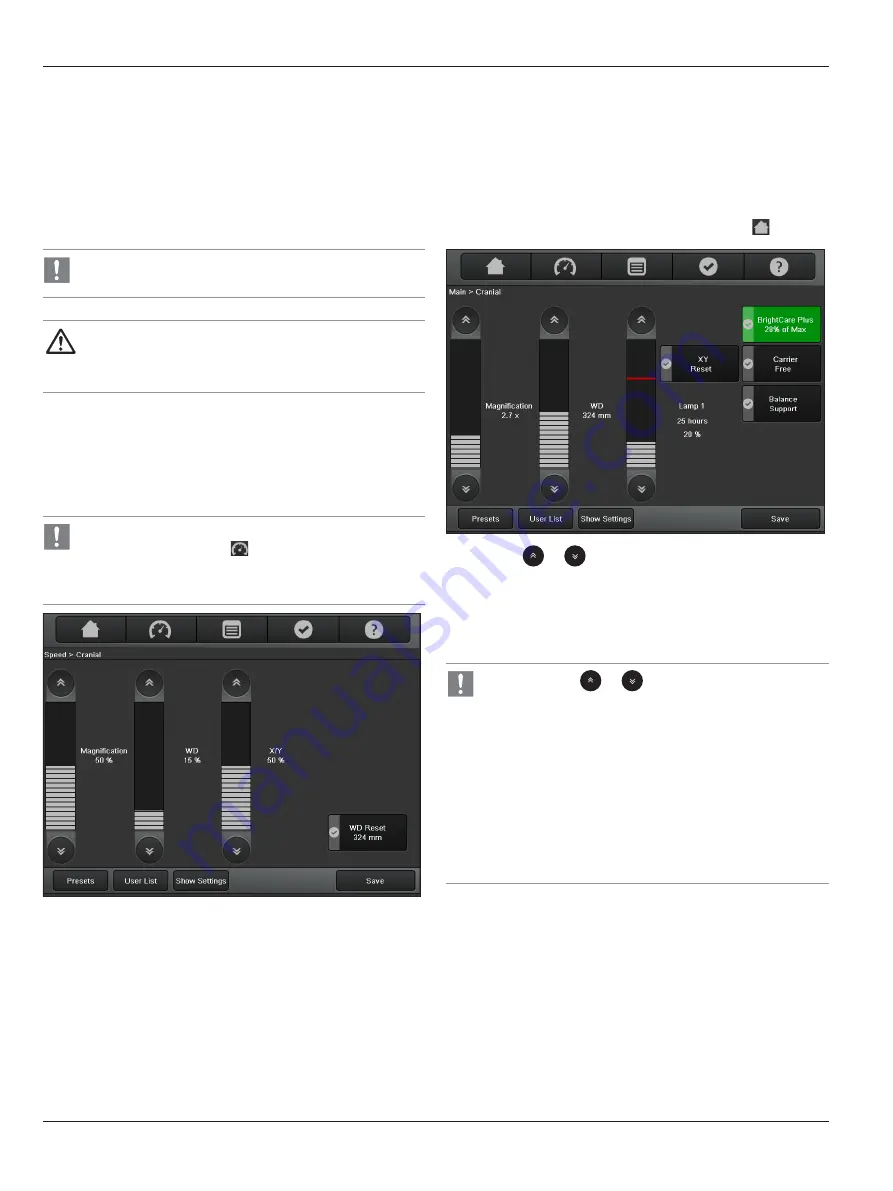
You can change the speed at which the XY motors move on 
the "Speed" menu screen  .
This value can be saved individually for each user 
(see page 41).

8.3  Adjusting the microscope

8.3.1  Adjusting the brightness

You can make the illumination brighter or darker using either the 
touch panel monitor, a hand/footswitch, or handle.

On the touch panel monitor in the "Main" menu screen 


X

Press the 

 or 

 button on the bar for adjusting the 

brightness of the illumination "Lamp 1" or "Lamp 2".

– or –


X

Press the brightness adjustment bar directly.
The brightness of the active main illumination changes.

•  Clicking the 

 or 

 button changes the brightness 

value in increments of 1. Holding down the button with 
your finger changes the value in increments of 5.

•  The start setting can be saved individually for each user 

(see page 41).

•  The main illumination can only be switched on and off 

using the illumination push-button on the stand.

•  The brightness setting is also visible when the 

illumination is off. However, the display bar will appear 
darker.

On the footswitch/handle

Depending on the assignment (see page 44), you can also 
increase and decrease the brightness of the main illuminator using 
two correspondingly assigned buttons on the footswitch/handle.

Summary of Contents for PROVIDO

Page 1: ...From Eye to Insight MEDICAL DIVISION User Manual 10732418 Version 03 PROVIDO...

Page 2: ...Tel 41 71 726 3333 Fax 41 71 726 3334 Legal disclaimer All specifications are subject to change without notice The information provided by this manual is directly related to the operation of the equi...

Page 3: ...the operating table 27 7 8 Attaching sterile controls and drape 29 7 9 Function check 30 8 Operation 31 8 1 Switching the microscope on 31 8 2 Positioning the microscope 32 8 3 Adjusting the microsco...

Page 4: ...use which if not avoided may result in appreciable material financial and environmental damage Information about use that helps the user to employ the product in a technically correct and efficient wa...

Page 5: ...ning operation and maintenance Monitor compliance with this X Only use the PROVIDO surgical microscope if it is free of defects X Inform your Leica representative or Leica Microsystems Schweiz AG Medi...

Page 6: ...Always push the PROVIDO surgical microscope at the handrail and never pull it X Make sure that the movement range is free WARNING Risk of injury due to downward movement of the surgical microscope X A...

Page 7: ...ls adjust the working distance manually WARNING Danger injury to the eyes due to laser radiation X Never point the laser directly or indirectly via reflecting surfaces to the eyes X Never point the la...

Page 8: ...magnification motor X Only adjust the magnification manually if the magnification motor is defective CAUTION Destruction of the working distance motor X Only adjust the working distance manually if t...

Page 9: ...ransport position to the operating position X Ensure that the transport lock must be locked CAUTION Damage to other medical equipment or injury to personnel X Take care of monitor movement when rotati...

Page 10: ...Safety notes 8 PROVIDO Ref 10732418 Version 03 3 7 Signs and labels 11 12 17 20 21 22 27 24 26 25 19 10 14 Recording system optional see chapter 10 Monitor arm optional see chapter 10...

Page 11: ...nd Canada 12 MET label 13 Follow the user manual 14 Equipotential bonding 15 Laser label 16 17 RISK GROUP 3 WARNING IR emitting from this product Do not look at operating lamp WARNING Possibly hazardo...

Page 12: ...ANVISA Registration number only brazil 21 INMETRO label only brazil 22 Lamp Switch Label 23 Lamp On Off 24 LAN Local Area Network Label Optional 25 UDI Label Production Identifier PI Serial number Da...

Page 13: ...arm also referred to as Parallelogram 2 XY coupling optional 3 C sledge 4 Microscope carrier 5 Handles 6 Leica M530 optics carrier 7 Tubes 8 Video monitor optional 9 Base 10 Handrail 11 Documentation...

Page 14: ...switchable either to the left or to the right side 4 2 3 Leica M530 with ULT530 Optics carrier with integrated camera for visible light Leica HD C100 optional Interface for assistants either to the le...

Page 15: ...NG Danger of tilting if load exceeds permitted load X The load placed on the microscope interface must not exceed 8 5 kg X Install the necessary accessories on the PROVIDO see page 25 X Connect the po...

Page 16: ...ckwise until the PROVIDO is in balance with the brakes released Tilt the PROVIDO by 90 The PROVIDO tilts forward X Turn rotary knob B 2 counter clockwise until the PROVIDO is in balance with the brake...

Page 17: ...The system is balanced X If the rotary knob 5 cannot be turned easily hold the articulate arm higher or lower in a position where the rotary knob can be turned easily 5 2 Brakes The PROVIDO has 6 elec...

Page 18: ...n the brake combination Focus Lock is activated 5 2 3 Selected Brakes Carrier Free The following movements can be performed with the surgical microscope when the Carrier Free mode is activated The Car...

Page 19: ...tance is changed from 600 to 225 mm Ev light intensity Iv brightness d distance from light source This means that less light is required to work with the microscope at a shorter distance than at a gre...

Page 20: ...microscope Exit of the laser beams Laser Course of the laser beams Laser 6 Controls 6 1 PROVIDO microscope with arm system 1 C sledge 2 Microscope carrier 3 Handle clamping lever 4 Handle 5 B sledge 6...

Page 21: ...Leica M530 with ULT530 Leica FL800 ULT a or with Leica FL560 for M530 b 3 a 3 a b 3 Optical fiber connection 6 1 3 Optics carrier controls Leica M530 with Top plate Leica M530 with IVA530 5 4 2 3 1 6...

Page 22: ...e 10 Receiver Remote Control Camera 11 Rotary knob Working distance emergency operation only 12 Rotary knob Manual override AutoIris 13 Rotary knob Magnification emergency operation only 14 Assistant...

Page 23: ...AD F Additional Function 6 4 Stand 2 3 4 5 6 1 Equipotential bonding socket For connecting the PROVIDO to an equipotential bonding device This is part of the customer s building installation Observe...

Page 24: ...other keys presets are available according to your task 6 5 1 Presets for Cranial Spinal ENT Handles Joystick available with premium handles only Y Y Y Y X X X X Handles Buttons F F Magni fication Wor...

Page 25: ...e CAUTION Surgical microscope can move without warning X Always lock the footbrake when you are not moving the system CAUTION Damage to the PROVIDO due to uncontrolled tilting X Grasp the handles secu...

Page 26: ...by depressing the foot lever 6 X Move the PROVIDO by the handrail 5 7 2 Locking unlocking the PROVIDO 7 2 1 Locking the parallelogram WARNING Risk of injury due to downward movement of the surgical m...

Page 27: ...of operation X Before changing accessories always lock the PROVIDO X Balance the PROVIDO after re equipping it X Do not release the brakes when the instrument is in an unbalanced state X Before re equ...

Page 28: ...l ensure that the image will stay in focus within the entire magnification range parfocal The surgical microscope ensures a high degree of fatigue resistance when the diopter setting is correct for bo...

Page 29: ...r re equipping it X Do not release the brakes when the instrument is in an unbalanced state X Before re equipping during the operation first swing the microscope away from the operating field X Never...

Page 30: ...table by the handle and into the required position for the operation Recommendations for positioning the PROVIDO on the OP table All positions are also possible as the mirror image position The instr...

Page 31: ...and AutoIris manual override knobs X Attach steam sterilizable covers to accessories as well if present 7 8 2 Sterile drape for stand Only use the sterile Leica tested drapes specified in the Accesso...

Page 32: ...s Do not drape further than to position 1 CAUTION Risk of overheating of the system Covering the air inlet 2 can result in a controlled shutdown of the system due to overheating X Make sure the air in...

Page 33: ...und frequently X Cover the exposed parts of the pinna with a moist surgical sponge X Connect the microscope to a grounded socket X Secure power cable 2 at the stand with the power cable clip 1 1 2 X S...

Page 34: ...or darker using either the touch panel monitor a hand footswitch or handle On the touch panel monitor in the Main menu screen X Press the or button on the bar for adjusting the brightness of the illum...

Page 35: ...ity until an optimum level of illumination is achieved When shipped from the factory the BrightCare Plus safety function is activated for all users Deactivating BrightCare Plus Deactivating BrightCare...

Page 36: ...ter than the field of view and the light intensity is too high uncontrolled tissue heating may occur outside of the area visible through the microscope X Do not set the light intensity too high With A...

Page 37: ...es the value in increments of 5 You can adjust the magnification motor speed in the Speed menu These values can be saved individually for each user see page 41 WARNING Danger to the patient due to fai...

Page 38: ...tance changes Clicking the or button changes the working distance in increments of 1 Holding down the button with your finger changes the value in increments of 5 You can adjust the working distance m...

Page 39: ...ess key 1 again The yellow LED 2 turns off and the working distance is released 8 3 7 Adjusting the video fine focus optional The Leica FL800 ULT and ULT530 offer fine focusing and parfocality reset o...

Page 40: ...not transport or store the system in areas with an elevation angle bigger than 10 CAUTION Damage to the housing of the stand or to the touch panel of the control unit If the optics carrier is moved i...

Page 41: ...ve substances These substances can scratch the surface and cause it to be become dull 9 1 Menu structure 1 2 3 4 5 1 Quick access to the screens Main Speed Menu and Help 2 Status line 3 Display range...

Page 42: ...gs of the current user 9 2 2 User list The User List opens a two page user list from which you can select one of up to thirty users that can be saved X Click the 1 15 or 16 30 button to switch between...

Page 43: ...oon as the basic settings of the current users have been changed either for the current user Save or under a new username Save as New Editing the user list Various functions are available in the user...

Page 44: ...ssword PIN 4 10 characters X Press OK for re entering and confirmation If the re entered password PIN does not match the enter re enter process has to be repeated If no password PIN should be defined...

Page 45: ...ne Holding down the button with your finger changes the value in increments of five X You can also set the desired value by directly clicking the bars Intelligent Focus Speed X If Intelligent Focus Sp...

Page 46: ...using X You can scroll forwards or backwards in the list by clicking the arrowheads X In the left selection field select the function group with the desired functions X You can scroll forwards or bac...

Page 47: ...d can neither be overwritten nor deleted X In the left selection field select the function group with the desired functions X You can scroll forwards or backwards in the list by clicking the arrowhead...

Page 48: ...mend a life time of 150 hours 9 3 8 AutoFocus Settings AutoFocus is an optional function and can be ordered additionally AutoFocus does not work during FL800 mode The small grey field in the middle re...

Page 49: ...The button for the preselected brake combination lights up green CAUTION Risk of damage X Only move the surgical microscope when all brakes are released 9 3 10 Saving user settings X Click the Save bu...

Page 50: ...ufficient 9 4 2 Maintenance Check Switches On this screen you can test your handles and the optional footswitch Top right selection field In this field you can select the connection you are using or t...

Page 51: ...es being used by the surgeon X Scroll forwards or backwards in the list by clicking the arrowheads If you do not make a selection the magnification is calculated for the standard equipment binocular t...

Page 52: ...100 for IVA530 Footswitches Leica Wireless Footswitch 14 functions type B Leica Wireless Footswitch 12 functions type B Recording Systems Evolution 4K500 Camera Systems Leica Camera System HD C100 Mon...

Page 53: ...ecommended to conclude a service contract with Leica Service 11 2 Cleaning the touch panel X Before cleaning the touch panel switch off your PROVIDO and disconnect it from the power supply X Use a sof...

Page 54: ...ch the hot lamp insert X Remove the defective lamp insert 3 or 4 and install a new lamp insert available from Leica Microsystems X Close the access door X Switch on the surgical device A lamp test for...

Page 55: ...per cloth Storage and transport No special requirements It is recommended to perform the reprocessing of a product immediately following its use Preparation for cleaning X Remove the product from the...

Page 56: ...rview of the available sterilizable components to the surgical microscopes of Leica Microsystems Schweiz AG Medical Division Permissible sterilization methods Products Article No Designation Steam aut...

Page 57: ...inator see page 34 Light intensity below expectation Fiber optics cable not in place properly X Check connection of fiber optics cable Lamp life time over X Check lamp life time and change bulbs if re...

Page 58: ...amera was not correctly mounted and touches the arm system X Properly install the video camera PROVIDO is not correctly balanced Position of accessory was changed after balancing X Balance out PROVIDO...

Page 59: ...Lamp1 defective Lamp 1 is defective X After the operation replace lamp 1 Lamp2 defective Lamp 2 is defective X After the operation replace lamp 2 Exhaust fan defective The exhause fan is defective X...

Page 60: ...igh voltage part BrightCare Plus Safety function through working distance dependent limitation of the brightness controlled by a built in luxmeter SpeedSpot Laser focussing aid for fast and exact posi...

Page 61: ...s IR sensor for remote control of the external Leica HD C100 camera Leica M530 with IVA530 Integrated video adapter for attachment of an external C mount video camera preferably with sensor size 1 3 F...

Page 62: ...s Carrier for monitor 610 mm long and flexible arm with 180 rotation and inclination to carry optional video monitor Materials All solid metal construction Surface coating system Coated with antimicro...

Page 63: ...ard ISO 13485 relating to quality management and quality assurance 14 7 Limitations of use The PROVIDO may be used only in closed rooms and must be placed on a solid floor The PROVIDO is not suitable...

Page 64: ...30 with Beamsplitter and 180 Dual Stereo Attach 1 2 3 4 1 Optics carrier 2 Top plate 3 Beamsplitter 4 180 Dual Stereo Attachment 1 Side assistant left or right 1 Videoadapter opposite side assistant T...

Page 65: ...ed binocular tube T Type II 0 74 kg 10448668 O Magnification multiplier 0 28 kg M Binoculartubeforbackassistant 10446797 S Binocular tube var 30 150 T Type II L Recommended 0 81 kg 10448088 S Binocula...

Page 66: ...on Comment Restrictions Weight Total M Videoadapter Only 1 piece left or right 10448215 S ZVA 0 74 kg S MVA RVA 0 40 kg O Camera Recommended Leica HD C100 0 12 kg O Laser micro manipulator O Laser fil...

Page 67: ...rier NOTE Destruction of the IVA530 optics X Do not use the Zoom Video Adapter in combination with Leica M530 with IVA530 1 or 2 side assistants switchable only one active Camera Magn Multipl Tube 0 1...

Page 68: ...ion multiplier 0 28 kg 1xM 1xO Sideobservation Only left or right side observation gets light at the same time switch 10448597 S Stereo attachment 1 01 kg 10446797 S Binocular tube var 30 150 T Type I...

Page 69: ...th Leica FL560 NOTE Destruction of the ULT530 optics X Do not use any video adapter in combination with the ULT530 Optional Side assistant Magnification Multiplier Tube 30 150 Tube 0 180 Ergo Wedge St...

Page 70: ...t 10448597 S Stereo attachment 1 01 kg 10446797 S Binocular tube var 30 150 T Type II L Recommended 0 81 kg 10446587 S Straight binocular tube T Type II 0 72 kg 10446618 S Inclined binocular tube 45 T...

Page 71: ...anipulator O Laser filter 0 4 pieces main back sides 10448028 S Eyepiece 10x 2 eyepieces per binocular tube 0 10 kg 10448125 S Eyepiece 8 3x 0 10 kg 10443739 S Eyepiece 12 5x 0 10 kg 10446058 O Protec...

Page 72: ...Specifications 70 PROVIDO Ref 10732418 Version 03 14 9 Dimensional drawings 45 95 30 360 150 180 25 32 270 max 1487 1801 1975 Dimensions in mm...

Page 73: ...ef 10732418 Version 03 71 700 700 2390 lowest without XY coupling 790 without XY coupling 1222 highest without XY coupling 1650 lowest with XY coupling 700 with XY coupling 1132 highest with XY coupli...

Page 74: ...tting for the selected user 4 Function check X Check the fiber optics cable connection to the optics carrier X Connect the power cable X Switch on the microscope X Switch on the illuminator at the con...

Page 75: ...PROVIDO Ref 10732418 Version 03 73...

Page 76: ...435 Heerbrugg 2020 Printed 11 2020 Subject to modifications LEICA and the Leica Logo are registered trademarks of Leica Microsystems IR GmbH Leica Microsystems Schweiz AG Max Schmidheiny Strasse 201 C...

Reviews: