motor overheated.
Troubleshoot the cause (cords or similar items that
impede movement, surface too rough, etc.) and press
the reset breaker (the first from the top).
The motor relay or the brush motor is broken.
Replace it.
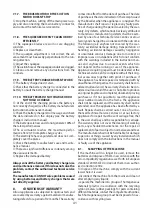
7.1.4. NOT ENOUGH OR TOO MUCH DETERGENT
The detergent solution tank is empty.
Fill the detergent solution tank after having emp-
tied the recovery tank.
The brushes or the machine is stopped.
Activate the brushes and press the control lever.
The flow adjustment lever is closed or almost closed.
Adjust/increase the detergent solution outlet flow
as required.
The cleaning solution filter is clogged.
Clean the filter.
The detergent feed conduit is clogged in some point.
Clean out the conduit by removing the dirt.
The flow-opening solenoid valve is burnt out.
Replace it.
40
7.1.5. NO SUCTION
The suction hose is not connected to the squeegee.
Connect it correctly.
The suction hose or the squeegee conduit are clogged.
Clean out and remove any obstructions from the
conduits.
The suction motor is turned off.
Activate it.
The recovery tank is full.
Empty it.
The suction motor is not receiving electric power
or is burned.
Check the connections and, for the latter case,
replace the motor.
7.1.6. INSUFFICIENT SUCTION
The recovery tank drain hose plug is not perfectly
closed.
Close it correctly.
The suction hose, the squeegee conduit or the
inspection compartment is clogged.
Clean out and remove any obstructions from the
conduits.
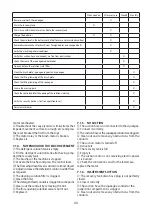
When needed
After every use
Weekly Monthly
Remove and wash the squeegee
X
Drain the recovery tank
X
Drain, rinse with clean water or sanificate the recovery tank
X
Charge the batteries
X
X
Check the acid level in the battery cells (if batteries are not maintenance-free)
X
Remove brushes and check for brush wear, foreign bodies and wrapped belts
X
Verify the machine general conditions.
X
Verify that suction hose and conduct are free from obstructions
X
Check the wear of the squeegee rubber blades
X
Open and clean the solution water filter
X
Clean the brush plate, squeegee support and squeegee
X
Check the lifting/lowering of the brush plate.
X
Check the lifting/lowering of the squeegee.
X
Grease the moving parts.
X
Check the control cable for the opening of the solution water tap.
X
Verify the security devices ( traction operation lever ).
X
Descale water hoses.
X
Summary of Contents for Fasa A5 EVO 50
Page 3: ...3 2 1 3 A B 6 1 3 4 5 2 E AC 230V...
Page 4: ...4 C D 2 2A 3A 3B 3C 1A 1 3 6 3 4 5 1 8 2 B DC 24V 7...
Page 6: ...6 H G 1 2 1 3 2 I...
Page 7: ...7 1 2 L M 1 1 4 4 3 2 5 7 6 5 2 6...
Page 8: ...8 N O 1 1 2 3 3 2 4...
Page 9: ...9 P 1...
Page 95: ...95 1 1 1 1 2 2 10 1 3 1 4...
Page 96: ...96 1 5 2 2 1 4 35 10 50 30 95 2 10...
Page 97: ...97 2 2...
Page 98: ...98 3 3 1 3 2 3 3 C C 3 4...
Page 99: ...99 4 4 1 4 1 1 20 20 20h 5 5 5h 5 5 20 20 24 4 1 2 4 1 3 I 2 G 1 3 I 1 I 2...
Page 104: ...104 5 4 M 6 M 6 M 3 5 5 M 6 5 6 6 5 M 4 M 6 M 4 M 6 6 4 5 7 M 2 45 M 2 M 7 5 8 5 9...
Page 105: ...105 1 1 5 10 50 C 3 4 2 2 2 P 1 5 11 3 1...
Page 106: ...106 5 D 6 F 7 3 5 12 AC 230V AC230 AC 230V 5 13 230V 1 1 ON 2 B 5 A 3 3 2 4 DC 24V D 7 D 1 3 1...
Page 108: ...108 6 11 6 6 1 50 6 2 M 3 6 3 6 4 6 5 6 6...
Page 109: ...109 6 7 6 8 6 8 1 6 8 2 6 8 3 6 9...
Page 110: ...110 7 7 1 7 1 1 1 C 30 7 1 2 5 7 1 3 7 1 4 7 1 5 7 1 6 7 1 7...
Page 111: ...111 7 1 8 7 1 9 7 1 10 100 20 30 8 12 8 1 2013 56 EU...
Page 112: ...112 8 2 2012 19 EU 2012 19 EU...
Page 130: ...130 8...
Page 131: ...131 7 3 12...
Page 132: ...132 6...
Page 133: ...133 5 2 10...
Page 134: ...134 4 4 35 10 50 30 95...
Page 135: ...135 3 5 1 CE CE 2 1 2...
Page 136: ...136 2 3 1 CE 4 1...
Page 137: ...137 1 1 1 1 1 2...
Page 153: ...153...
Page 231: ...231...
Page 247: ...247 1 1 1 1 2 2 10 1 3 a 1 4...
Page 248: ...248 1 5 2 2 1 4 C 35 C 10 C 50 C 30 95 2 10...
Page 249: ...249 2 2 3 3 1 3 2 3 3...
Page 250: ...250 3 4 4 4 1 Ah 20 C20 20h 5 C5 5h C5 C20 Pb Acid...
Page 255: ...255 1 Pb Pb 5 4 M 6 6 M 3 5 5 6 5 6 6 5 M 4 M 6 M 4 M 6 6 4 5 7 M 7 2 45 M 2 M 7 5 8...
Page 256: ...256 5 9 OFF 1 cm 1 cm OFF 5 10 L 50 C N 4 N 3 2 N 2 2 L Q 1 5 11 N 3 0 1...
Page 259: ...6 11 6 259 6 1 50 6 2 X X X X X X X X X X X X X X X X X X...
Page 260: ...260 3 6 3 6 4 6 5 6 6 BPb 3 AGM 6 6 7...
Page 261: ...261 6 8 6 9 7 7 1 7 1 1 ON 30 7 1 2 5 7 1 3 7 1 4 7 1 5 7 1 6...
Page 262: ...262 7 1 7 7 1 8 7 1 9 7 1 10 100 20 30 8 12...
Page 263: ...263 8 1 2013 56 8 2 WEEE 2012 19 2012 19 EU...
Page 265: ...265 1 1 1 1 2 2 2 10 1 3 1 4...
Page 266: ...266 1 5 2 2 1 4 C 35 C 10 C 50 C 30 95 2 10...
Page 267: ...267 2 2 134 3 3 1 3 2 3 3...
Page 268: ...268 3 4 4 4 1 4 1 1 Ah 20 C20 20h 5 C5 5h C5 C20 24...
Page 274: ...274 5 8 5 9 1 cm 1 cm 5 10 50 C N 4 N 3 G 2 N 2 2 cm 5 11...
Page 277: ...6 13 6 14 3 5 14 5 277 6 11 6 X X X X X X X X X X X X X X X X X X...
Page 278: ...278 6 1 50 6 2 M 3 6 3 6 4 6 5 6 6...
Page 279: ...279 3 AGM 6 6 7 6 8 6 9 7 7 1 7 1 1 1 30 7 1 2 5 7 1 3 7 1 4...
Page 280: ...280 7 1 5 7 1 6 7 1 7 7 1 8 7 1 9 7 1 10 100 20 30 8 12...
Page 281: ...281 8 1 2013 56 E 8 2 2012 19 2012 19...
Page 282: ......
Page 283: ......
Page 284: ......

