background image


Predátor  P 56RX


29 


Handling and Storage 

-


The  stump  cutter  is  allowed  to  be  transported  to  site  either  on  a 

trailer or on a low-bed truck. It is not designed to go on public roads.  

-


As an option you can get a special trailer directly by the machine manufacturer. 

-


When loading the cutter on a trailer, fasten retention chains, straps or cables to 
the  machine  chassis.  Do  not  put  them  over  or  against  hydraulic  hoses.  Make 
sure that they do not cause damage to rubber tracks. Fasten each corner of the 
machine and fasten the front arm to the trailer / vehicle bed with a chain / strap 
or a suitable anchor. 

-


Remember to use a purpose-designed ramp or a loading platform for loading 
and unloading the stump cutter. The ramp must be strong enough to support the 
weight of the machine (min. carrying capacity of 2000 kg).  

-


Do  not  load  the  machine  by  means  of  ramps  and  emergency  controls  if  the 
height  of  loading  area  exceeds  750  mm.  Otherwise  these  controls  should  get 
beyond the reach of your hands - accident risk.  

-


Before loading expand the track base to maximum.  

-


Avoid any handling with inclination exceeding the permissible limit of 11

o

-


While  loading  and  transporting  the  cutter  never  operate  any  control  levers 
except for the drive control levers when going up or down a ramp. Actuating 
other  levers  can  cause  the  machine  to  become  unbalanced  and  tip  over. 

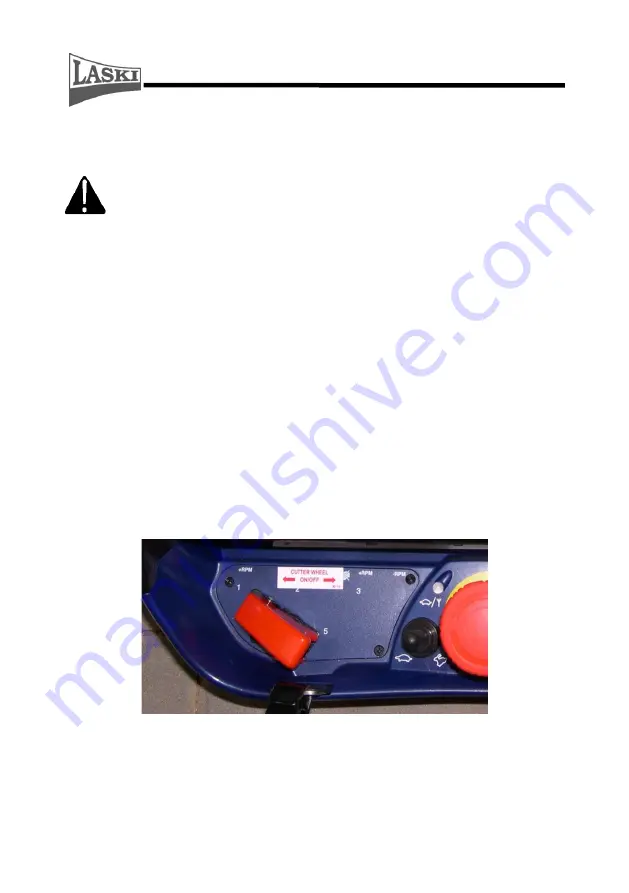
The 

switch for cutting head control must be closed by its red cover


(fig. 12)


Fig. 12 - Driver running milling cutter 


-


When  going  to  another  working  site  always  ascend  and  descend  slopes  very 
carefully and with the cutting head up hill. Before going on hilly terrain expand 
the track base to maximum. 

Summary of Contents for Predator

Page 1: ...Orig version 07 2020 OPERATING INSTRUCTIONS STUMP CUTTER Pred tor P56 RX...

Page 2: ...instructions for users i e instructions for putting the machine into operation work safety and operating experiences You will learn how to carry out maintenance repairs and servicing and who is author...

Page 3: ...9 PRODUCT DELIVERY 20 HANDLING 20 PRECAUTIONS IN DESIGN 21 CONTROLS 21 NOISE AND VIBRATIONS 25 USE 26 BEFORE PUTTING INTO OPERATION 26 HANDLING AND STORAGE 29 CHECKLIST BEFORE OPERATION 31 STARTING TH...

Page 4: ...Pred tor P 56RX 4 MAINTENANCE OF ENGINE 46 MAINTENANCE INTERVALS 49 FAILURES AND TROUBLESHOOTING 50 WARRANTY 57 SERVICE REPORT 58...

Page 5: ...Pred tor P 56RX 5...

Page 6: ...Pred tor P 56RX 6...

Page 7: ...orm concerning the given product and your dealer Tab 1 Basic information Product type Product serial number Engine type Engine serial number Dealer s address Address of authorised service Date of deli...

Page 8: ...of overturning the machine Always ascend and descend slopes with the cutting head up hill Before trying to go up a slope make sure that the engine and the hydraulic system has reached normal operatin...

Page 9: ...capability Before working learn all functions of individual controls and safety elements and carry out functional checks before any use Make sure if necessary operating and ancillary space is free and...

Page 10: ...great care when maintaining the hydraulic system since oil is very hot when the machine has just finished working Do not let the engine running at high speed unreasonably Do not attempt to detect cont...

Page 11: ...c energy If the wooden material to be cut contains not allowed parts such as metal sand glass etc then such objects can reach a longer distance than wooden chips The operator of this machine is fully...

Page 12: ...rk do not hesitate and stop the machine immediately Any fault particularly on rotary parts may cause fatal and dangerous situations Observe the working area If any person children or animals approach...

Page 13: ...uards removed ELECTRICAL SHOCKS Never touch electrical wires or components while the engine is running they can be sources of electrical shocks ROTATING HEAD When the engine is turned off the cutting...

Page 14: ...finished the work first turn off the cutting head drive only and reduce the engine speed to idling While idling wait for about 1 minute to let the engine and its turbo set cool down Repeated and too...

Page 15: ...parts pull in hazard 7 8 9 10 11 12 Warning Keep extremities away squeeze hazard Warning Lower extremities injury hazard Warning Cutting head runs out Warning Close all guards before starting the mach...

Page 16: ...ts track width Its travel gear is powered by hydrodrive with continuous regulation Adjustment of the track base can be done also by means of a hydraulic cylinder Profiled rubber tracks are stretched o...

Page 17: ...aulic valves installed under the cover at the rear of the machine Hydraulic system It is designed for transmission of the torque from the driving engine to the working elements powered by a hydraulic...

Page 18: ...kg 233 Cooling liquid Cooling fluid G 12 nebo G12 Starter elektric Battery lead acid 92 Ah 12V For winter periods we recommend hydraulic oil ISO VG 32 With a dozer Use the same sort of Diesel fuel as...

Page 19: ...nd the trailer wheels are chocked prior to attempting to move the stump cutter onto from the trailer If loading on a gradient always ensure that the trailer wheels are adequately chocked Failure to do...

Page 20: ...t put them over or against hydraulic hoses Make sure that they do not cause damage to rubber tracks Fasten each corner of the machine and fasten the front arm to the trailer vehicle bed with a chain s...

Page 21: ...nwanted sinking in case of a sudden failure or leakage in the hydraulic system This stump cutter can be operated by means of a remote control box and the operator can stand off not in the close proxim...

Page 22: ...Response speed control of hydraulics 5 LED of response speed control of hydraulics 6 Cutting head switch with safety cover 7 Cutter arm up down 8 Left track forward back 9 Variable track width contro...

Page 23: ...hine controls 1 battery disconnector hydraulic oil thermometer 2 STOP button emergency stopping of machine 3 engine speed controller 4 flashing light indicator 5 fuel tank filler neck 6 quick couplers...

Page 24: ...g head switch external hydraulic circuit control for attachments 2 switch for control of chassis scraper 3 light beacon switch ON OFF 4 working lights switch ON OFF 5 voltmeter 6 receptacle 12V 7 swit...

Page 25: ...ponse for cutter arm Noise and Vibrations While in duty the stump cutter Predator P56 RX brings the following emissions Engine speed while being measured 2200 rpm Measurement 1 measured values recorde...

Page 26: ...utting into Operation This stump cutter is delivered completely mounted and ready to use For servicing or spare parts contact your dealer or an authorised service Use always original spare parts Check...

Page 27: ...bolted joints especially of guards and completeness of other parts For the engine operation use Diesel fuel NM4 only winter Diesel fuel NM20 according to season Keep this machine beyond children s an...

Page 28: ...pump again or try to crank the engine by turning the ignition key shortly Keep an interval between two starts standstill 30 sec at least When the engine roars to life let the engine run warm at highe...

Page 29: ...strong enough to support the weight of the machine min carrying capacity of 2000 kg Do not load the machine by means of ramps and emergency controls if the height of loading area exceeds 750 mm Other...

Page 30: ...local regulations Remove any spilled oil and clean all oily spots properly Always put the machine aside on a flat and solid floor and block it against unwilling motion by means of scotch blocks Do no...

Page 31: ...y of guards and completeness of other parts Check out the cutting head for its condition attachment and wear of blades bolts etc Check out condition of the blades Replace them if worn or damaged CAUTI...

Page 32: ...box fig 14 Ensure that the red emergency stop button is out Turn ignition key one position clockwise Wait till the LEDs stop flashing This is the preheat mode and will vary depending on ambient temper...

Page 33: ...ton above Fig 14 Switch box 1 removable ignition key 2 display 3 free 4 free 5 button for parameters change 6 Indicator lamp Do not crank the engine for a longer time than 10 sec Keep an interval betw...

Page 34: ...under conditions of low visibility especially at foggy weather when you may overlook persons coming Operate it only at daylight or with sufficient lighting Every operator of this machine is fully res...

Page 35: ...ze of cut layers depends on speed and cutting depth Try to keep the same engine speed while cutting Optimal working conditions could be adapted by response speed control of hydraulics cutter arm respo...

Page 36: ...top button may damage the engine Do not turn off the engine while still running in its max speed First reduce the engine speed to idling While idling wait for about 1 minute to let the engine cool dow...

Page 37: ...uring appliances and skilled attendants If necessary ask for help by an authorised service in order to inspect or to recharge the battery particularly after a longer operational break exceeding 50 day...

Page 38: ...the slot fig 16 Check the groove in the top of the keeper plate and the edges underneath that locate with the blade If these are damaged replace 3 Check the condition of the slot If it is badly worn...

Page 39: ...eper block together Tap the front of the keeper block until it is located fig 19 Insert the bolt and tighten it to a torque of 55 Nm After about ten minutes of use stop and check bolt tightness again...

Page 40: ...aw blade LASKI Replacement of the LASKI blades fig 22 Loosen the bolts 10 Replace the blades by new ones Tighten the new blades slightly Use the torque wrench and tighten the bolts with a torque of 11...

Page 41: ...ly installed and in good condition Immediately repair all damage and replace worn or broken parts Remove any build ups of grease oil or debris regularly Check up hydraulic hoses for oil leaks and or d...

Page 42: ...When temperature variation ranges are very high we recommend using synthetic oils with E P properties and minimum 165 viscosity index and viscosity class VG Fig 24 Tracked chassis components 62 Gearb...

Page 43: ...nnect a grease gun to grease the nipple 73 and pump grease until the track tightens so that there is 10 15 mm of sag Then stop it Front idler locking It is not normal for the track to remain tight aft...

Page 44: ...g a steel tube and turn the driving gear again Make sure the track links mesh correctly with the sprocket and with the front idler wheel Adjust track tension as set out previously Replace the cover an...

Page 45: ...tally Remove both plugs and check that the oil level is up to their holes Top up as necessary filling through one of the holes and using the other to check the oil level Replacement of oil in the gear...

Page 46: ...ng conditions Grease points for the tracked undercarriage widening cylinder pins can be found when the tracks are extended to maximum Grease more regularly if working in dusty or wet conditions Maz n...

Page 47: ...g 29 Oil level checks Air suction checks Should heavy fouling with dust deposits be detected then maintenance must be performed at shorter intervals accordingly Check up the air intake resp the cyclon...

Page 48: ...ble with this machine for voltages 12 to 30 V DC The other option is 240 V with an adapter The battery pack is rechargeable and of Nickel Cadmium NiCd type The normal charging time for an empty unchar...

Page 49: ...aintenance Intervals Tab 5 Machine maintenance Maintenance intervals Maintenance to be done Every 8 15 hours respectively daily checks before starting Engine oil hydraulic oil top up if necessary Air...

Page 50: ...ighten the cylinder head nuts Make sure that all retaining bolts on the cutting head are tight Every 500 hours Change the fuel pre filter Check out and adjust if necessary valve clearance Check out al...

Page 51: ...broken Change Problemati c starting at low temperatur es Failure of pre heating system See Engine Manual SERVICE Jellied fuel Check of fuel qualities at injection nozzle it should be clear not turbid...

Page 52: ...Check and remedy SERVICE Engines with disconnecti ng automatics STOP indication from control elements low oil pressure too high engine temperature air filter fouled check oil level check cooling syste...

Page 53: ...e set in motion Blown fuse Replace Insufficient cutting quality Blades blunt Remove blades and regrind resp change them as needed SERVICE Note The note SERVICE in the Remedy column means that this ope...

Page 54: ...Pred tor P 56RX 54 ELECTRIC CIRCUITRY...

Page 55: ...Pred tor P 56RX 55...

Page 56: ...Pred tor P 56RX 56 HYDRAULICS...

Page 57: ...d actions on the machine Usage of unoriginal spare parts or parts intended for other models Disobedience to instructions for use Damage of the machine caused by faulty handling maintenance or overload...

Page 58: ...Pred tor P 56RX 58 Service Report...

Page 59: ...Pred tor P 56RX 59 LASKI s r o 798 17 SMR ICE 263 CZECH REPUBLIC tel fax 00420582381152 e mail info laski cz http www laski cz...

Reviews: