background image

6

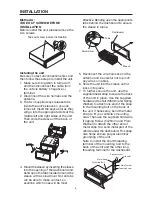
Method A:

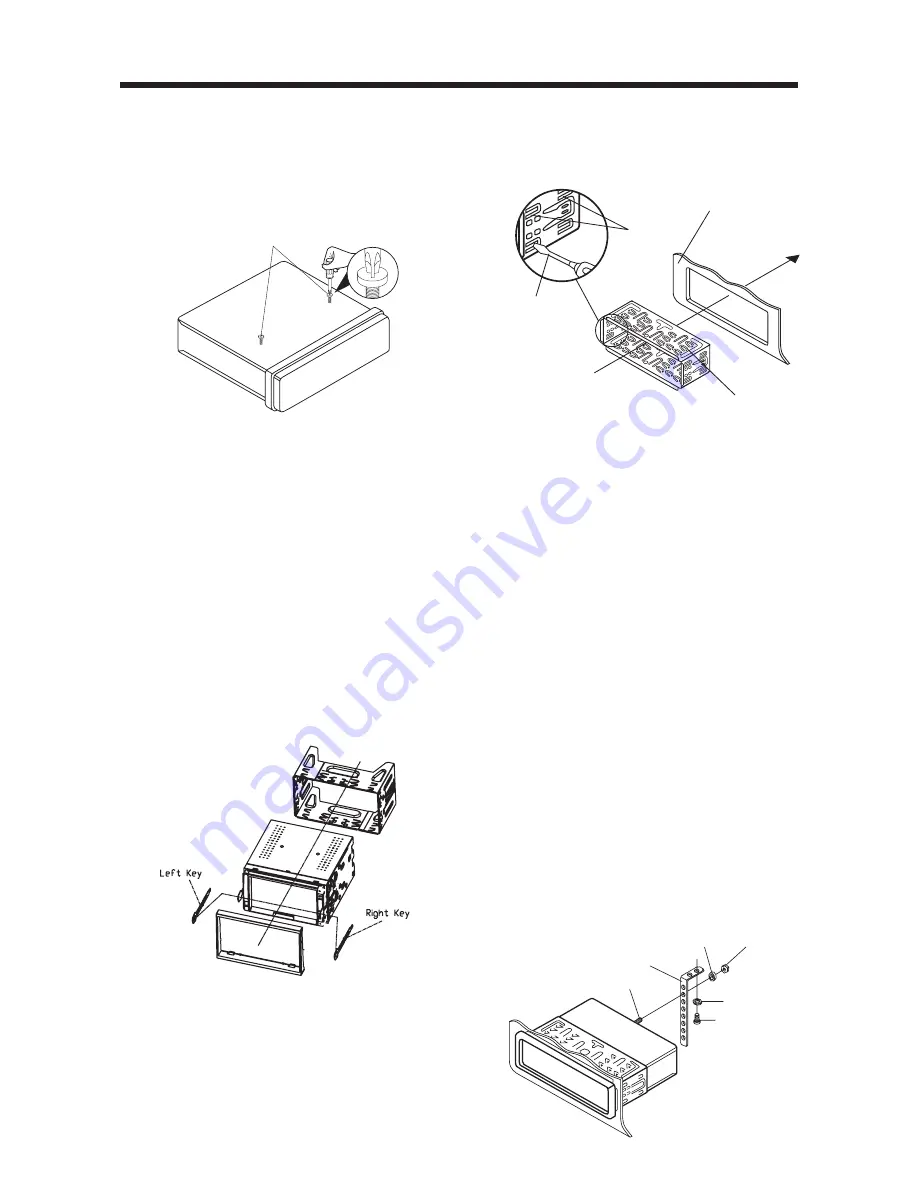
TAKE OUT SCREW BEFORE
INSTALLATION

Before install the unit, please remove the
two screws.

Installing the unit

Be sure you test all connections first, and
then follow these steps to install the unit.
1. Make sure the ignition is turned off,

and then disconnect the cable from
the vehicle battery's negative (-)
terminal.

2. Disconnect the wire harness and the

antenna.

3. The two supplied keys release tabs

inside the unit's sleeve so you can
remove it. Insert the keys as far as they
will go into the appropriate slots at the
middle left and right sides of the unit.
Then slide the sleeve off the back of
the unit.

4. Mount the sleeve by inserting the sleeve

into the opening of the dashboard and
bend open the tabs located around the
sleeve with a screwdriver. Not all tabs
will be able to make contact, so
examine which ones will be most

INSTALLATION

effective. Bending open the appropriate
tabs behind the dashboard to secure
the sleeve in place.

5. Reconnect the wire harness and the

antenna and be careful not to pinch
any wires or cables.

6. Slide the unit into the sleeve until it

locks into place.

7. To further secure the unit, use the

supplied metal strap to secure the back
of the unit in place. Use the supplied
hardware (Hex Nut (M5mm) and Spring
Washer) to attach one end of the strap
to the mounting bolt on the back of
the unit. If necessary, bend the metal
strap to fit your vehicle's mounting
area. Then use the supplied hardware
(Tapping Screw (5x25mm) and Plain
Washer) to attach the other end of
metal strap to a solid metal part of the
vehicle under the dashboard. This strap
also helps ensure proper electrical
grounding of the unit.
Note to install the short threading
terminal of the mounting bolt to the
back of the unit and the other long
threading terminal to the dashboard.

Take out screw before installation

Sleeve

Dashboard

Screwdriver

Tabs

Spring Washer

Tapping Screw

Plain Washer

Hex Nut

Metal Strap

Mounting Bolt

Summary of Contents for STS65BT

Page 1: ...em 6 5 Inch Touch Screen Monitor DVD Player with Stereo Radio Multi subtitle audio Languages Function Multi angle Function Parental Control Bluetooth Function USB Interface IPOD Ready Remote Control V...

Page 2: ...moisture This could cause electrical shorts fire or other damage When Parked Parking in direct sunlight can produce very high temperatures inside your vehicle Give the interior a chance to cool down b...

Page 3: ...NOTES 5 INSTALLATION 6 THE PLAYER 9 ELECTRICAL CONNECTION 10 REMOTE CONTROL 11 BASIC OPERATION 14 DISC DVD VCD CD MP3 OPERATION 17 AV OPERATION 21 RADIO OPERATION 22 USB PLAY OPERATION 22 BLUETOOTH OP...

Page 4: ...S DEVICE IS INTENDED FOR CONTINUOUS OPERATION This product incorporates copyright protection technology that is protected by method claims of certain U S patents and other intellectual property rights...

Page 5: ...l record cleaners as they may mar the surface of the disc Note A disc may become somewhat scratched although not enough to make it unusable depending on the way it is handle and conditions in the usag...

Page 6: ...ding open the appropriate tabs behind the dashboard to secure the sleeve in place 5 Reconnect the wire harness and the antenna and be careful not to pinch any wires or cables 6 Slide the unit into the...

Page 7: ...t 1 Make sure the ignition is turned off and then disconnect the cable from the vehicle battery s negative terminal 2 Remove the metal strap attached the back of the unit if attached 3 Lift the top of...

Page 8: ...hod B Install the unit onto the car bracket using the supplied screws M5X8mm The holes of the car bracket to use will differ depending on the car model INSTALLATION Screws M5x8mm Screws M5x8mm Car Bra...

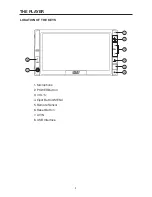
Page 9: ...9 THE PLAYER LOCATION OF THE KEYS 1 Microphone 2 POWER Button 3 VOL v 4 Eject Button MENU 5 Remote Sensor 6 Reset Button 7 AV IN 8 USB Interface 8 1 2 3 4 5 6 VOL AV IN 7...

Page 10: ...IN WHITE R IN RED VIDEO IN YELLOW R OUT RED L OUT WHITE VIDEO OUT YELLOW RED Rch WHITE Lch RED Rch WHITE Lch REAR RCA CABLE GREY FOR RCA LINE OUT VERSION ONLY FRONT Lch SPEAKER REAR Lch SPEAKER WHITE...

Page 11: ...11 REMOTE CONTROL LOCATION AND FUNCTION OF KEYS 1 21 3 20 18 11 8 31 30 24 32 27 10 25 2 7 34 33 29 22 19 16 17 12 14 13 4 15 9 26 35 23 28 5 6 36...

Page 12: ...Press to search forward rapidly to search reverse rapidly In FM mode use to search the frequency 18 Press to skip to the next track press to skip back one track In radio mode press to select the pres...

Page 13: ...e and negative terminals of the batteries are oriented as indicated 3 Close the cover Battery One button cell lithium battery Using the Remote Control Point the remote control towards the remote contr...

Page 14: ...tch to the corresponding mode Radio DVD MEMU AV and NAV In any mode press MODE button on the remote control will enter Main Menu interface you can change the mode in the menu 2 Setup Menu Tap icon on...

Page 15: ...Use buttons or tap the corresponding icon to select the items Then use buttons on the remote control or tap to change the setup In this menu you can change Time Disp On or Off and Switch Beep On or Of...

Page 16: ...sound Press the button or tap again will resume the sound Brake function If the brake wire wasn t connected to the ground when driving in BRAKE OFF Only the audio would be heard the picture would not...

Page 17: ...us track PBC playback control buttons may be unavailable DVD Video Menu Play 1 When playing a DVD disc press TITLE button on the remote control will stop the playback and return to the TITLE menu that...

Page 18: ...discs press REPEAT button has different effects For DVD For VCD SVCD CD MP3 WMA Note REPEAT feature does not support VCD2 0 with PBC ON 2 When you want to play a paragraph repeatedly A B repeat allows...

Page 19: ...rnative scenes with lower rating are included The player plays the highest rated scene OPERATION Note When playing tracks you programmed press PROG button to enter the program interface press PROG for...

Page 20: ...al control the player will show a different section depending on the parental control level set in the player s menu In this way parents can control the content of films and there is no indication tha...

Page 21: ...disc playback if you change the mode to other mode then change back to DVD mode again the unit will resume playing from the point that just interrupted AV OPERATION Switching to AV Mode Tap icon on t...

Page 22: ...the signal strength until one cycle search is finished And then stations are stored into the preset number button in turn according to the strength of the stations When auto search is finished it wil...

Page 23: ...r phone receive a short message icon will be displayed on the Bluetooth interface but you can not read the message by the unit Dial the Phone Number 1 Dail a phone number manually In Bluetooth menu ta...

Page 24: ...want to call then tap icon on the screen to dial the phone number you selected and the unit will return to the Bluetooth interface automatically Delete the selected item Go to the previous page Go to...

Page 25: ...u can get an optimum picture effect COMPLETELY DISTORTED PICTURE The disc format is not according to the TV set used PAL NTSC DISC DOES NOT PLAY Ensure the disc label is upwards Clean the disc Check i...

Page 26: ...12 cm single sided double layer 2 Compact disc CD DA CD R CD RW MP3 3 12 cm VIDEO CD Monitor Screen Size 6 5 TFT Note Specifications and design are subject to modification without notice due to impro...

Reviews: