Maintenance
63
Transmission and power circuit oil
levels
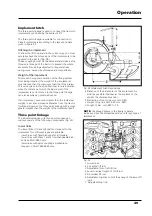
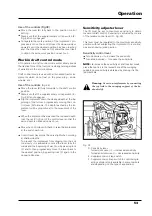
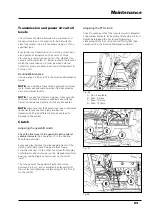
The oil levels should be between the minimum and
maximum marks on the dipstick (A-Fig.56) with the
arms fully raised: top up if necessary using oil of the
specified type.
Ensure that the transmission oil is at the correct level
since hydraulic actuators such as rams, motors,
etc.,require a certain amount of oil. The dipstick has
various notch marks
B - C - D
that indicate the level at
which the transmission oil must be when external
hydraulic circuits are used. Each mark corresponds to
5 litres of oil.
Routine Maintenance
See operations 9, 29 and 37 in the Routine Maintenance
Guide.
NOTE:
never let the oil level drop below the minimum
mark. Never use hydraulic services if the transmission
oil is at minimum level A.
NOTE:
if you use the tractor on slopes, make sure the
minimum oil level is always respected even with the
tractor on the steepest gradients it has to encounter.
NOTE:
make sure that the hydraulic services connected
to the tractor use the same type of oil as the
transmission. Mixing different oil types can lead to
damage to the system.
Clutch
Adjusting the gearshift clutch
Check the free travel of the gearshift clutch pedal at
siutable intervals.
(See operation 13 in the Routine
Maintenance Guide)
Excessive play reduces the disengaging travel of the
clutch and could prevent the gears from being
correctly meshed. On the other hand, insufficient play
could lead to abnormal wear on the disengaging thrust
bearing, overheating and rapid wear on the clutch
itself.
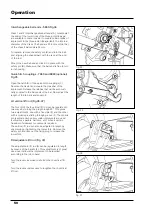
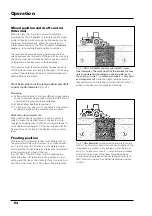
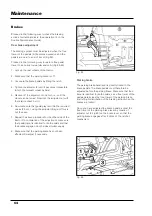
The free travel of the pedal (A-Fig.57) should be
between 3.5-4 cm. and is adjusted by slackening off
the nut (2) and tightening or slackening off the fork (1)
on the rod (3).
Fig. 56
A - No oil available.
B - Max. 5 liters.
C - Max. 10 liters.
D - Max. 15 liters.
Fig. 57
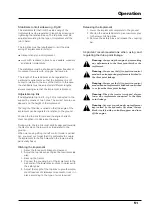
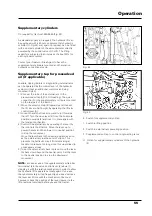
Fig.58
Adjusting the PTO clutch
Check to make sure that the lever is correctly adjusted
at periodical intervals. Its free travel B should be 4-5 cm.
Adjust by releasing the nut (5) and tightening or
slackening off the fork (6) on the rod (4) (Fig.58). (See
operation 14 in the Routine Maintenance Guide).

