16
2. Setup
CO2 Laser Machine © 2018 Laguna Tools 8/27/2018
2.
S
et
up
EN
Water Chiller & Pump
WARNING!
Do not connect to a power supply until the set-up is complete. Do not perform any of the following
steps, installations, or adjustments with the machine connected to a power source unless directed to do so.
USE CAUTION!
Only use deionized or distilled water. (Tap water or bottled water has minerals in it that will affect
the performance and life of the laser tube.) DO NOT USE ANY TYPE OF CHEMICAL COOLANT.
NOTICE!
The chiller will leak water out the inlet and outlet ports, so use caution when moving the machine.
You will need 7 liters of distilled or deionized water, the water chiller tubing, the
alarm cable, and one of the power cables.
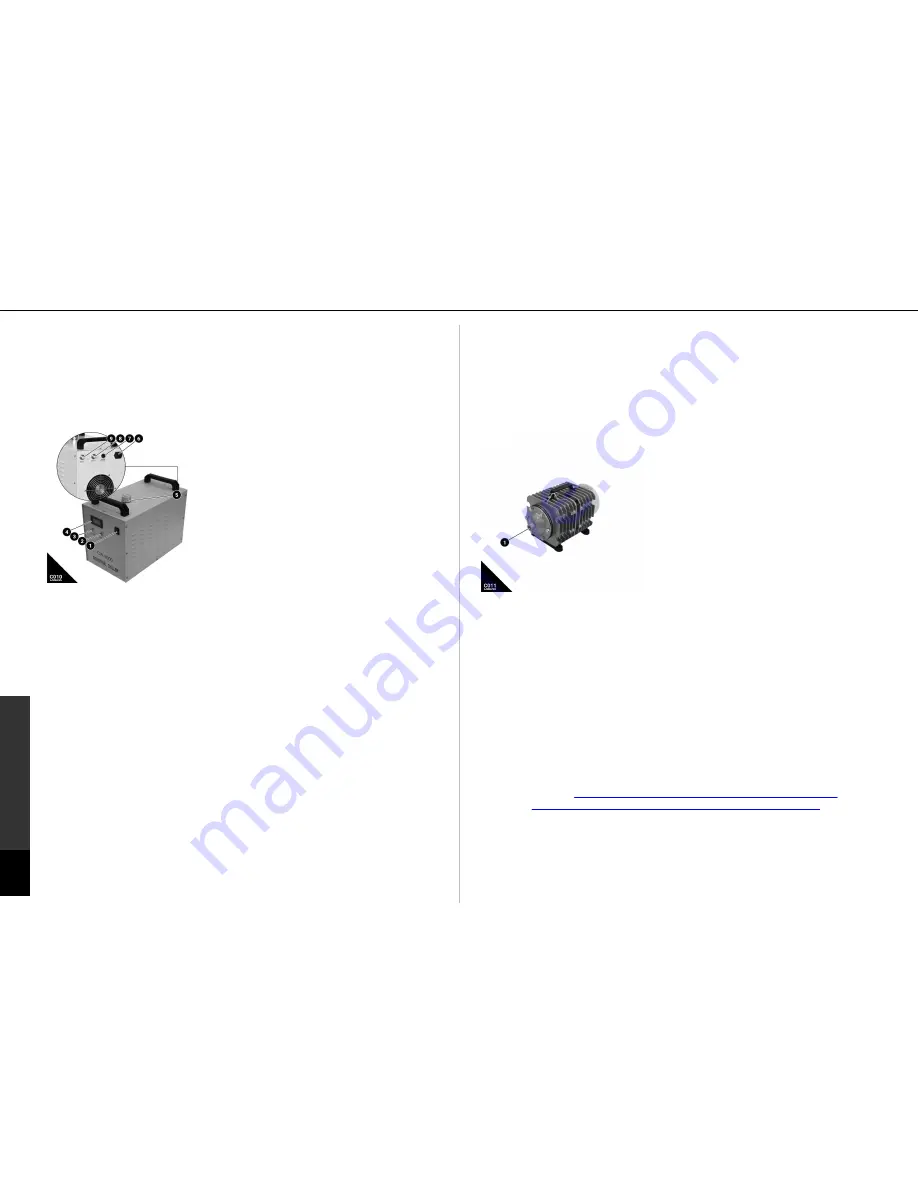
Fig C010: Water Chilling/Pumping Unit for CO2 &
Plasma Laser Machines. (1)
ON/OFF Switch
(2)
All
systems normal LED indication light.
(3)
Alarm LED
indication light.
(4)
Temperature digital read out
(DRO).
(5)
Water fill cap.
(6)
5-15 to C13 Power cable
input.
(7)
Alarm Cable Input
(8)
Water Return Input
Nozzle.
(9)
Water to machine Output Nozzle.
SKU:
N/A included with laser machine
Fits:
All CO2 and Fiber Laser machines <
120Watt.
A chiller must be used to operate the laser tube.
The Ruida controller has several safety features;
one of those features detects when water is not in circulation. When this is detected
the laser beam is shut off and an alarm sounds until the water can pass through. It
is a good idea to test this by pinching the lines of a properly installed chiller.
Q: What type of water should be used?
A: It is important to only used deionized or distilled water. The purer the water (the
less minerals and contaminants) the better.
Q: Can I use a different chiller than the one included?
A: The unit was chosen because it is best suited for the operating conditions of the
Laser Machine. It is our recommendation to use the included auxiliary equipment.
Setup
Tools Needed:
None needed
1. Place the chiller in its location.
2. Unscrew the cap [5] and fill the unit with 7 liters of water. There is no indication
of a fill limit, so measure it out prior to filling.
3. Connect the water inlet to the machine outlet according to the connection
diagram.
4. Connect the water outlet to the machine inlet according to the connection
diagram.
5. Connect the alarm cable to the laser machine [7].
6. Do not connect to power until set-up is complete.
Air Compressor
WARNING!
Do not connect to a power supply until the set-up is complete. Do not perform any of the following
steps, installations, or adjustments with the machine connected to a power source unless directed to do so.
NOTICE:
Make sure the air hose fits all the way into the adapter. The connection should leak very slightly – this is
normal.
NOTICE:
It is a good idea to use a power strip with an on/off switch to give power to all components at the same
time, and to turn the machine (systems) on and off easily.
The air pump needs to supply air to the nozzle to direct fumes away from the focal
lens. To install, you will need the air pump, the quick set adapter, and a ¼” air hose.
Fig C011: Air compressing unit for C02 laser
machines. (1)
Threaded nozzle insert.
SKU:
N/A included with laser machine
Fits:
All CO2 and Fiber Laser machines < 100Watt.
The air compressor supplies a continuous air
supply through the laser head assembly so that
fumes and debris cannot obstruct the laser
pathway. The air compressor must be used in
operation with the CO2 Laser machine.
Q: Can I use a different air compressor than the
one included?
A: The unit was chosen because it is best suited
for the operating conditions of the Laser Machine. An alternative air compressor
can be used at a set 60 PSI constant flow, and the appropriate fittings are installed.
It is our recommendation to use the included compressor with the machine.
Set-up
Tools Needed:
N/A
1. Screw the quick set adapter into the air pump adapter insert.
2. Press in the ¼” air hose.
3. Do not connect to power until set-up is complete.
2.6 Software Set-Up & Installation
To configure the included software, please refer to the software owners manual:
Laser Engraving & Cutting Software User Manual-RDWorks V8.0
Available @
https://system.na3.netsuite.com/core/media/media.nl?
id=2146197&c=860860&h=104e12797ee3c23af4e2&_xt=.pdf


