34
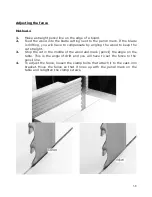
Adjusting the blade guides
The blade should run through the center of the rear blade guide, and the side
guides should be parallel with the blade. If they have been moved out of
adjustment, adjust as follows:
1.
Top upper side guides parallel adjustment
. Loosen the clamp screw
that attaches the guide to the vertical shaft and rotate the assembly until
the side guide is parallel to the blade. Retighten the clamp screw. There is
no adjustment on the lower guides.
2.
Centralizing the back guide to the blade. Loosen the 2 screws just above
the 2 side guide blocks and move the assembly left or right so that the
blade runs through the center of the back blade guide. Retighten the
clamp screws. We are now ready to adjust the guides to the blade.
Top guide
1.
Rotate the blade by hand and ensure that it is
tracking consistently in the correct position.
2.
Loosen the side guides.
3.
Loosen the 2 clamp screws that allow the guide
assembly to move forward and back. Adjust
so that the ceramic blocks are just behind the
gullet of the tooth and retighten the clamp
screws.
4.
Gently push one side guide so that it touches the blade and lock in
position. Bring the other guide towards the blade so that there is
minimal clearance between the blade and the guide. You can use a
thin piece of paper to put between the blade and the guide to obtain
the correct clearance until you gain experience. Tighten the clamp
screws and remove the paper. Rotate the blade by hand ensuring that
the weld of the blade does not hit the ceramic blocks, as this will cause
damage. If the blade has a bad weld, dress the blade or return it to
your supplier.
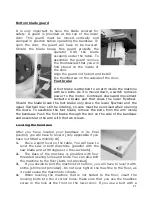
5.
Loosen the rear guide clamp screw and
push the guide forward so that it just
touches the back of the blade. Tighten
the guide in position.
6.
Rotate the blade by hand and check
that the back of the blade does not hit
the blade guide with a bad weld. If the
back of the blade hits the back blade
guide at the weld, then dress the blade
or, in excessive cases, return the blade to the supplier.
Summary of Contents for 16HD Classic
Page 2: ......
Page 6: ......
Page 9: ...9 What you will receive with the bandsaw Tool Kit Fence table insert and door guard Table...
Page 36: ...36 Fitting cool block guide system Optional not supplied with the machine...
Page 41: ...41...
Page 58: ...58 Electrical system drawing with switch ON knob...
Page 59: ...59 Electrical system drawing with switch ON knob...
Page 60: ...60 Electrical system drawing with push ON button...
Page 61: ...61 Electrical system drawing with push ON button...
Page 63: ......
Page 64: ......
Page 65: ......
Page 66: ...TOP GUIDE BOTTOM GUIDE...
Page 99: ......


