16
Mounting the motor
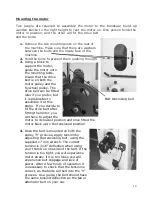
Two people are required to assemble the motor to the bandsaw; build up
wooden blocks to the right height to rest the motor on. One person holds the
motor in position, and the other will fit the drive belt
and the bolts.
1.
Remove the two mounting nuts on the rear of
the machine. Make sure that there are washers
between the bolts and the inside face of the
machine.
2.
Hold the bolts to prevent them pushing through.
3.
Using a block to
support the motor,
guide the motor onto
the mounting bolts.
Insure that the drive
belt is on both the
motor pulley and the
fly wheel pulley. The
drive belt can be fitted
later if you prefer, but
it is preferable to
assemble it at this
stage. If you decide to
fit the drive belt after
fitting the motor, you
will have to adjust the
motor to its lowest position and once fitted the
motor back up to the tensioned position.
4.
Once the belt is mounted on both the
pulley "V" grooves, apply tension by
adjusting the tensioning bolt, using the
supplied 17 mm wrench. The correct
tension is 3/16" deflection when using
your thumb on one side of the belt. If the
tension is too tight, you will experience
motor strain: if it is too loose you will
experience belt slippage and lack of
power. After a few hours of operation it
is necessary to check that the tension is
correct, as the belts will bed into the "V"
grooves. As a guide, the belt should have
the same tension/deflection as the fan or
alternator belt on your car.
Belt tensioning bolt
Summary of Contents for 16HD Classic
Page 2: ......
Page 6: ......
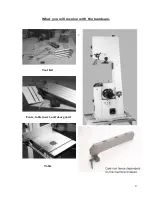
Page 9: ...9 What you will receive with the bandsaw Tool Kit Fence table insert and door guard Table...
Page 36: ...36 Fitting cool block guide system Optional not supplied with the machine...
Page 41: ...41...
Page 58: ...58 Electrical system drawing with switch ON knob...
Page 59: ...59 Electrical system drawing with switch ON knob...
Page 60: ...60 Electrical system drawing with push ON button...
Page 61: ...61 Electrical system drawing with push ON button...
Page 63: ......
Page 64: ......
Page 65: ......
Page 66: ...TOP GUIDE BOTTOM GUIDE...
Page 99: ......

