


UNICO 01.07.2019
English / Englisch
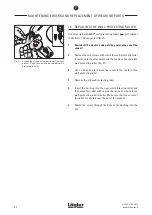
Fig. 73
Pull the V-belt slightly of the attachment and place
it in the motor belt pulley.
Fig. 72
D u r i n g t h e a s s e m b l y o f t h e f a n h o u s i n g ,
pay attention to the correct position of the
intermediate sheet-metal plate!
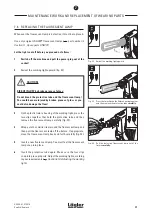
Fig. 75
Inserting the belt disc into the V-belt.
Fig. 74
Install the five screw including washers for
fastening the attachment to the fan housing.
Do
not tighten the screws firmly!
Fig. 76
For simplified assembly, insert a screwdriver from
above through a hole in the attachment into a hole
in the bearing unit of the sanding disc wheel.
11
During the assembly of the attachment, pay attention to
the correct position of the intermediate sheet-metal plate
between the fan housing and the attachment (fig. 72)!
12
On the motor side, pull the V-belt slightly out of the attachment
and then place it in the motor belt pulley (fig. 73).
13
Pull the V-belt forward on the sanding disc wheel side. Make
sure that the V-belt is in the V-belt groove of the motor belt
pulley. The attachment can then no longer fall off the fan
housing.
14
To fasten the attachment to the fan housing, install the five
hexagon socket screws including the respective washers
(fig. 74). Do not tighten the screws!
15
Push the attachment all the way back.
16
At the front of the attachment, insert the belt pulley of
the bearing unit of the sanding disc wheel into the V-belt
(fig. 75).
17
To make sure that the hole pattern of the attachment and
the fixture of the sanding disc wheel line up properly, insert
a screwdriver from above through a hole in the attachment
into a hole in the fixture of the sanding disc wheel (fig. 76).
18
Insert the bearing unit of the sanding disc wheel into the
attachment.
7
MAINTENANCE WORK AND REPLACEMENT OF WEARING PARTS
45