


UNICO 01.07.2019
English / Englisch
4
Use the proper Allen key to undo all five screws with which
the attachment is installed on the fan housing (fig. 59).
Do
not unscrew this screws all the way out!
5
Push the attachment all the way back. Use the machine
handle to pull the attachment forward again until you feel the
resistance caused by the V-belt (fig. 60). To prevent damage
to the floor, make sure that the attachment does not touch
the floor!
6
Use the Allen key to screw the five attachment-fastening
screws only so far into the drilled holes as required to ensure
that the attachment can no longer slide away; do not tighten
the screws.
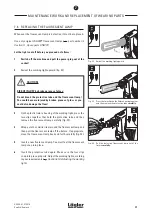
7
Set the attachment down again use the proper Allen key to
screw the belt-tensioning screw all the way forward until it
rests against the attachment (fig. 61).
8
With 3 to 4 additional rotations of the belt-tensioning screw,
you will then tighten the belt exactly as required.
ATTENTION!
Do not overtighten the V-belt! This will allow you to avoid
excessive wearing of the V-belt and the pulleys!
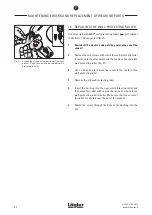
Whenever the V-belt can no longer be retightened because
the fastening screws are up against the slits in the attachment
(fig. 62), the wear limit of the V-belt has been reached and
the V-belt must be replaced
(
Section 7.3, Replacing the
V-belt)
.
9
Tighten the five screws with which the attachment is fastened
to the fan housing carefully.
7
MAINTENANCE WORK AND REPLACEMENT OF WEARING PARTS
Fig. 62
The fastening screws are up against the slits in
the attachment.
Fig. 61
Screw the belt-tensioning screw all the way in
until it rests against the attachment.
Fig. 60
Use the handle to pull the attachment forward
until you feel the belt resistance.
Fig. 59
Undoing the five fastening screws of the
attachment.
Do not unscrew the screws all the
way out!
42